示例手册:自定义服务和控制器
🌐 Examples cookbook: Custom services and controllers
此页面的内容可能尚未与 Strapi 5 完全同步。
🌐 The content of this page might not be fully up-to-date with Strapi 5 yet.
此页面是后端自定义示例手册的一部分。请确保你已阅读其介绍。
🌐 This page is part of the back end customization examples cookbook. Please ensure you've read its introduction.
在 FoodAdvisor的前端网站上,你可以浏览可访问的餐厅列表,链接为`localhost:3000/restaurants`。点击列表中的任何餐厅,将使用/client文件夹中的代码显示有关该餐厅的更多信息。餐厅页面上显示的内容是在Strapi的内容管理器中创建的,并通过查询Strapi的REST API获取,该API使用/api文件夹中的代码。
本页将教授以下高级主题:
🌐 This page will teach about the following advanced topics: | 主题 | 部分 ||------|---------|| 创建一个与 Strapi 后端交互的组件 | 从前端进行 REST API 查询 || 了解服务和控制器如何协同工作 | 控制器 vs. 服务 || 创建自定义服务 |
|| 在控制器中使用服务 | 自定义控制器 |来自前端的 REST API 查询
🌐 REST API queries from the front end
💭 上下文:
FoodAdvisor 前端网站上的餐厅页面包含一个只读的评论部分。添加评论需要登录到 Strapi 的管理面板,并通过 内容管理器 向“评论”集合类型添加内容。
让我们在餐厅页面上添加一个小型前端组件。这个组件将允许用户直接从前端网站撰写评论。
🌐 Let's add a small front-end component to restaurant pages. This component will allow a user to write a review directly from the front-end website.
🎯 目标:
- 添加一个表格来撰写评论。
- 在任何餐厅页面上显示该表格。
- 提交表单时,向 Strapi 的 REST API 发送 POST 请求。
- 使用先前存储的 JWT来验证请求。
🧑💻 代码示例:
在 FoodAdvisor 项目的/client文件夹中,你可以使用以下代码示例来:
- 创建一个新的
pages/restaurant/RestaurantContent/Reviews/new-review.js文件, - 并更新现有的
components/pages/restaurant/RestaurantContent/Reviews/reviews.js。
用于在餐厅页面添加评论组件并显示它的示例前端代码:
- 在
/client文件夹中创建一个新文件,以添加一个用于撰写评论的新组件,代码如下:
import { Button, Input, Textarea } from '@nextui-org/react';
import { useFormik } from 'formik';
import { useRouter } from 'next/router';
import React from 'react';
import { getStrapiURL } from '../../../../../utils';
const NewReview = () => {
const router = useRouter();
const { handleSubmit, handleChange, values } = useFormik({
initialValues: {
note: '',
content: '',
},
onSubmit: async (values) => {
/**
* Queries Strapi REST API to reach the reviews endpoint
* using the JWT previously stored in localStorage to authenticate
*/
const res = await fetch(getStrapiURL('/reviews'), {
method: 'POST',
body: JSON.stringify({
restaurant: router.query.slug,
...values,
}),
headers: {
Authorization: `Bearer ${localStorage.getItem('token')}`,
'Content-Type': 'application/json',
},
});
},
});
/**
* Renders the form
*/
return (
<div className="my-6">
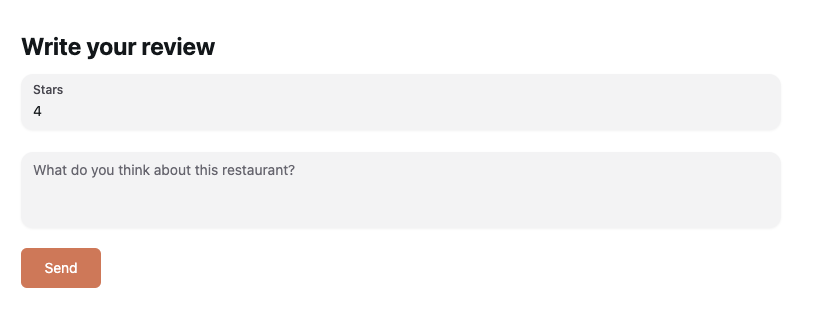
<h1 className="font-bold text-2xl mb-3">Write your review</h1>
<form onSubmit={handleSubmit} className="flex flex-col gap-y-4">
<Input
onChange={handleChange}
name="note"
type="number"
min={1}
max={5}
label="Stars"
/>
<Textarea
name="content"
onChange={handleChange}
placeholder="What do you think about this restaurant?"
/>
<Button
type="submit"
className="bg-primary text-white rounded-md self-start"
>
Send
</Button>
</form>
</div>
);
};
export default NewReview;
- 通过将高亮的行(7、8 和 13)添加到用于渲染餐厅信息的代码中,在任何餐厅页面上显示新的表单组件:
import React from 'react';
import delve from 'dlv';

import { formatDistance } from 'date-fns';

import { getStrapiMedia } from '../../../../../utils';
import { Textarea } from '@nextui-org/react';
import NewReview from './new-review';

const Reviews = ({ reviews }) => {
  return (
    <div className="col-start-2 col-end-2 mt-24">
      <NewReview />
      {reviews &&
        reviews.map((review, index) => (
  // …
控制器与服务
🌐 Controllers vs. Services
控制器可以包含在客户端请求某个路由时执行的任何业务逻辑。然而,随着你的代码不断增大并变得更加结构化,最佳实践是将逻辑拆分到只做好一件事的特定服务中,然后从控制器中调用这些服务。
🌐 Controllers could contain any business logic to be executed when the client requests a route. However, as your code grows bigger and becomes more structured, it is a best practice to split the logic into specific services that do only one thing well, then call the services from controllers.
为了说明服务的使用,在本文档中,自定义控制器不处理任何职责,并将所有业务逻辑委托给服务。
🌐 To illustrate the use of services, in this documentation the custom controller does not handle any responsibilities and delegates all the business logic to services.
假设我们希望自定义 FoodAdvisor 的后端以实现以下情景:当在前端网站提交之前添加的评价表单时,Strapi将在后端创建一个评价,并通过电子邮件通知餐厅老板。将其转化为Strapi后端自定义意味着需要执行三个操作:
- 创建一个自定义服务来创建评论。
- 创建一个自定义服务以发送电子邮件。
- 自定义 Strapi 为 Review 内容类型提供的默认控制器 以使用这两个新服务。
定制服务:创建评论
🌐 Custom service: Creating a review
💭 上下文:
默认情况下,Strapi 中的服务文件包含使用 createCoreService 工厂函数的基本样板代码。
🌐 By default, service files in Strapi includes basic boilerplate code that use the createCoreService factory function.
让我们通过替换其创建评论的代码来更新现有的 review.js 服务文件,以用于 FoodAdvisor 的“Reviews”集合类型。
🎯 目标:
- 声明一个
create方法。 - 从请求中获取上下文。
- 使用 EntityService API 的
findMany()方法来查找餐厅。 - 使用 EntityService API 中的
create()方法向餐厅追加数据,填充餐厅所有者信息。 - 返回新的评论数据。
更多信息可以在请求上下文、服务和EntityService API文档中找到。
🌐 Additional information can be found in the request context, services and EntityService API documentation.
🧑💻 代码示例:
要创建这样的服务,在 FoodAdvisor 项目的 /api 文件夹中,将 src/api/review/services/review.js 文件的内容替换为以下代码:
const { createCoreService } = require('@strapi/strapi').factories;

module.exports = createCoreService('api::review.review', ({ strapi }) => ({
  async create(ctx) {
    const user = ctx.state.user;
    const { body } = ctx.request;

    /**
     * Queries the Restaurants collection type
     * using the Entity Service API
     * to retrieve information about the restaurant.
     */
    const restaurants = await strapi.entityService.findMany(
      'api::restaurant.restaurant',
      {
        filters: {
          slug: body.restaurant,
        },
      }
    );

    /**
     * Creates a new entry for the Reviews collection type
     * and populates data with information about the restaurant's owner
     * using the Entity Service API.
     */
    const newReview = await strapi.entityService.create('api::review.review', {
      data: {
        note: body.note,
        content: body.content,
        restaurant: restaurants[0].id,
        author: user.id,
      },
      populate: ['restaurant.owner'],
    });

    return newReview;
  },
}));
客户服务:向餐厅老板发送电子邮件
🌐 Custom Service: Sending an email to the restaurant owner
💭 上下文:
开箱即用, FoodAdvisor 不提供任何自动邮件服务功能。
让我们创建一个 email.js 服务文件来发送电子邮件。我们可以在 自定义控制器 中使用它,以便在前端网站上创建新评论时通知餐厅老板。
🌐 Let's create an email.js service file to send an email. We could use it in a custom controller to notify the restaurant owner whenever a new review is created on the front-end website.
此服务是一个使用 Email 插件的高级代码示例,需要了解插件和提供者在 Strapi 中的工作原理。如果你不需要通过电子邮件服务通知餐厅老板,可以跳过此部分,直接查看自定义 控制器 示例。
🌐 This service is an advanced code example using the Email plugin and requires understanding how plugins and providers work with Strapi. If you don't need an email service to notify the restaurant's owner, you can skip this part and jump next to the custom controller example.
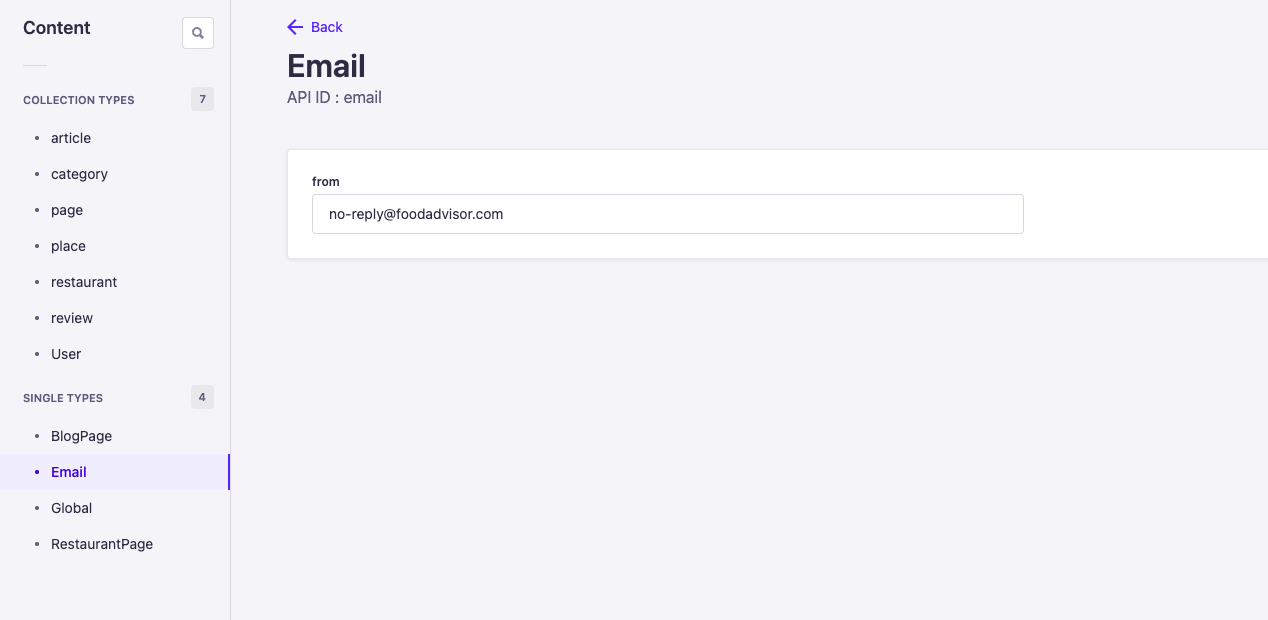
- 你已经为电子邮件插件设置了一个提供商,例如 Sendmail 提供商。
- 在 Strapi 的管理面板中,你已经创建了一个
Email单类型,其中包含一个from文本字段,用于定义发件人电子邮件地址。
🎯 目标:
- 为“Email”单一类型创建一个新的服务文件,
- 为此服务声明一个
send()方法, - 使用实体服务 API 获取存储在电子邮件单一类型中的发件人地址,
- 使用在调用服务的
send()方法时传入的电子邮件详细信息(收件人地址、主题和邮件正文),通过电子邮件插件和之前配置的提供者发送电子邮件。
更多信息可以在服务、实体服务 API和电子邮件功能文档中找到。
🌐 Additional information can be found in the Services, Entity Service API and Email feature documentation.
🧑💻 代码示例:
要创建这样的服务,在 FoodAdvisor 项目的 /api 文件夹中,创建一个新的 src/api/email/services/email.js 文件,并输入以下代码:
const { createCoreService } = require('@strapi/strapi').factories;

module.exports = createCoreService('api::email.email', ({ strapi }) => ({
  async send({ to, subject, html }) {
    /**
     * Retrieves email configuration data
     * stored in the Email single type
     * using the Entity Service API.
     */
    const emailConfig = await strapi.entityService.findOne(
      'api::email.email',
      1
    );

    /**
     * Sends an email using:
     * - parameters to pass when invoking the service
     * - the 'from' address previously retrieved with the email configuration
     */
    await strapi.plugins['email'].services.email.send({
      to,
      subject,
      html,
      from: emailConfig.from,
    });
  },
}));
在控制器的代码中,可以使用 strapi.service('api::email.email).send(parameters) 调用此电子邮件服务的 send 方法,其中 parameters 是包含电子邮件相关信息(收件人地址、主题和邮件正文)的对象。
🌐 In a controller's code, the send method from this email service can be called with strapi.service('api::email.email).send(parameters) where parameters is an object with the email's related information (recipient's address, subject, and email body).
自定义控制器
🌐 Custom controller
💭 上下文:
默认情况下,Strapi 中的控制器文件包含使用 createCoreController 工厂函数的基本模板代码。这提供了基本的方法来创建、检索、更新和删除内容,当访问请求的端点时。控制器的默认代码可以进行自定义,以执行任何业务逻辑。
🌐 By default, controllers files in Strapi includes basic boilerplate code that use the createCoreController factory function. This exposes basic methods to create, retrieve, update, and delete content when reaching the requested endpoint. The default code for the controllers can be customized to perform any business logic.
让我们为 FoodAdvisor 的“评论”集合类型自定义默认控制器,使用以下情景:在对/reviews端点的POST请求时,控制器调用之前创建的服务,同时创建评论并发送电子邮件给餐厅的老板。
🎯 目标:
- 扩展现有的“Reviews”集合类型控制器。
- 声明一个自定义
create()方法。 - 调用之前创建的服务。
- 清理要返回的内容。
🧑💻 代码示例:
在 FoodAdvisor 项目的 /api 文件夹中,根据之前是仅创建了一个自定义服务还是同时为评论创建和邮件通知创建了两个自定义服务,将 src/api/review/controllers/review.js 文件的内容替换为以下代码示例之一:
- Custom controller without email service
- Custom controller with email service
const { createCoreController } = require('@strapi/strapi').factories;

module.exports = createCoreController('api::review.review', ({ strapi }) => ({
  /**
   * As the controller action is named
   * exactly like the original `create` action provided by the core controller,
   * it overwrites it.
   */
  async create(ctx) {
    // Creates the new review using a service
    const newReview = await strapi.service('api::review.review').create(ctx);

    const sanitizedReview = await this.sanitizeOutput(newReview, ctx);

    ctx.body = sanitizedReview;
  },
}));
const { createCoreController } = require('@strapi/strapi').factories;

module.exports = createCoreController('api::review.review', ({ strapi }) => ({
  /**
   * As the controller action is named
   * exactly like the original `create` action provided by the core controller,
   * it overwrites it.
   */
  async create(ctx) {
    // Creates the new review using a service
    const newReview = await strapi.service('api::review.review').create(ctx);

    // Sends an email to the restaurant's owner, using another service
    if (newReview.restaurant?.owner) {
      await strapi.service('api::email.email').send({
        to: newReview.restaurant.owner.email,
        subject: 'You have a new review!',
        html: `You've received a ${newReview.note} star review: ${newReview.content}`,
      });
    }

    const sanitizedReview = await this.sanitizeOutput(newReview, ctx);

    ctx.body = sanitizedReview;
  },
}));
了解更多关于自定义策略如何帮助你调整基于 Strapi 的应用,并根据特定条件限制对某些资源的访问。
🌐 Learn more about how custom policies can help you tweak a Strapi-based application and restrict access to some resources based on specific conditions.