预览
🌐 Preview
Page summary:
预览将内容管理器连接到前端,以便编辑人员在发布之前查看更改。在本指南中:配置预览 URL 的步骤。
通过预览功能,你可以直接在 Strapi 的管理面板中预览前端应用。这有助于查看在内容管理器的编辑视图中更新内容将如何影响最终结果。
🌐 With the Preview feature, you can preview your front end application directly from Strapi's admin panel. This is helpful to see how updates to your content in the Edit View of the Content Manager will affect the final result.
实时预览仅适用于 CMS Growth 和 Enterprise 计划。
config/admin 文件中配置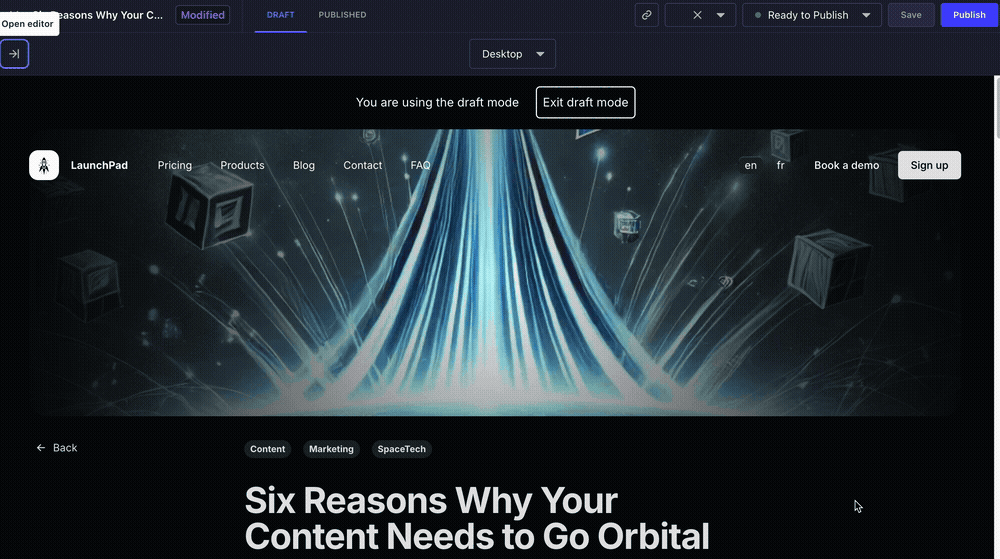
配置
🌐 Configuration
-
必须在你的
.env文件中定义以下环境变量,并将示例值替换为适当的值:CLIENT_URL=https://your-frontend-app.com
PREVIEW_SECRET=your-secret-keyPREVIEW_SECRET键是可选的,但在 Next.js 草稿模式下是必需的。 -
应该已经创建并设置了你的 Strapi 项目的前端应用。
配置组件
🌐 Configuration components
预览功能配置存储在 config/admin 文件 的 preview 对象中,并由 3 个关键组件组成:
🌐 The Preview feature configuration is stored in the preview object of the config/admin file and consists of 3 key components:
激活标志
🌐 Activation flag
启用或禁用预览功能:
🌐 Enables or disables the preview feature:
// …
preview: {
  enabled: true,
    // …
}
// …
允许的来源
🌐 Allowed origins
控制哪些域可以访问预览:
🌐 Controls which domains can access previews:
// …
preview: {
  enabled: true,
  config: {
    allowedOrigins: env("CLIENT_URL"),  // Usually your frontend application URL
    // …
  }
}
// …
预览处理器
🌐 Preview handler
管理预览逻辑和 URL 生成,如以下基本示例所示,其中 uid 是内容类型标识符(例如,api::article.article 或 plugin::my-api.my-content-type):
🌐 Manages the preview logic and URL generation, as in the following basic example where uid is the content-type identifier (e.g., api::article.article or plugin::my-api.my-content-type):
// …
preview: {
  enabled: true,
  config: {
    // …
    async handler(uid, { documentId, locale, status }) {
      const document = await strapi.documents(uid).findOne({ documentId });
      const pathname = getPreviewPathname(uid, { locale, document });

      return `${env('PREVIEW_URL')}${pathname}`
    },
  }
}
// …
以下基本实现指南中给出了URL生成逻辑的示例。
🌐 An example of URL generation logic in given in the following basic implementation guide.
预览草稿条目
🌐 Previewing draft entries
前端应用查询草稿或已发布内容的策略是特定于框架的。至少存在三种策略:
🌐 The strategy for the front end application to query draft or published content is framework-specific. At least 3 strategies exist:
- 使用查询参数,有类似
/your-path?preview=true的东西(例如,这就是 Nuxt 的工作方式) - 重定向到专用的预览路由,如
/preview?path=your-path(例如,这就是 Next's draft mode 的工作方式) - 或者使用不同的域名进行预览,比如
preview.mysite.com/your-path。
当你的内容类型启用了 Draft & Publish 时,你还可以直接利用 Strapi 的 status 参数在预览处理程序中处理逻辑,方法如下通用方式:
🌐 When Draft & Publish is enabled for your content-type, you can also directly leverage Strapi's status parameter to handle the logic within the Preview handler, using the following generic approach:
async handler(uid, { documentId, locale, status }) {
   const document = await strapi.documents(uid).findOne({ documentId });
   const pathname = getPreviewPathname(uid, { locale, document });
   if (status === 'published')  {
      // return the published version
   }
   // return the draft version
},
在 基本实现指南 中提供了一个使用 Next.js 草稿模式的更详细示例。
🌐 A more detailed example using the draft mode of Next.js is given in the basic implementation guide.
基本实现指南
🌐 Basic implementation guide
按照以下步骤将��预览功能添加到你的内容类型。
🌐 Follow these steps to add Preview capabilities to your content types.
1. [Strapi] 创建预览配置
🌐 1. [Strapi] Create the Preview configuration
创建一个新的文件 /config/admin.ts(如果存在则更新它),并使用以下基本结构:
🌐 Create a new file /config/admin.ts (or update it if it exists) with the following basic structure:
export default ({ env }) => ({
  // Other admin-related configurations go here
  // (see docs.strapi.io/cms/configurations/admin-panel)
  preview: {
    enabled: true,
    config: {
      allowedOrigins: env('CLIENT_URL'),
      async handler (uid, { documentId, locale, status }) => {
        // Handler implementation coming in step 3
      },
    },
  },
});
2. [Strapi] 添加 URL 生成逻辑
🌐 2. [Strapi] Add URL generation logic
使用 getPreviewPathname 函数添加 URL 生成逻辑。以下示例取自 Launchpad Strapi 演示应用:
// Function to generate preview pathname based on content type and document
const getPreviewPathname = (uid, { locale, document }): string => {
  const { slug } = document;

  // Handle different content types with their specific URL patterns
  switch (uid) {
    // Handle pages with predefined routes
    case "api::page.page":
      switch (slug) {
        case "homepage":
          return `/${locale}`; // Localized homepage
        case "pricing":
          return "/pricing"; // Pricing page
        case "contact":
          return "/contact"; // Contact page
        case "faq":
          return "/faq"; // FAQ page
      }
    // Handle product pages
    case "api::product.product": {
      if (!slug) {
        return "/products"; // Products listing page
      }
      return `/products/${slug}`; // Individual product page
    }
    // Handle blog articles
    case "api::article.article": {
      if (!slug) {
        return "/blog"; // Blog listing page
      }
      return `/blog/${slug}`; // Individual article page
    }
    default: {
      return null;
    }
  }
};

// … main export (see step 3)
某些内容类型如果没有意义,就不需要预览,因此默认情况返回 null。例如,带有一些站点元数据的全局单一类型,将不会有匹配的前端页面。在这些情况下,处理函数应返回 null,管理员面板中将不会显示预览界面。这就是如何按内容类型启用或禁用预览的方式。
🌐 Some content types don't need to have a preview if it doesn't make sense, hence the default case returning null. A Global single type with some site metadata, for example, will not have a matching front-end page. In these cases, the handler function should return null, and the preview UI will not be shown in the admin panel. This is how you enable or disable preview per content type.
3. [Strapi] 添加处理程序逻辑
🌐 3. [Strapi] Add handler logic
创建完整配置,扩展在步骤1中创建的基本配置,并结合在步骤2中创建的URL生成逻辑,添加适当的处理逻辑:
🌐 Create the complete configuration, expanding the basic configuration created in step 1. with the URL generation logic created in step 2., adding an appropriate handler logic:
const getPreviewPathname = (uid, { locale, document }): string => {
  // … as defined in step 2
};

// Main configuration export
export default ({ env }) => {
  // Get environment variables
  const clientUrl = env("CLIENT_URL"); // Frontend application URL
  const previewSecret = env("PREVIEW_SECRET"); // Secret key for preview authentication

  return {
    // Other admin-related configurations go here
    // (see docs.strapi.io/cms/configurations/admin-panel)
    preview: {
      enabled: true, // Enable preview functionality
      config: {
        allowedOrigins: clientUrl, // Restrict preview access to specific domain
        async handler(uid, { documentId, locale, status }) {
          // Fetch the complete document from Strapi
          const document = await strapi.documents(uid).findOne({ documentId });

          // Generate the preview pathname based on content type and document
          const pathname = getPreviewPathname(uid, { locale, document });

          // Disable preview if the pathname is not found
          if (!pathname) {
            return null;
          }

          // Use Next.js draft mode passing it a secret key and the content-type status
          const urlSearchParams = new URLSearchParams({
            url: pathname,
            secret: previewSecret,
            status,
          });
          return `${clientUrl}/api/preview?${urlSearchParams}`;
        },
      },
    },
  };
};
4. [前端] 设置前端预览路由
🌐 4. [Front end] Set up the front-end preview route
设置前端预览路线高度依赖于前端应用使用的框架。
🌐 Setting up the front-end preview route is highly dependent on the framework used for your front-end application.
例如, Next.js draft mode 和 Nuxt preview mode 在各自的文档中提供了有关如何实现前端部分的附加文档。
如果使用 Next.js,一个基本的实现可以像下面这个从 Launchpad Strapi 演示应用中取出的示例一样��:
import { draftMode } from "next/headers";
import { redirect } from "next/navigation";

export async function GET(request: Request) {
  // Parse query string parameters
  const { searchParams } = new URL(request.url);
  const secret = searchParams.get("secret");
  const url = searchParams.get("url");
  const status = searchParams.get("status");

  // Check the secret and next parameters
  // This secret should only be known to this route handler and the CMS
  if (secret !== process.env.PREVIEW_SECRET) {
    return new Response("Invalid token", { status: 401 });
  }

  // Enable Draft Mode by setting the cookie
  if (status === "published") {
    draftMode().disable();
  } else {
    draftMode().enable();
  }

  // Redirect to the path from the fetched post
  // We don't redirect to searchParams.slug as that might lead to open redirect vulnerabilities
  redirect(url || "/");
}
5. [前端] 允许前端被嵌入
🌐 5. [Front end] Allow the front-end to be embedded
在 Strapi 端,allowedOrigins 配置参数 允许管理面板在 iframe 中加载前端窗口。但允许嵌入是双向的,因此在前端端,你也需要允许窗口被嵌入到 Strapi 的管理面板中。
🌐 On the Strapi side, the allowedOrigins configuration parameter allows the admin panel to load the front-end window in an iframe. But allowing the embedding works both ways, so on the front-end side, you also need to allow the window to be embedded in Strapi's admin panel.
这要求前端应用拥有自己的头部指令,即 CSP frame-ancestors 指令。设置此指令取决于你的网站是如何构建的。例如,在 Next.js 中设置此指令需要进行中间件配置(参见 Next.js 文档)。
🌐 This requires the front-end application to have its own header directive, the CSP frame-ancestors directive. Setting this directive up depends on how your website is built. For instance, setting this up in Next.js requires a middleware configuration (see Next.js docs).
6. [前端] 为草稿内容调整数据获取
🌐 6. [Front end] Adapt data fetching for draft content
一旦预览系统设置完成,你需要调整你的数据获取逻辑以适当地处理草稿内容。这包括以下步骤:
🌐 Once the preview system is set up, you need to adapt your data fetching logic to handle draft content appropriately. This involves the following steps:
- 创建或调整你的数据获取实用程序以检查是否启用了草稿模式
- 更新 API 调用以在适当时包含草稿状态参数
以下内容摘自 Launchpad Strapi 演示应用,是在你的 Next.js 前端应用中实现草稿感知数据获取的示例:
import { draftMode } from "next/headers";
import qs from "qs";

export default async function fetchContentType(
  contentType: string,
  params: Record = {}
): Promise {
  // Check if Next.js draft mode is enabled
  const { isEnabled: isDraftMode } = await draftMode();

  try {
    const queryParams = { ...params };
    // Add status=draft parameter when draft mode is enabled
    if (isDraftMode) {
      queryParams.status = "draft";
    }

    const url = `${baseURL}/${contentType}?${qs.stringify(queryParams)}`;
    const response = await fetch(url);
    if (!response.ok) {
      throw new Error(
        `Failed to fetch data from Strapi (url=${url}, status=${response.status})`
      );
    }
    return await response.json();
  } catch (error) {
    console.error("Error fetching content:", error);
    throw error;
  }
}
然后可以在页面组件中使用此实用方法根据预览状态获取草稿或已发布的内容:
🌐 This utility method can then be used in your page components to fetch either draft or published content based on the preview state:
// In your page component:
const pageData = await fetchContentType('api::page.page', {
  // Your other query parameters
});
实时预览实现
🌐 Live Preview implementation
GrowthThis feature is available with a Growth plan. EnterpriseThis feature is available with an Enterprise plan.设置基本预览功能后,你可以通过实现实时预览来增强体验。
🌐 After setting up the basic Preview feature, you can enhance the experience by implementing Live Preview.
窗口消息
🌐 Window messages
实时预览通过在管理员和前端之间进行通信,创建了更具互动性的体验。它依赖于通过 window 对象上的 postMessage() API 发布的事件。
🌐 Live Preview creates a more interactive experience by communicating between the admin and your frontend. It relies on events posted through the postMessage() API on the window object.
你需要在你的应用中添加一个事件监听器。它应该出现在所有页面上,最好是在封装整个应用的布局组件中。监听器需要过滤消息,并且只对 Strapi 发起的消息做出反应。
🌐 You need to add an event listener in your application. It should be present on all pages, ideally in a layout component that wraps your entire application. The listener needs to filter through messages and react only to Strapi-initiated messages.
有 2 条消息可供监听:
🌐 There are 2 messages to listen to:
strapiUpdate:当内容更新已保存到数据库时,Strapi 会发送此信息。这是获取内容更新版本并刷新预�览的机会。在 Next.js 中,刷新 iframe 内容的推荐方法是使用 `router.refresh()` 方法。previewScript:由 Strapi 发送给你,以提供一个驱动实时预览功能的脚本。该脚本应注入页面的<head>标签中。它负责在预览中高亮可编辑区域,并在某个区域双击进行编辑时,将消息发送回 Strapi。
为了接收 previewScript 消息,你需要让 Strapi 知道你的前端已经准备好接收它。这可以通过向父窗口发送 previewReady 消息来完成。
🌐 In order to receive the previewScript message, you need to let Strapi know that your frontend is ready to receive it. This is done by posting a previewReady message to the parent window.
将所有内容放在一起后,准备添加到全局布局的组件可能如下所示:
🌐 When putting it all together, a component ready to be added to your global layout could look like:
- JavaScript
- TypeScript
'use client';

export default function LivePreview() {
  // …
  const router = useRouter();

  useEffect(() => {
    const handleMessage = async (message) => {
      const { origin, data } = message;

      if (origin !== process.env.NEXT_PUBLIC_API_URL) {
        return;
      }

      if (data.type === 'strapiUpdate') {
        router.refresh();
      } else if (data.type === 'strapiScript') {
        const script = window.document.createElement('script');
        script.textContent = data.payload.script;
        window.document.head.appendChild(script);
      }
    };

    // Add the event listener
    window.addEventListener('message', handleMessage);

    // Let Strapi know we're ready to receive the script
    window.parent?.postMessage({ type: 'previewReady' }, '*');

    // Remove the event listener on unmount
    return () => {
      window.removeEventListener('message', handleMessage);
    };
  }, [router]);

  return null;
}
'use client';

export default function LivePreview() {
  // …
  const router = useRouter();

  useEffect(() => {
    const handleMessage = async (message: MessageEvent<any>) => {
      const { origin, data } = message;

      if (origin !== process.env.NEXT_PUBLIC_API_URL) {
        return;
      }

      if (data.type === 'strapiUpdate') {
        router.refresh();
      } else if (data.type === 'strapiScript') {
        const script = window.document.createElement('script');
        script.textContent = data.payload.script;
        window.document.head.appendChild(script);
      }
    };

    // Add the event listener
    window.addEventListener('message', handleMessage);

    // Let Strapi know we're ready to receive the script
    window.parent?.postMessage({ type: 'previewReady' }, '*');

    // Remove the event listener on unmount
    return () => {
      window.removeEventListener('message', handleMessage);
    };
  }, [router]);

  return null;
}
Next.js 中的缓存:
在 Next.js 中,缓存持久化 可能需要额外的步骤。你可能需要通过从客户端向服务器发起 API 调用来使缓存失效,其中会处理重新验证逻辑。有关详细信息,请参阅 Next.js 文档,例如使用 revalidatePath() 方法。
内容源映射
🌐 Content source maps
实时预览能够识别前端中对应于 Strapi 字段的部分。这是通过内容源映射完成的,内容源映射是作为隐藏字符编码在基于字符串的内容(例如文本字段)中的元数据。它使用 @vercel/stega 库来编码和解码这些元数据。
🌐 Live Preview is able to identify the parts of your frontend that correspond to fields in Strapi. This is done through content source maps, which are metadata encoded as hidden characters in your string-based content (e.g., text fields). It uses the @vercel/stega library to encode and decode this metadata.
只有在将 strapi-encode-source-maps 头设置为 true 时,元数据才会添加到你的内容 API 响应中。你可以在数据获取工具中设置此头。确保仅在检测到你的网站在预览环境中呈现时才传递此头。
🌐 Metadatas will only be added in your Content API responses when the strapi-encode-source-maps header is set to true. You can set this header in your data fetching utility. Make sure to only pass the header when you detect that your site is rendered in a preview context.
对于 Next.js 应用,你可以使用来自 next/headers 的 draftMode() 方法来检测是否启用了草稿模式,并在所有 API 调用中相应地设置头信息:
🌐 For a Next.js application, you may use the draftMode() method from next/headers to detect if draft mode is enabled, and set the header accordingly in all your API calls:
import { draftMode } from "next/headers";
import qs from "qs";

export default async function fetchContentType(
  contentType: string,
  params: Record = {}
): Promise {
  // Check if Next.js draft mode is enabled
  const { isEnabled: isDraftMode } = await draftMode();

  try {
    const queryParams = { ...params };
    // Add status=draft parameter when draft mode is enabled
    if (isDraftMode) {
      queryParams.status = "draft";
    }

    const url = `${baseURL}/${contentType}?${qs.stringify(queryParams)}`;
    const response = await fetch(url, {
      headers: {
        // Enable content source maps in preview mode
        "strapi-encode-source-maps": isDraftMode ? "true" : "false",
      },
    });
    if (!response.ok) {
      throw new Error(
        `Failed to fetch data from Strapi (url=${url}, status=${response.status})`
      );
    }
    return await response.json();
  } catch (error) {
    console.error("Error fetching content:", error);
    throw error;
  }
}
使用
🌐 Usage
使用此功能的路径: 内容管理器,编辑你的内容类型视图
根据你的 CMS 计划,你使用预览的体验将有所不同:
🌐 Based on your CMS plan, your experience with Preview will be different:
- 使用免费计划,预览将仅全屏显示。
- 使用 GrowthThis feature is available with a Growth plan. 和 EnterpriseThis feature is available with an Enterprise plan. 计划,你可以使用称为实时预览的增强功能。有了实时预览,你可以在内容管理器的编辑视图旁边查看预览,并且还可以通过双击任何内容直接在预览中编辑内容。
一旦预览功能设置正确,右侧的 内容管理器编辑视图 将显示一个 打开预览 按钮。点击它将直接在 Strapi 的管理面板中显示内容的预览效果,就像它在前端应用中显示的一样。
🌐 Once the Preview feature is properly set up, an Open preview button is visible on the right side of the Content Manager's edit view. Clicking it will display the preview of your content as it will appear in your front-end application, but directly within Strapi's the admin panel.

打开预览后,你可以:
🌐 Once the Preview is open, you can:
- 点击左上角的关闭按钮 返回内容管理器的编辑视图,
- 使用预览内容上方的下拉菜单在桌面版和移动版预览之间切换,
- 在预览草稿和已发布版本之间切换(如果该内容类型启用了 草稿与发��布 功能),
- 然后点击右上角的链接图标 以复制预览链接。根据你当前查看的预览标签,这将复制草稿预览的链接或已发布版本的链接。
在内容管理器的编辑视图中,如果你有未保存的更改,‘打开预览’按钮将被禁用。保存你最近的更改后,你应该可以再次预览内容。
🌐 In the Edit view of the Content Manager, the Open preview button will be disabled if you have unsaved changes. Save your latest changes and you should be able to preview content again.
实时预览
🌐 Live Preview
GrowthThis feature is available with a Growth plan. EnterpriseThis feature is available with an Enterprise plan.实时预览是 Strapi 付费 CMS 方案提供的增强预览体验。
🌐 Live Preview is the enhanced Preview experience available with Strapi’s paid CMS plans.
使用实时预览功能,除了免费套餐中包含的功能外,你还可以:
🌐 With Live Preview, in addition to what’s included in the Free plan, you can:
- 使用侧边编辑器可以同时查看内容管理器中条目的编辑视图和前端预览。你还可以使用 和 按钮在全屏预览和并排预览之间切换。
- 在预览窗格中双击任意内容即可进行原位编辑。这将打开一个弹出窗口,将前端内容与 Strapi 中的对应字段同步。
