首页自定义
Page summary:
管理面板主页显示默认内容和个人资料小部件,并支持通过
app.widgets.registerAPI 添加自定义内容。
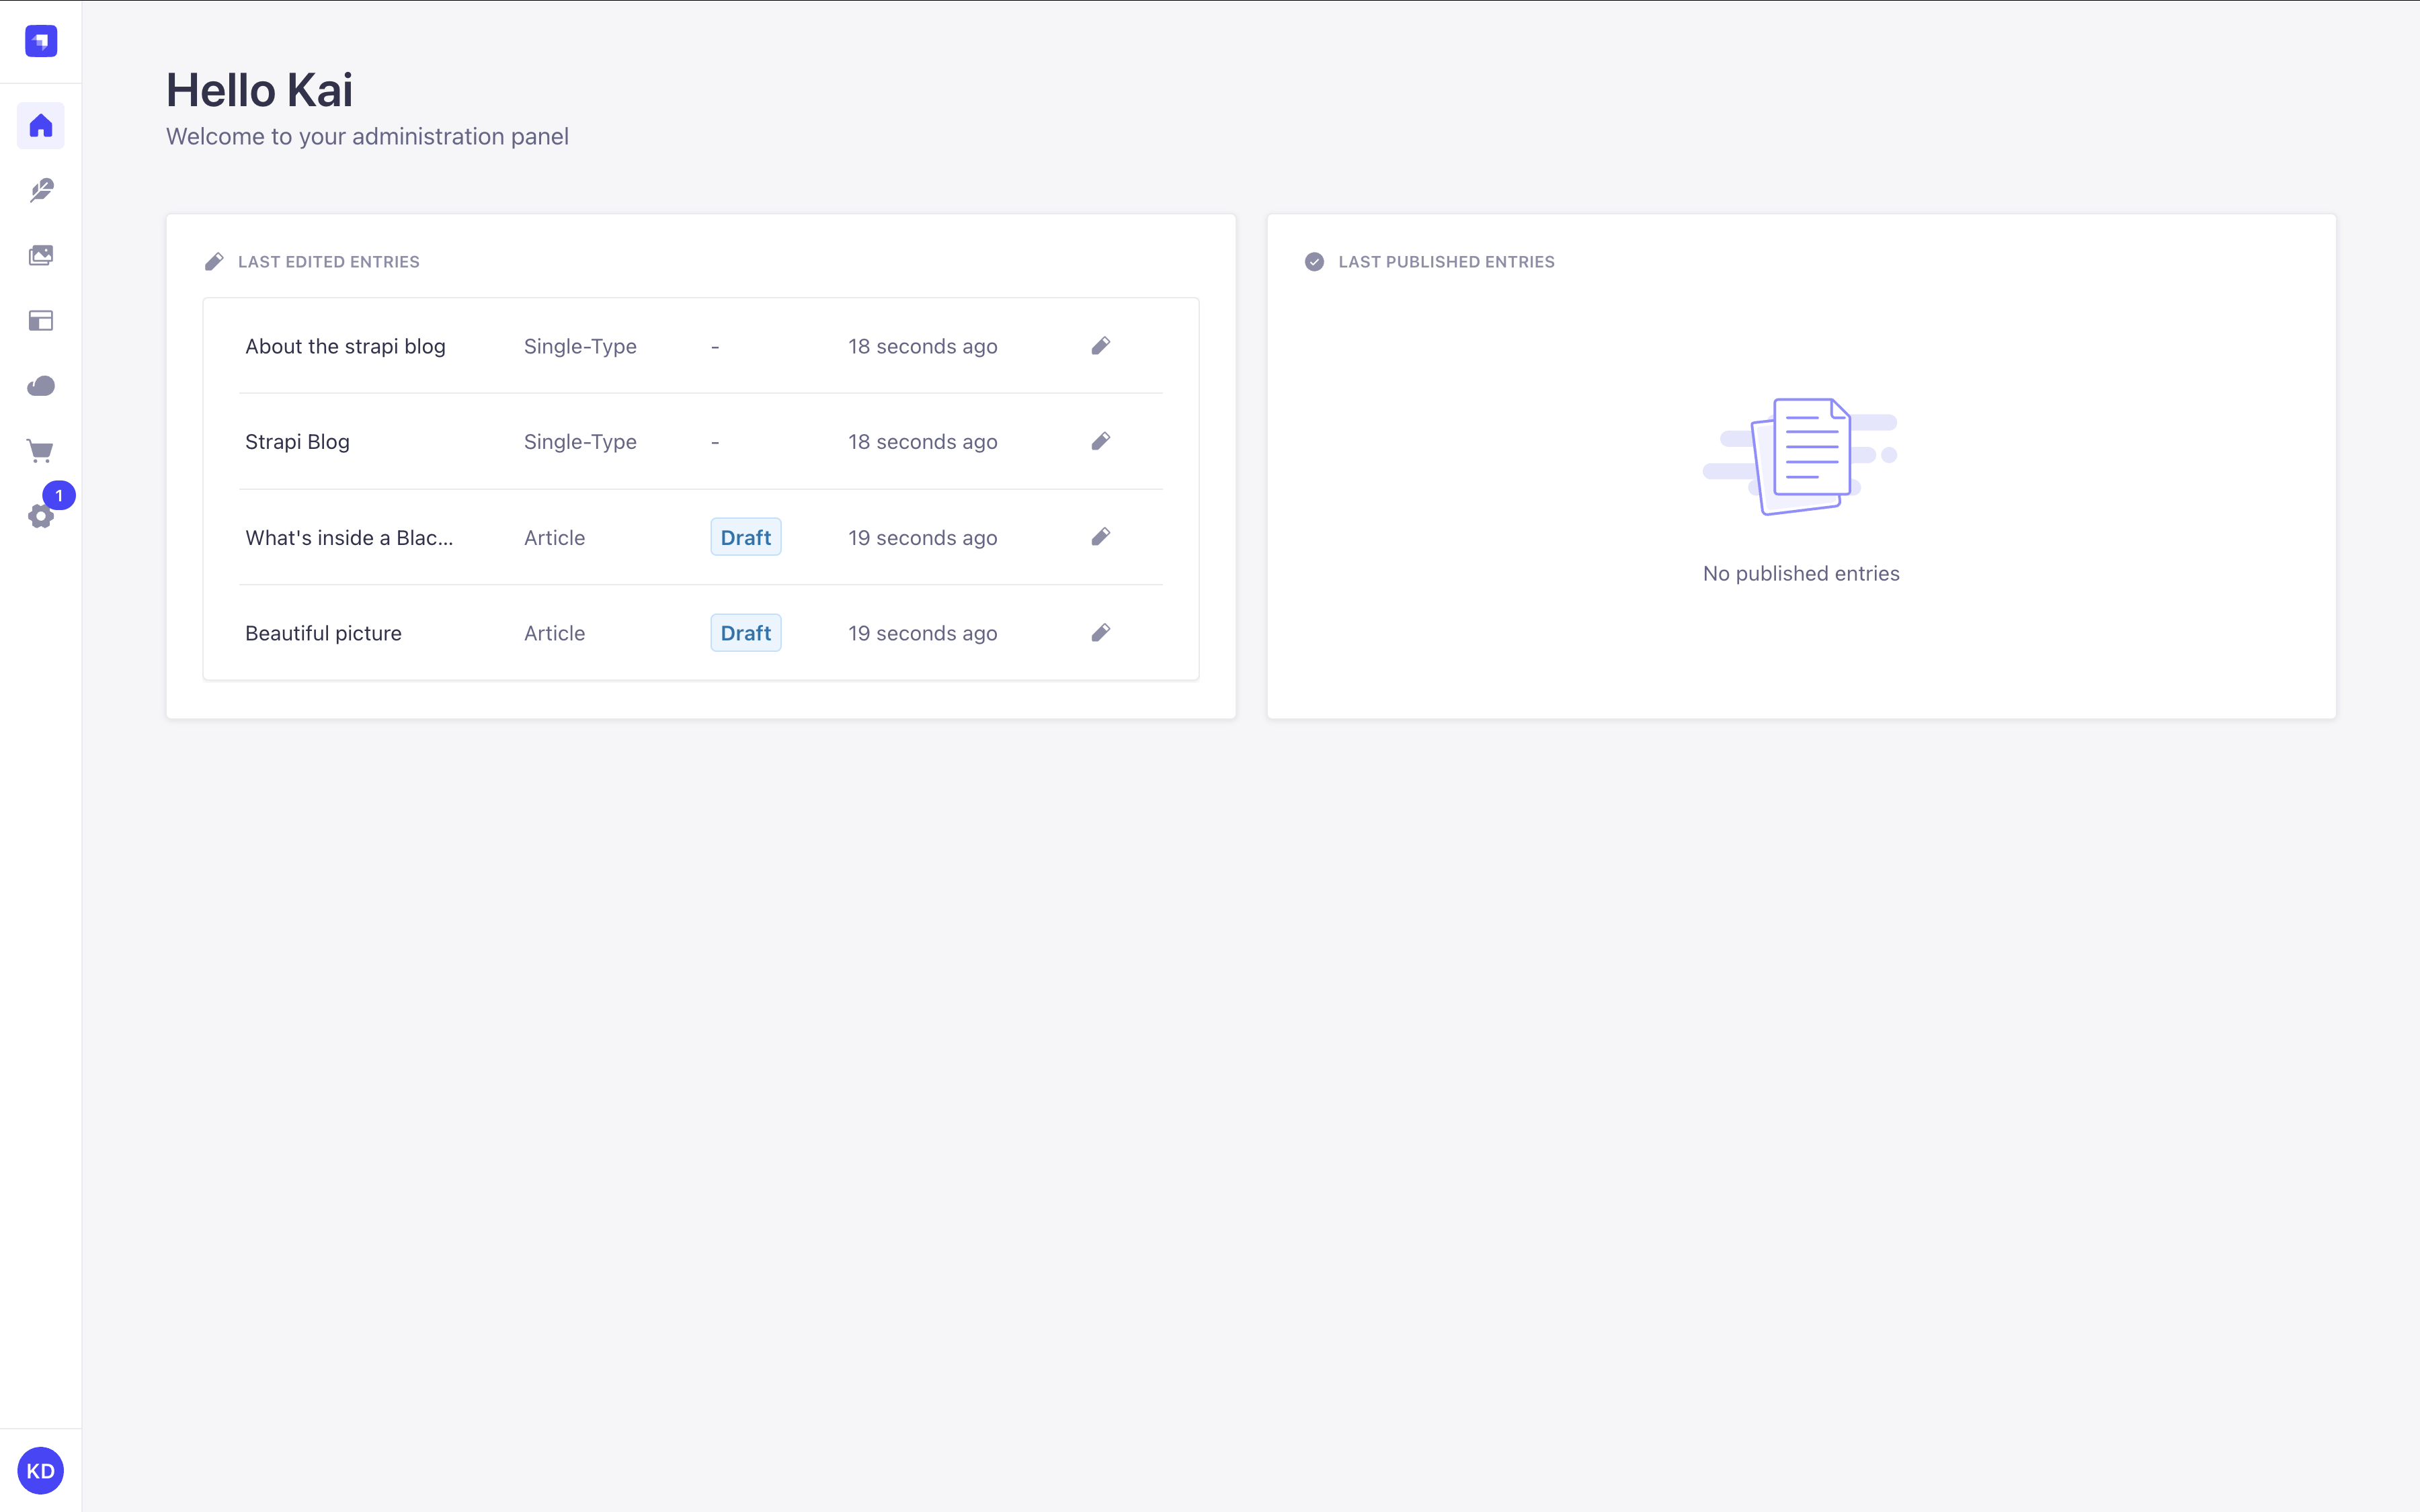
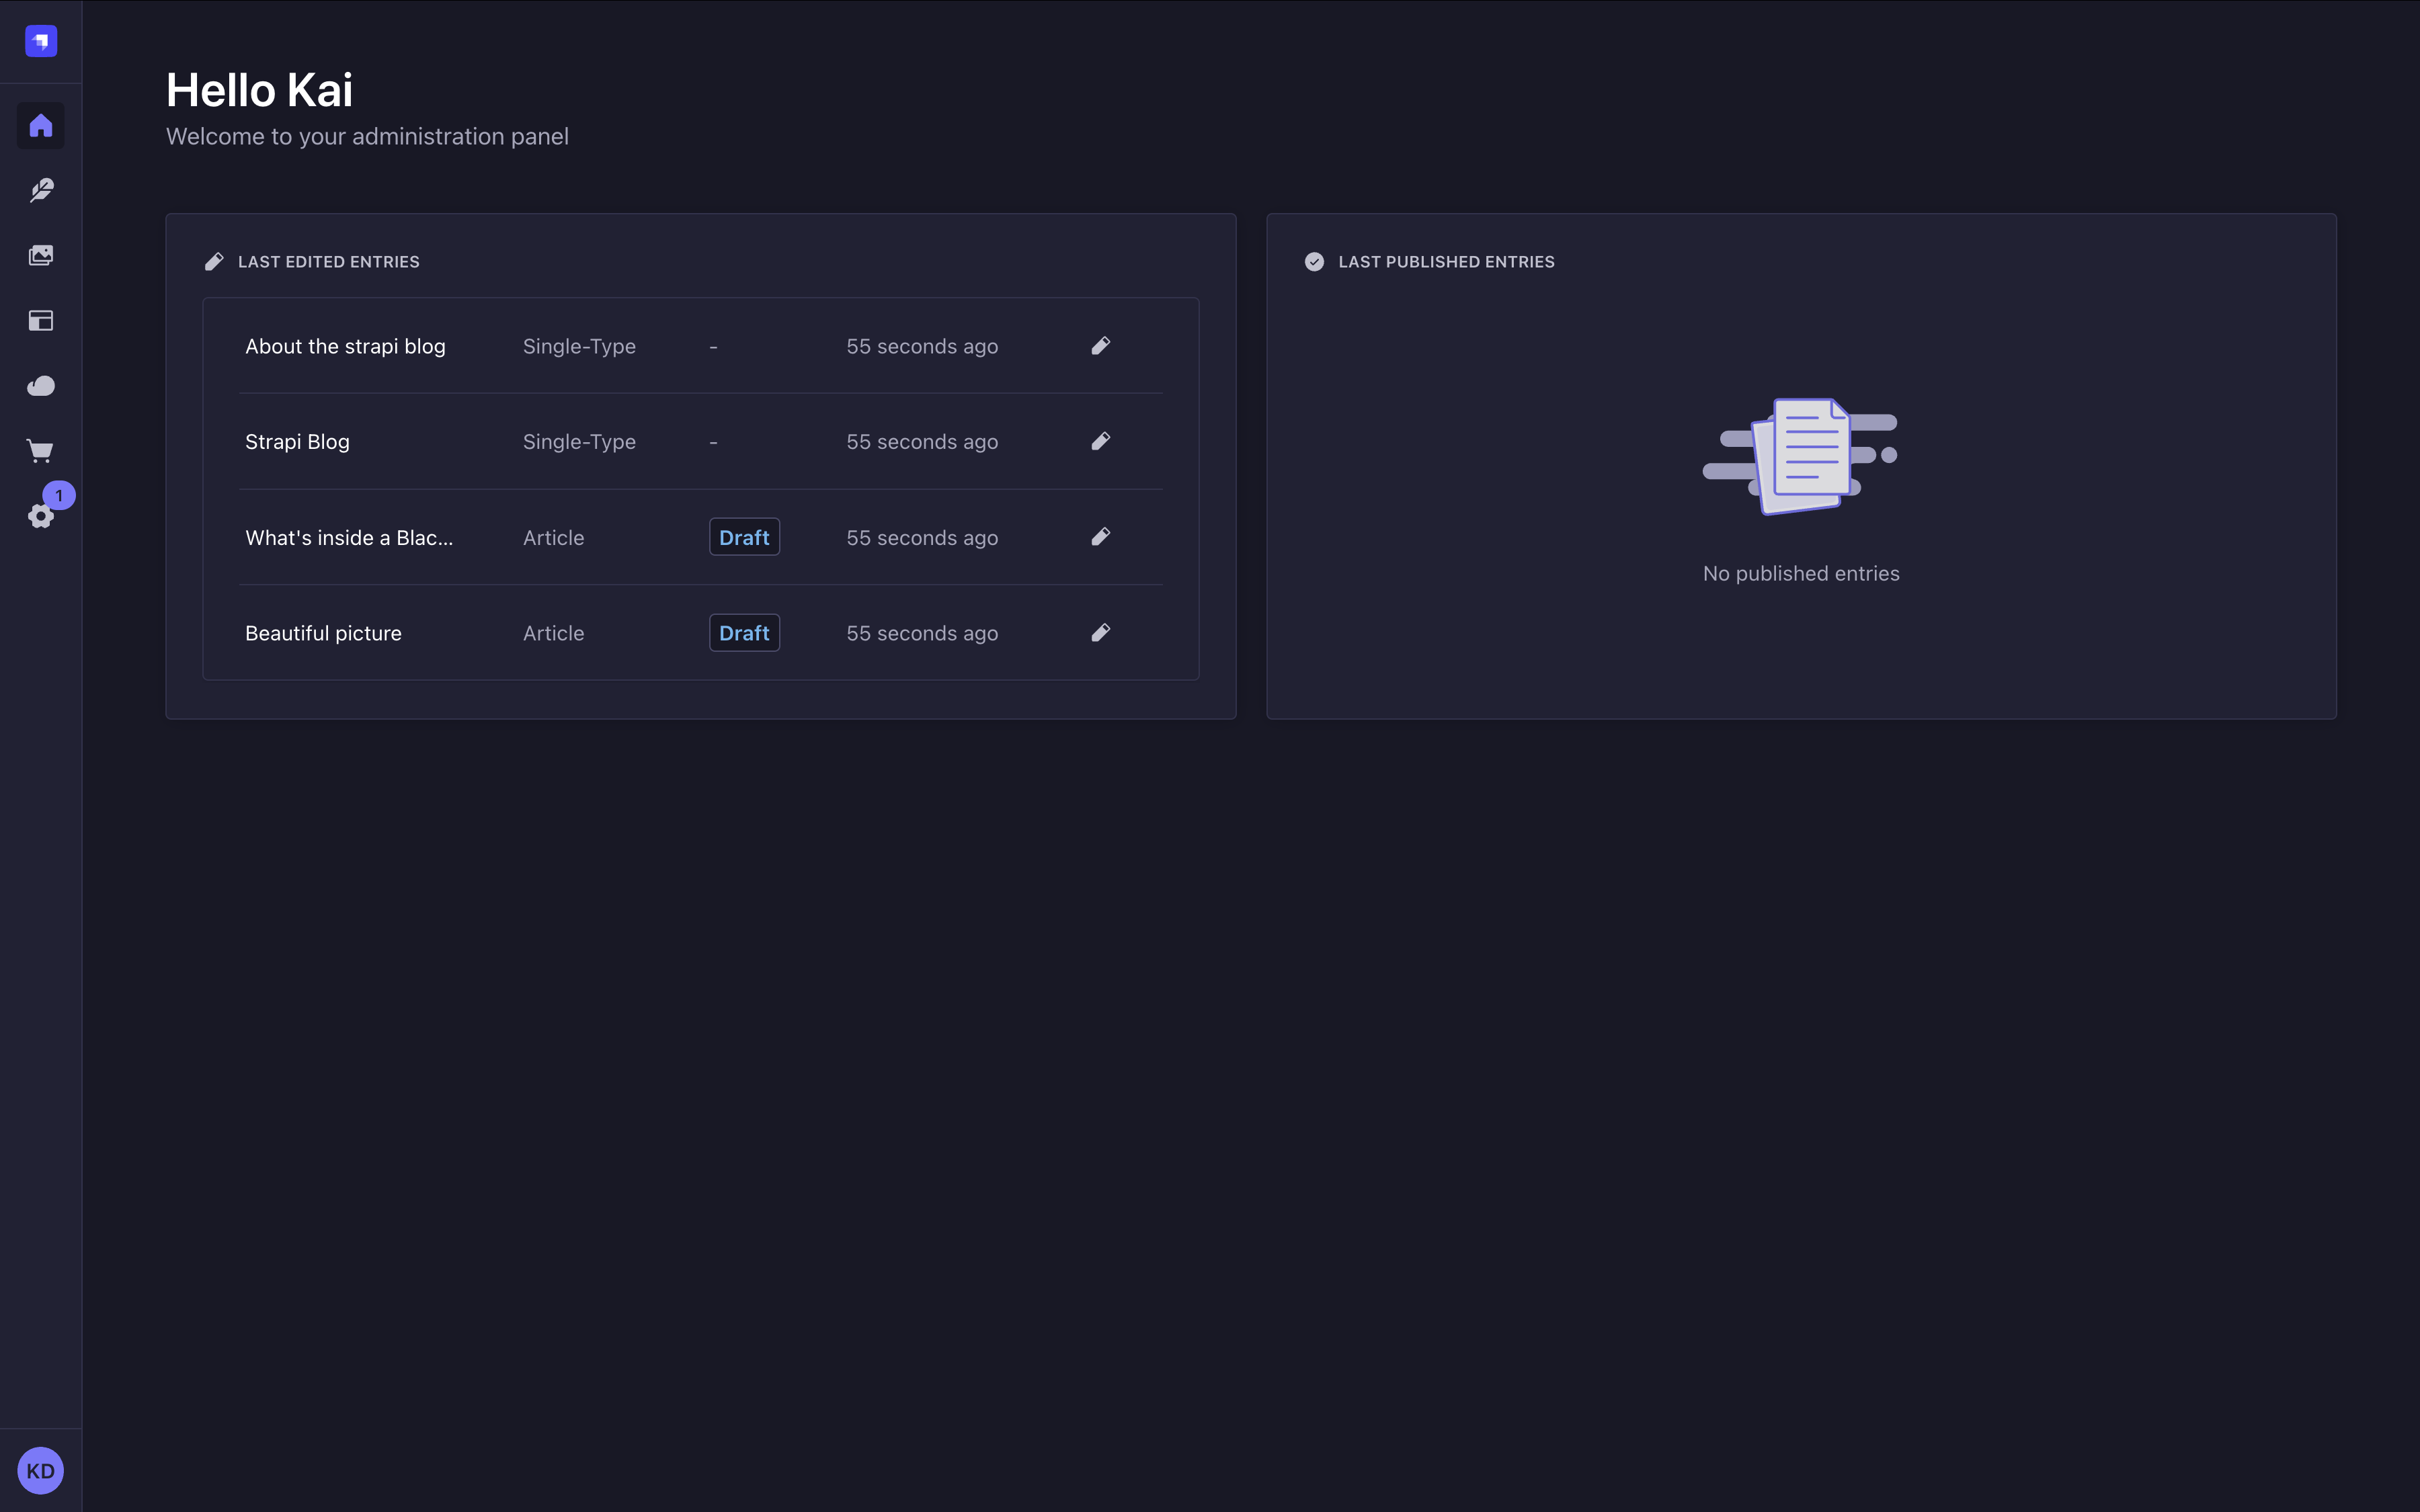
Strapi 管理面板的 主页是着陆页。默认情况下,它提供包含 5 个默认小部件的内容概览:
- 最近编辑的条目:显示最近修改的内容条目,包括它们的内容类型、状态以及更新时间。
- 最近发布的条目:显示最近发布的内容条目,使你能够快速访问和管理已发布的内容。
- 个人资料:显示你的个人资料简要摘要,包括你的名称、电子邮件地址和角色。
- 条目:显示草稿和已发布条目的总数。
- 项目统计: 显示有关你的条目、内容类型、语言环境、资源等的统计信息。
这些默认小部件目前无法删除,但你可以通过创建自己的小部件来自定义主页。
🌐 These default widgets cannot currently be removed, but you can customize the Homepage by creating your own widgets.
如果你最近创建了一个 Strapi 项目,首页还可能在小部件上方显示引导游览,如果你尚未跳过它(详情请参阅 管理面板 文档)。
🌐 If you recently created a Strapi project, the Homepage may also display a guided tour above widgets if you haven't skipped it yet (see Admin Panel documentation for details).
添加自定义小部件
🌐 Adding custom widgets
要添加自定义小部件,你可以:
🌐 To add a custom widget, you can:
- 从市场安装插件
- 或者,创建并注册你自己的小部件
本页面将介绍如何创建和注册小部件。
🌐 The present page will describe how to create and register your widgets.
注册自定义小部件
🌐 Registering custom widgets
要注册一个小部件,使用 app.widgets.register():
🌐 To register a widget, use app.widgets.register():
- 如果你正在构建插件(推荐方式),在
index文件的插件register生命周期方法 中, - 或者在应用的全局
register()生命周期方法中,如果你只是将小部件添加到一个 Strapi 应用而不使用插件。
本页的示例将涵盖通过插件注册小部件。如果你在应用的全局 register() 生命周期方法中注册小部件,大部分代码应该是可重用的,只是你不应该传递 pluginId 属性。
🌐 The examples on the present page will cover registering a widget through a plugin. Most of the code should be reusable if you register the widget in the application's global register() lifecycle method, except you should not pass the pluginId property.
- JavaScript
- TypeScript
import pluginId from './pluginId';
import MyWidgetIcon from './components/MyWidgetIcon';

export default {
  register(app) {
    // Register the plugin itself
    app.registerPlugin({
      id: pluginId,
      name: 'My Plugin',
    });

    // Register a widget for the Homepage
    app.widgets.register({
      icon: MyWidgetIcon,
      title: {
        id: `${pluginId}.widget.title`,
        defaultMessage: 'My Widget',
      },
      component: async () => {
        const component = await import('./components/MyWidget');
        return component.default;
      },
      /**
       * Use this instead if you used a named export for your component
       */
      // component: async () => {
      //   const { Component } = await import('./components/MyWidget');
      //   return Component;
      // },
      id: 'my-custom-widget',
      pluginId: pluginId,
    });
  },

  bootstrap() {},
  // ...
};
import pluginId from './pluginId';
import MyWidgetIcon from './components/MyWidgetIcon';
import type { StrapiApp } from '@strapi/admin/strapi-admin';

export default {
  register(app: StrapiApp) {
    // Register the plugin itself
    app.registerPlugin({
      id: pluginId,
      name: 'My Plugin',
    });

    // Register a widget for the Homepage
    app.widgets.register({
      icon: MyWidgetIcon,
      title: {
        id: `${pluginId}.widget.title`,
        defaultMessage: 'My Widget',
      },
      component: async () => {
        const component = await import('./components/MyWidget');
        return component.default;
      },
      /**
       * Use this instead if you used a named export for your component
       */
      // component: async () => {
      //   const { Component } = await import('./components/MyWidget');
      //   return Component;
      // },
      id: 'my-custom-widget',
      pluginId: pluginId,
    });
  },

  bootstrap() {},
  // ...
};
app.widgets.register API 仅适用于 Strapi 5.13 及以上版本。尝试在较旧版本的 Strapi 中调用该 API 会导致管理面板崩溃。
希望注册小部件的插件开发者应当选择以下一种方式:
🌐 The app.widgets.register API only works with Strapi 5.13 and above. Trying to call the API with older versions of Strapi will crash the admin panel.
Plugin developers who want to register widgets should either:
-
在他们的插件
package.json中将^5.13.0设置为其@strapi/strapi的 peerDependency。这个 peerDependency 支撑了市场的兼容性检查。 -
或者,在调用 API 之前检查它是否存在:
if ('widgets' in app) {
  // proceed with the registration
}
如果插件的全部目的是注册小部件,建议使用 peerDependency 方法。如果插件想添加小部件,但其大部分功能在其他地方,第二种方法更合理。
🌐 The peerDependency approach is recommended if the whole purpose of the plugin is to register widgets. The second approach makes more sense if a plugin wants to add a widget but most of its functionality is elsewhere.
组件 API 参考
🌐 Widget API reference
app.widgets.register() 方法可以接受单个小部件配置对象或一个配置对象数组。每个小部件配置对象可以接受以下属性:
🌐 The app.widgets.register() method can take either a single widget configuration object or an array of configuration objects. Each widget configuration object can accept the following properties:
| 属性 | 类型 | 描述 | 是否必填 ||-------------|------------------------|-------------------------------------------------------|----------|| icon | React.ComponentType | 显示在小部件标题旁的图标组件 | 是 || title | MessageDescriptor | 支持翻译的小部件标题 | 是 || component | () => Promise<React.ComponentType> | 返回小部件组件的异步函数 | 是 || id | string | 小部件的唯一标识符 | 是 || link | Object | 可选的要添加到小部件的链接(请参见链接对象属性) | 否 || pluginId | string | 注册小部件的插件ID | 否 || permissions | Permission[] | 查看小部件所需的权限 | 否 |
链接对象属性:
如果你想为你的小部件添加一个链接(例如,导航到详细视图),你可以提供一个具有以下属性的 link 对象:
🌐 If you want to add a link to your widget (e.g., to navigate to a detailed view), you can provide a link object with the following properties:
| 属性 | 类型 | 描述 | 必填 ||----------|---------------------|------------------------------------------------|----------|| label | MessageDescriptor | 链接显示的文本 | 是 || href | string | 链接应导航到的 URL | 是 |
创建一个小部件组件
🌐 Creating a widget component
小部件组件的设计应以紧凑且信息丰富的方式显示内容。
🌐 Widget components should be designed to display content in a compact and informative way.
以下是如何实现一个基本的小部件组件:
🌐 Here's how to implement a basic widget component:
- JavaScript
- TypeScript
import React, { useState, useEffect } from 'react';
import { Widget } from '@strapi/admin/strapi-admin';

const MyWidget = () => {
  const [loading, setLoading] = useState(true);
  const [data, setData] = useState(null);
  const [error, setError] = useState(null);

  useEffect(() => {
    // Fetch your data here
    const fetchData = async () => {
      try {
        // Replace with your actual API call
        const response = await fetch('/my-plugin/data');
        const result = await response.json();

        setData(result);
        setLoading(false);
      } catch (err) {
        setError(err);
        setLoading(false);
      }
    };

    fetchData();
  }, []);

  if (loading) {
    return <Widget.Loading />;
  }

  if (error) {
    return <Widget.Error />;
  }

  if (!data || data.length === 0) {
    return <Widget.NoData />;
  }

  return (
    <div>
      {/* Your widget content here */}
      <ul>
        {data.map((item) => (
          <li key={item.id}>{item.name}</li>
        ))}
      </ul>
    </div>
  );
};

export default MyWidget;
import React, { useState, useEffect } from 'react';
import { Widget } from '@strapi/admin/strapi-admin';

interface DataItem {
  id: number;
  name: string;
}

const MyWidget: React.FC = () => {
  const [loading, setLoading] = useState<boolean>(true);
  const [data, setData] = useState<DataItem[] | null>(null);
  const [error, setError] = useState<Error | null>(null);

  useEffect(() => {
    // Fetch your data here
    const fetchData = async () => {
      try {
        // Replace with your actual API call
        const response = await fetch('/my-plugin/data');
        const result = await response.json();

        setData(result);
        setLoading(false);
      } catch (err) {
        setError(err instanceof Error ? err : new Error(String(err)));
        setLoading(false);
      }
    };

    fetchData();
  }, []);

  if (loading) {
    return <Widget.Loading />;
  }

  if (error) {
    return <Widget.Error />;
  }

  if (!data || data.length === 0) {
    return <Widget.NoData />;
  }

  return (
    <div>
      {/* Your widget content here */}
      <ul>
        {data.map((item) => (
          <li key={item.id}>{item.name}</li>
        ))}
      </ul>
    </div>
  );
};

export default MyWidget;
为了简单起见,下面的示例在 useEffect 钩子内部直接使用数据获取。虽然这在演示中可行,但它可能不反映生产中的最佳实践。
🌐 For simplicity, the example below uses data fetching directly inside a useEffect hook. While this works for demonstration purposes, it may not reflect best practices in production.
对于更稳健的解决方案,请考虑在React 文档中推荐的替代方法。如果你希望集成数据获取库,我们建议使用TanStackQuery。
🌐 For more robust solutions, consider alternative approaches recommended in the React documentation. If you're looking to integrate a data fetching library, we recommend using TanStackQuery.
数据管理:
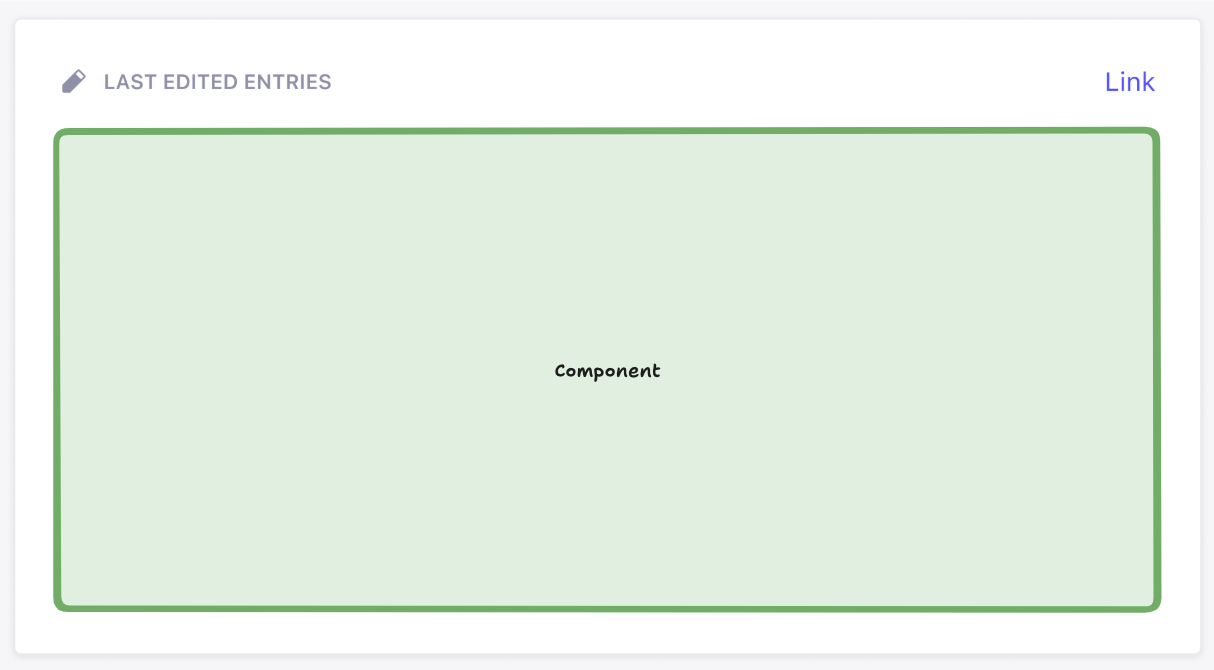
上方的绿色框表示用户的 React 组件(来自 API 中的 widget.component)被渲染的区域。你可以在这个框内渲染你想要的任何内容。然而,框外的所有内容都是由 Strapi 渲染的。这确保了管理员面板内整体设计的一致性。API 提供的 icon、title 和(可选的)link 属性用于显示小部件。
🌐 The green box above represents the area where the user’s React component (from widget.component in the API) is rendered. You can render whatever you like inside of this box. Everything outside that box is, however, rendered by Strapi. This ensures overall design consistency within the admin panel. The icon, title, and link (optional) properties provided in the API are used to display the widget.
小部件辅助组件参考
🌐 Widget helper components reference
Strapi 提供了几个辅助组件,以便在各个小部件之间保持一致的用户体验:
🌐 Strapi provides several helper components to maintain a consistent user experience across widgets:
| 组件 | 描述 | 用法 ||------------------|-----------------------------------------------------|--------------------------------------|| Widget.Loading | 显示加载旋转器和消息 | 当数据正在加载时 || Widget.Error | 显示错误状态 | 当发生错误时 || Widget.NoData | 当没有可用数据时显示 | 当小部件没有数据可显示时 || Widget.NoPermissions | 当用户缺少所需权限时显示 | 当用户无法访问该小部件时 |
这些组件有助于在不同的部件中保持一致的外观和感觉。
你可以在没有子组件的情况下渲染这些组件以获得默认文案:<Widget.Error />
或者你可以传递子组件来覆盖默认文案并指定你自己的文字:<Widget.Error>Your custom error message</Widget.Error>。
🌐 These components help maintain a consistent look and feel across different widgets.
You could render these components without children to get the default wording: <Widget.Error />
or you could pass children to override the default copy and specify your own wording: <Widget.Error>Your custom error message</Widget.Error>.
示例:添加内容指标小部件
🌐 Example: Adding a content metrics widget
以下是如何创建内容指标小部件的完整示例,该小部件显示 Strapi 应用中每种内容类型的条目数量。
🌐 The following is a complete example of how to create a content metrics widget that displays the number of entries for each content type in your Strapi application.
最终结果在你的管理员面板的 首页中将如下所示:
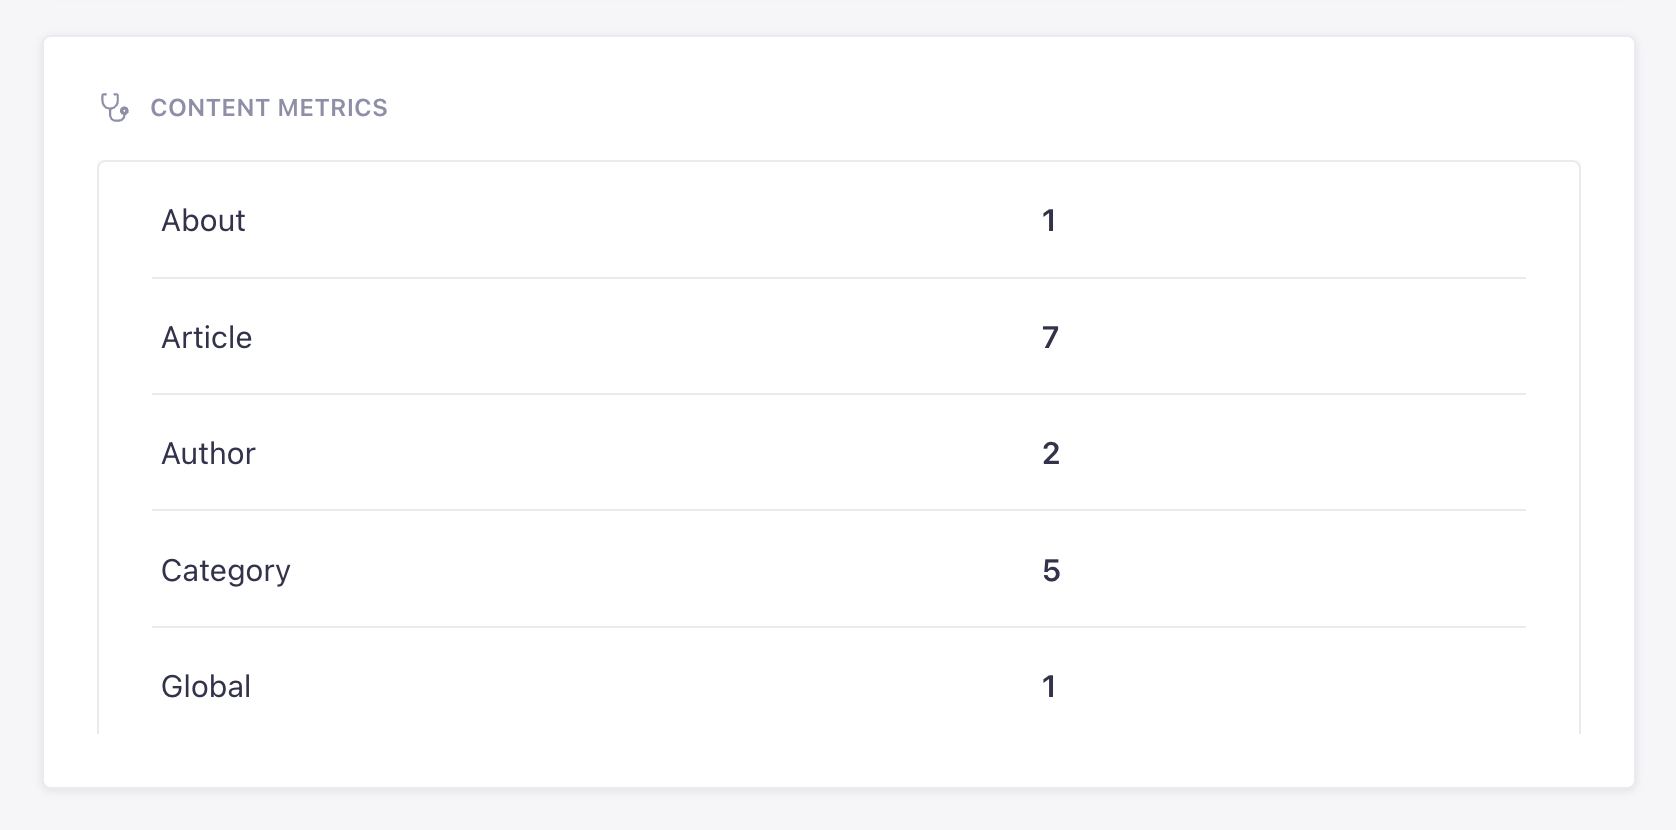
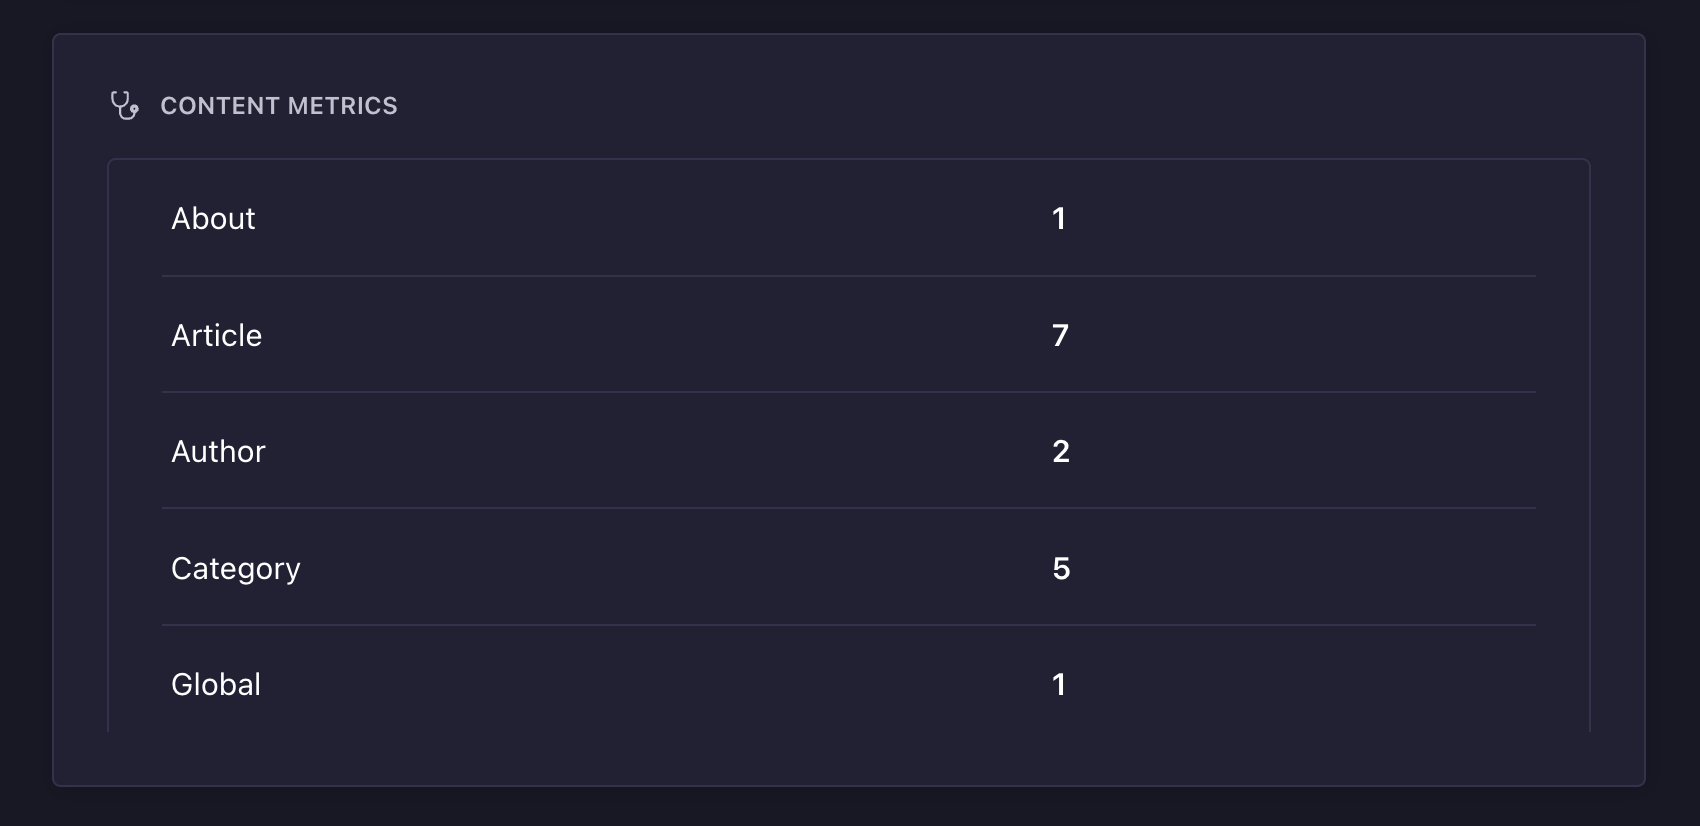
该小工具显示 Strapi 在安装时提供 --example 标志时自动生成的示例内容类型的计数(详情请参见 CLI 安装选项)。
🌐 The widget shows counts for example content-types automatically generated by Strapi when you provide the --example flag on installation (see CLI installation options for details).
此小部件可以通过以下方式添加到 Strapi:
🌐 This widget can be added to Strapi by:
- 创建一个“内容指标”插件(详情请参见插件创建文档)
- 重复使用下面提供的代码示例。
如果你更喜欢动手操作,可以重复使用以下 CodeSandbox link。
- JavaScript
- TypeScript
以下��文件注册插件和小部件:
🌐 The following file registers the plugin and the widget:
import { PLUGIN_ID } from './pluginId';
import { Initializer } from './components/Initializer';
import { PluginIcon } from './components/PluginIcon';
import { Stethoscope } from '@strapi/icons'

export default {
  register(app) {
    app.addMenuLink({
      to: `plugins/${PLUGIN_ID}`,
      icon: PluginIcon,
      intlLabel: {
        id: `${PLUGIN_ID}.plugin.name`,
        defaultMessage: PLUGIN_ID,
      },
      Component: async () => {
        const { App } = await import('./pages/App');
        return App;
      },
    });

    app.registerPlugin({
      id: PLUGIN_ID,
      initializer: Initializer,
      isReady: false,
      name: PLUGIN_ID,
    });

    // Registers the widget
    app.widgets.register({
      icon: Stethoscope,
      title: {
        id: `${PLUGIN_ID}.widget.metrics.title`,
        defaultMessage: 'Content Metrics',
      },
      component: async () => {
        const component = await import('./components/MetricsWidget');
        return component.default;
      },
      id: 'content-metrics',
      pluginId: PLUGIN_ID,
    });
  },

  async registerTrads({ locales }) {
    return Promise.all(
      locales.map(async (locale) => {
        try {
          const { default: data } = await import(`./translations/${locale}.json`);
          return { data, locale };
        } catch {
          return { data: {}, locale };
        }
      })
    );
  },

  bootstrap() {},
};
以下文件定义了小部件的组件及其逻辑。它正在使用我们将为插件创建的特定控制器和路由:
🌐 The following file defines the widget's component and its logic. It's tapping into a specific controller and route that we'll create for the plugin:
import React, { useState, useEffect } from 'react';
import { Table, Tbody, Tr, Td, Typography, Box } from '@strapi/design-system';
import { Widget } from '@strapi/admin/strapi-admin'

const MetricsWidget = () => {
  const [loading, setLoading] = useState(true);
  const [metrics, setMetrics] = useState(null);
  const [error, setError] = useState(null);

  useEffect(() => {
    const fetchMetrics = async () => {
      try {
        const response = await fetch('/api/content-metrics/count');
        const data = await response.json();

        console.log("data:", data);

        const formattedData = {};

        if (data && typeof data === 'object') {
          Object.keys(data).forEach(key => {
            const value = data[key];
            formattedData[key] = typeof value === 'number' ? value : String(value);
          });
        }

        setMetrics(formattedData);
        setLoading(false);
      } catch (err) {
        console.error(err);
        setError(err.message || 'An error occurred');
        setLoading(false);
      }
    };

    fetchMetrics();
  }, []);

  if (loading) {
    return (
      <Widget.Loading />
    );
  }

  if (error) {
    return (
      <Widget.Error />
    );
  }

  if (!metrics || Object.keys(metrics).length === 0) {
    return <Widget.NoData>No content types found</Widget.NoData>;
  }

  return (
    <Table>
      <Tbody>
        {Object.entries(metrics).map(([contentType, count], index) => (
          <Tr key={index}>
            <Td>
              <Typography variant="omega">{String(contentType)}</Typography>
            </Td>
            <Td>
              <Typography variant="omega" fontWeight="bold">{String(count)}</Typography>
            </Td>
          </Tr>
        ))}
      </Tbody>
    </Table>
  );
};

export default MetricsWidget;
以下文件定义了一个自定义控制器,用于统计所有内容类型:
🌐 The following file defines a custom controller that counts all content-types:
'use strict';
module.exports = ({ strapi }) => ({
  async getContentCounts(ctx) {
    try {
      // Get all content types
      const contentTypes = Object.keys(strapi.contentTypes)
        .filter(uid => uid.startsWith('api::'))
        .reduce((acc, uid) => {
          const contentType = strapi.contentTypes[uid];
          acc[contentType.info.displayName || uid] = 0;
          return acc;
        }, {});

      // Count entities for each content type
      for (const [name, _] of Object.entries(contentTypes)) {
        const uid = Object.keys(strapi.contentTypes)
          .find(key =>
            strapi.contentTypes[key].info.displayName === name || key === name
          );

        if (uid) {
          // Using the count() method from the Document Service API
          const count = await strapi.documents(uid).count();
          contentTypes[name] = count;
        }
      }

      ctx.body = contentTypes;
    } catch (err) {
      ctx.throw(500, err);
    }
  }
});
以下文件确保指标控制器可以通过自定义的 /count 路由访问:
🌐 The following file ensures that the metrics controller is reachable at a custom /count route:
export default {
  'content-api': {
    type: 'content-api',
    routes: [
      {
        method: 'GET',
        path: '/count',
        handler: 'metrics.getContentCounts',
        config: {
          policies: [],
        },
      },
    ],
  },
};
以下文件注册插件和小部件:
🌐 The following file registers the plugin and the widget:
import { PLUGIN_ID } from './pluginId';
import { Initializer } from './components/Initializer';
import { PluginIcon } from './components/PluginIcon';
import { Stethoscope } from '@strapi/icons'

export default {
  register(app) {
    app.addMenuLink({
      to: `plugins/${PLUGIN_ID}`,
      icon: PluginIcon,
      intlLabel: {
        id: `${PLUGIN_ID}.plugin.name`,
        defaultMessage: PLUGIN_ID,
      },
      Component: async () => {
        const { App } = await import('./pages/App');
        return App;
      },
    });

    app.registerPlugin({
      id: PLUGIN_ID,
      initializer: Initializer,
      isReady: false,
      name: PLUGIN_ID,
    });

    // Registers the widget
    app.widgets.register({
      icon: Stethoscope,
      title: {
        id: `${PLUGIN_ID}.widget.metrics.title`,
        defaultMessage: 'Content Metrics',
      },
      component: async () => {
        const component = await import('./components/MetricsWidget');
        return component.default;
      },
      id: 'content-metrics',
      pluginId: PLUGIN_ID,
    });
  },

  async registerTrads({ locales }) {
    return Promise.all(
      locales.map(async (locale) => {
        try {
          const { default: data } = await import(`./translations/${locale}.json`);
          return { data, locale };
        } catch {
          return { data: {}, locale };
        }
      })
    );
  },

  bootstrap() {},
};
以下文件定义了小部件的组件及其逻辑。它正在使用我们将为插件创建的特定控制器和路由:
🌐 The following file defines the widget's component and its logic. It's tapping into a specific controller and route that we'll create for the plugin:
import React, { useState, useEffect } from 'react';
import { Table, Tbody, Tr, Td, Typography, Box } from '@strapi/design-system';
import { Widget } from '@strapi/admin/strapi-admin'

const MetricsWidget = () => {
  const [loading, setLoading] = useState(true);
  const [metrics, setMetrics] = useState(null);
  const [error, setError] = useState(null);

  useEffect(() => {
    const fetchMetrics = async () => {
      try {
        const response = await fetch('/api/content-metrics/count');
        const data = await response.json();

        console.log("data:", data);

        const formattedData = {};

        if (data && typeof data === 'object') {
          Object.keys(data).forEach(key => {
            const value = data[key];
            formattedData[key] = typeof value === 'number' ? value : String(value);
          });
        }

        setMetrics(formattedData);
        setLoading(false);
      } catch (err) {
        console.error(err);
        setError(err.message || 'An error occurred');
        setLoading(false);
      }
    };

    fetchMetrics();
  }, []);

  if (loading) {
    return (
      <Widget.Loading />
    );
  }

  if (error) {
    return (
      <Widget.Error />
    );
  }

  if (!metrics || Object.keys(metrics).length === 0) {
    return <Widget.NoData>No content types found</Widget.NoData>;
  }

  return (
    <Table>
      <Tbody>
        {Object.entries(metrics).map(([contentType, count], index) => (
          <Tr key={index}>
            <Td>
              <Typography variant="omega">{String(contentType)}</Typography>
            </Td>
            <Td>
              <Typography variant="omega" fontWeight="bold">{String(count)}</Typography>
            </Td>
          </Tr>
        ))}
      </Tbody>
    </Table>
  );
};

export default MetricsWidget;
以下文件定义了一个自定义控制器,用于统计所有内容类型:
🌐 The following file defines a custom controller that counts all content-types:
'use strict';
module.exports = ({ strapi }) => ({
  async getContentCounts(ctx) {
    try {
      // Get all content types
      const contentTypes = Object.keys(strapi.contentTypes)
        .filter(uid => uid.startsWith('api::'))
        .reduce((acc, uid) => {
          const contentType = strapi.contentTypes[uid];
          acc[contentType.info.displayName || uid] = 0;
          return acc;
        }, {});

      // Count entities for each content type using Document Service
      for (const [name, _] of Object.entries(contentTypes)) {
        const uid = Object.keys(strapi.contentTypes)
          .find(key =>
            strapi.contentTypes[key].info.displayName === name || key === name
          );

        if (uid) {
          // Using the count() method from Document Service instead of strapi.db.query
          const count = await strapi.documents(uid).count();
          contentTypes[name] = count;
        }
      }

      ctx.body = contentTypes;
    } catch (err) {
      ctx.throw(500, err);
    }
  }
});
以下文件确保指标控制器可以通过自定义的 /count 路由访问:
🌐 The following file ensures that the metrics controller is reachable at a custom /count route:
export default {
  'content-api': {
    type: 'content-api',
    routes: [
      {
        method: 'GET',
        path: '/count',
        handler: 'metrics.getContentCounts',
        config: {
          policies: [],
        },
      },
    ],
  },
};