从命令行安装
🌐 Installing from CLI
Strapi CLI(命令行接口)安装脚本是让 Strapi 本地运行的最快方式。以下指南是 Strapi 最推荐的安装选项。
🌐 Strapi CLI (Command Line Interface) installation scripts are the fastest way to get Strapi running locally. The following guide is the installation option most recommended by Strapi.
准备安装
🌐 Preparing the installation
在安装 Strapi 之前,你的计算机上必须安装以下要求:
🌐 Before installing Strapi, the following requirements must be installed on your computer:
- Node.js:仅支持 Active LTS or Maintenance LTS versions (目前为
v20、v22和v24)。Node 的奇数版本发布,称为 Node.js 的“当前”版本,不受支持(例如 v23、v25)。 - 你首选的 Node.js 包管理器:
- Python (如果使用 SQLite 数据库)
任何 Strapi 项目也需要一个支持的数据库:
| 数据库 | 推荐 | 最低 ||------------|-------------|---------|| MySQL | 8.4 | 8.0 || MariaDB | 11.4 | 10.3 || PostgreSQL | 17.0 | 14.0 || SQLite | 3 | 3 |
Strapi 不支持 MongoDB(或任何 NoSQL 数据库),也不支持任何“云原生”数据库(例如 Amazon Aurora、Google Cloud SQL 等)。
🌐 Strapi does not support MongoDB (or any NoSQL databases), nor does it support any "Cloud Native" databases (e.g., Amazon Aurora, Google Cloud SQL, etc.).
创建一个 Strapi 项目
🌐 Creating a Strapi project
按照以下步骤创建一个新的 Strapi 项目,确保使用适合你已安装的包管理器的命令:
🌐 Follow the steps below to create a new Strapi project, being sure to use the appropriate command for your installed package manager:
-
在终端中,运行以下命令:
- NPM
- Yarn
- pnpm
npx create-strapi@latest该命令的附加说明:
npx从一个 npm 包运行命令create-strapi是 Strapi 包@latest表示使用的是 Strapi 的最新版本
Tip较旧的
npx create-strapi-app@latest命令仍然有效,并且将提供与较新的npx create-strapi@latest命令完全相同的体验。除了 npx,也可以使用传统的 npm 命令,使用
npm create strapi@latest。请注意使用 npx 时在 create 和 strapi 之间的额外连字符:
npx create-strapi与npm create strapi。yarn create strapiNoteYarn 不支持传递像
@latest这样的版本标签,这与 npm 不同。如果你在使用 Yarn 时遇到意外结果,并且最新版本的 Strapi 未安装,你可能需要 运行 `yarn cache clean` 命令 来清理你的 Yarn 缓存。Caution你在 Strapi Cloud 上使用 pnpm 创建的项目可能会遇到问题。Strapi Cloud 目前尚不支持 pnpm,因此如果你计划最终在 Strapi Cloud 上托管项目,建议使用 yarn 或 npm。
pnpm create strapi -
终端会询问你是否要在此步骤中选择
Login/Signup或Skip。使用箭头键并按下Enter来做出选择。如果你选择登录,你将获得一个 30 天的 GrowthThis feature is available with a Growth plan. 计划试用,该计划将自动应用到你创建的项目中。如果你跳过此步骤,项目将回退到 CMS 免费计划。 -
终端会问你几个问题。对于每个问题,如果你按
Enter而不是输入内容,将使用默认答案(是):
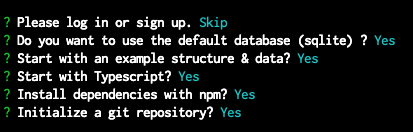
你可以使用传递给安装命令的各种选项来跳过这些问题。请参考表格获取所有可用选项的完整列表。
- (可选) 如果你在默认(SQLite)数据库问题上回答“否”为
n,CLI 会询问更多关于数据库的问题:- 使用箭头键选择你想要的数据库类型,然后按
Enter。 - 给数据库命名,定义数据库主机地址和端口,定义数据库管理员用户名和密码,并定义数据库是否使用 SSL 连接。
对于这些问题中的任何一个,如果你在没有输入任何内容的情况下按下Enter,将使用默认值(在终端输出中以括号表示)。
- 使用箭头键选择你想要的数据库类型,然后按
回答完所有问题后,脚本将开始创建 Strapi 项目。
🌐 Once all questions have been answered, the script will start creating the Strapi project.
CLI 安装选项
🌐 CLI installation options
上述安装指南仅涵盖使用 CLI 的基本安装选项。在创建新的 Strapi 项目时,还可以使用其他选项,例如:
🌐 The above installation guide only covers the basic installation option using the CLI. There are other options that can be used when creating a new Strapi project, for example:
| 选项 | 描述 |
|---|---|
--no-run | 创建后不要启动应用 |
--ts--typescript | 使用 TypeScript(默认)初始化项目 |
--js--javascript | 使用 JavaScript 初始化项目 |
--use-npm | 强制使用 npm 作为项目包管理器 |
--use-yarn | 强制使用 yarn 作为项目包管理器 |
--use-pnpm | 强制使用 pnpm 作为项目包管理器 |
--install | 安装所有依赖,跳过相关的命令行提示 |
--no-install | 不安装所有依赖,跳过相关的 CLI 提示 |
--git-init | 初始化一个 git 仓库,跳过相关的命令行提示 |
--no-git-init | 不要初始化 git 仓库,跳过相关 CLI 提示 |
--example | 添加示例数据,跳过相关的命令行提示 |
--no-example | 不要添加示例数据,跳过相关的 CLI 提示 |
--skip-cloud | 跳过 Strapi 登录和项目创建步骤 |
--non-interactive | 跳过所有交互提示并使用默认设置(TypeScript、安装依赖、初始化 git、SQLite 数据库、无 A/B 测试)。使用此标志时需要提供 <directory> 参数。 |
--enable-ab-tests--no-enable-ab-tests | 启用或禁用匿名 A/B 测试,跳过相关的命令行提示 |
--skip-db | 跳过所有与数据库相关的提示,并创建一个使用默认(SQLite)数据库的项目 |
--template <template-name-or-url> | 根据给定模板创建应用。 模板的其他选项可用,详情请参见模板文档。 |
--dbclient <dbclient> | 通过在命令中将 <dbclient> 替换为以下值之一来定义要使用的数据库客户端:
|
--dbhost <dbhost> | 通过将命令中的 <dbhost> 替换为你选择的值来定义要使用的数据库主机 |
--dbport <dbport> | 通过将命令中的 <dbport> 替换为你选择的值来定义要使用的数据库端口 |
--dbname <dbname> | 通过将命令中的 <dbname> 替换为你选择的值来定义要使用的数据库名称 |
--dbusername <dbusername> | 通过将命令中的 <dbusername> 替换为你选择的值来定义要使用的数据库用户名 |
--dbpassword <dbpassword> | 通过将命令中的 <dbpassword> 替换为你选择的值来定义要使用的数据库密码 |
--dbssl <dbssl> | 通过传递 --dbssl=true(默认不使用 SSL)来定义数据库使用 SSL |
--dbfile <dbfile> | 对于 SQLite 数据库,通过将命令中的 <dbclient> 替换为你选择的值来定义要使用的数据库文件路径 |
--quickstart | (在 Strapi 5 中已弃用) 直接以快速启动模式创建项目。请改用 --non-interactive。 |
- 如果你没有传递
--use-yarn|npm|pnpm选项,安装脚本将使用创建命令时使用的包管理器来安装所有依赖(例如,npm create strapi将使用 npm 安装项目的所有依赖)。 - 有关数据库配置的更多信息,请参阅数据库配置文档。
- 实验性的 Strapi 版本每周二至周六格林威治标准时间午夜发布。你可以使用
npx create-strapi@experimental基于最新的实验性发布创建一个新的 Strapi 应用。请自行承担使用这些实验性版本的风险。不建议在生产环境中使用它们。
跳过 Strapi 登录步骤
🌐 Skipping the Strapi login step
当安装脚本运行时,终端会首先询问你是否要登录/注册。选择 Login/signup 将为你提供 GrowthThe CMS Growth plan includes the Live Preview, Releases, and Content History features. 的 30 天试用,该试用将自动应用到你创建的项目中。这将使你可以访问高级 CMS 功能。
如果你想跳过这个 Strapi 登录部分,请使用箭头键选择 Skip。脚本将继续并使用 CMS 免费计划创建本地项目。
🌐 If you prefer skipping this Strapi login part, use the arrow keys to select Skip. The script will resume and create a local project using the CMS Free plan.
你稍后可以通过结账我们的 pricing page来购买CMS许可证。
托管你的项目
🌐 Hosting your project
你可以创建一个免费的 Strapi Cloud 项目。要部署此项目并将其托管到线上,你可以选择:
🌐 You can create a free Strapi Cloud project. To deploy this project and host it online, you can choose to:
如果你想自己托管项目并且还不熟悉 GitHub,以下可切换的内容应该可以帮助你入门👇。
🌐 If you want to host your project yourself and are not already familiar with GitHub, the following togglable content should get you started👇.
将你的 Strapi 项目代码推送到 GitHub 所需的步骤:
- 在终端中,确保你仍位于托管你创建的 Strapi 项目的文件夹中。
- 运行
git init命令来初始化此文件夹的 git。 - 运行
git add .命令以将所有已修改的文件添加到 git 索引中。 - 运行
git commit -m "Initial commit"命令以创建包含所有新增更改的提交。 - 登录到你的 GitHub 账户并 create a new repository。给新仓库起一个名字,例如
my-first-strapi-project,并记住这个名字。 - 返回终端并将本地存储库推送到 GitHub:
a. 运行类似以下的命令:git remote add origin git@github.com:yourname/my-first-strapi-project.git,确保将 yourname 替换为你自己的 GitHub 个人资料名称,将 my-first-strapi-project 替换为你在第 4 步中使用的实际名称。
b. 运行 git push --set-upstream origin main 命令,将提交最终推送到你的 GitHub 仓库。
关于使用命令行接口进行 git 操作的更多信息可以在 official GitHub documentation中找到。
运行 Strapi
🌐 Running Strapi
要启动 Strapi 应用,请在项目文件夹中运行以下命令:
🌐 To start the Strapi application, run the following command in the project folder:
- Yarn
- NPM
yarn develop
npm run develop
对于自托管的 Strapi 项目,所有内容都会保存在项目文件夹下 .tmp 子文件夹中的数据库文件中(默认使用 SQLite)。因此,每当你从创建 Strapi 项目的文件夹启动 Strapi 应用时,你的内容都会可用(有关更多信息,请参阅 数据库配置)。
🌐 For self-hosted Strapi projects, all your content is saved in a database file (by default, SQLite) found in the .tmp subfolder in your project's folder. So anytime you start the Strapi application from the folder where you created your Strapi project, your content will be available (see database configuration for additional information).
如果内容被添加到 Strapi Cloud 项目中,它将存储在由你的 Strapi Cloud 项目管理的数据库中(有关更多信息,请参见 Strapi Cloud 的高级数据库配置)。
🌐 If the content was added to a Strapi Cloud project, it is stored in the database managed with your Strapi Cloud project (see advanced database configuration for Strapi Cloud for additional information).