媒体库
🌐 Media Library
Page summary:
媒体库集中管理所有上传的资源,提供搜索、过滤和文件夹组织功能。本说明文档包括供应商选项、上传工作流程,以及在内容中插入媒体的说明。
媒体库是 Strapi 的一个功能,它显示在 Strapi 应用中上传的所有资源,并允许用户进行管理。
配置
🌐 Configuration
媒体库的一些配置选项在管理面板中可用,一些通过你的 Strapi 项目的代码处理。
🌐 Some configuration options for the Media Library are available in the admin panel, and some are handled via your Strapi project's code.
管理面板配置
🌐 Admin panel configuration
在管理面板中,可以通过全局设置访问一些媒体库设置,以管理上传资源的格式、文件大小和方向。也可以直接通过媒体库配置视图。
🌐 In the admin panel, some Media Library settings are available via the Global Settings to manage the format, file size, and orientation of uploaded assets. It is also possible, directly via the Media Library to configure the view.
配置设置
🌐 Configuring settings
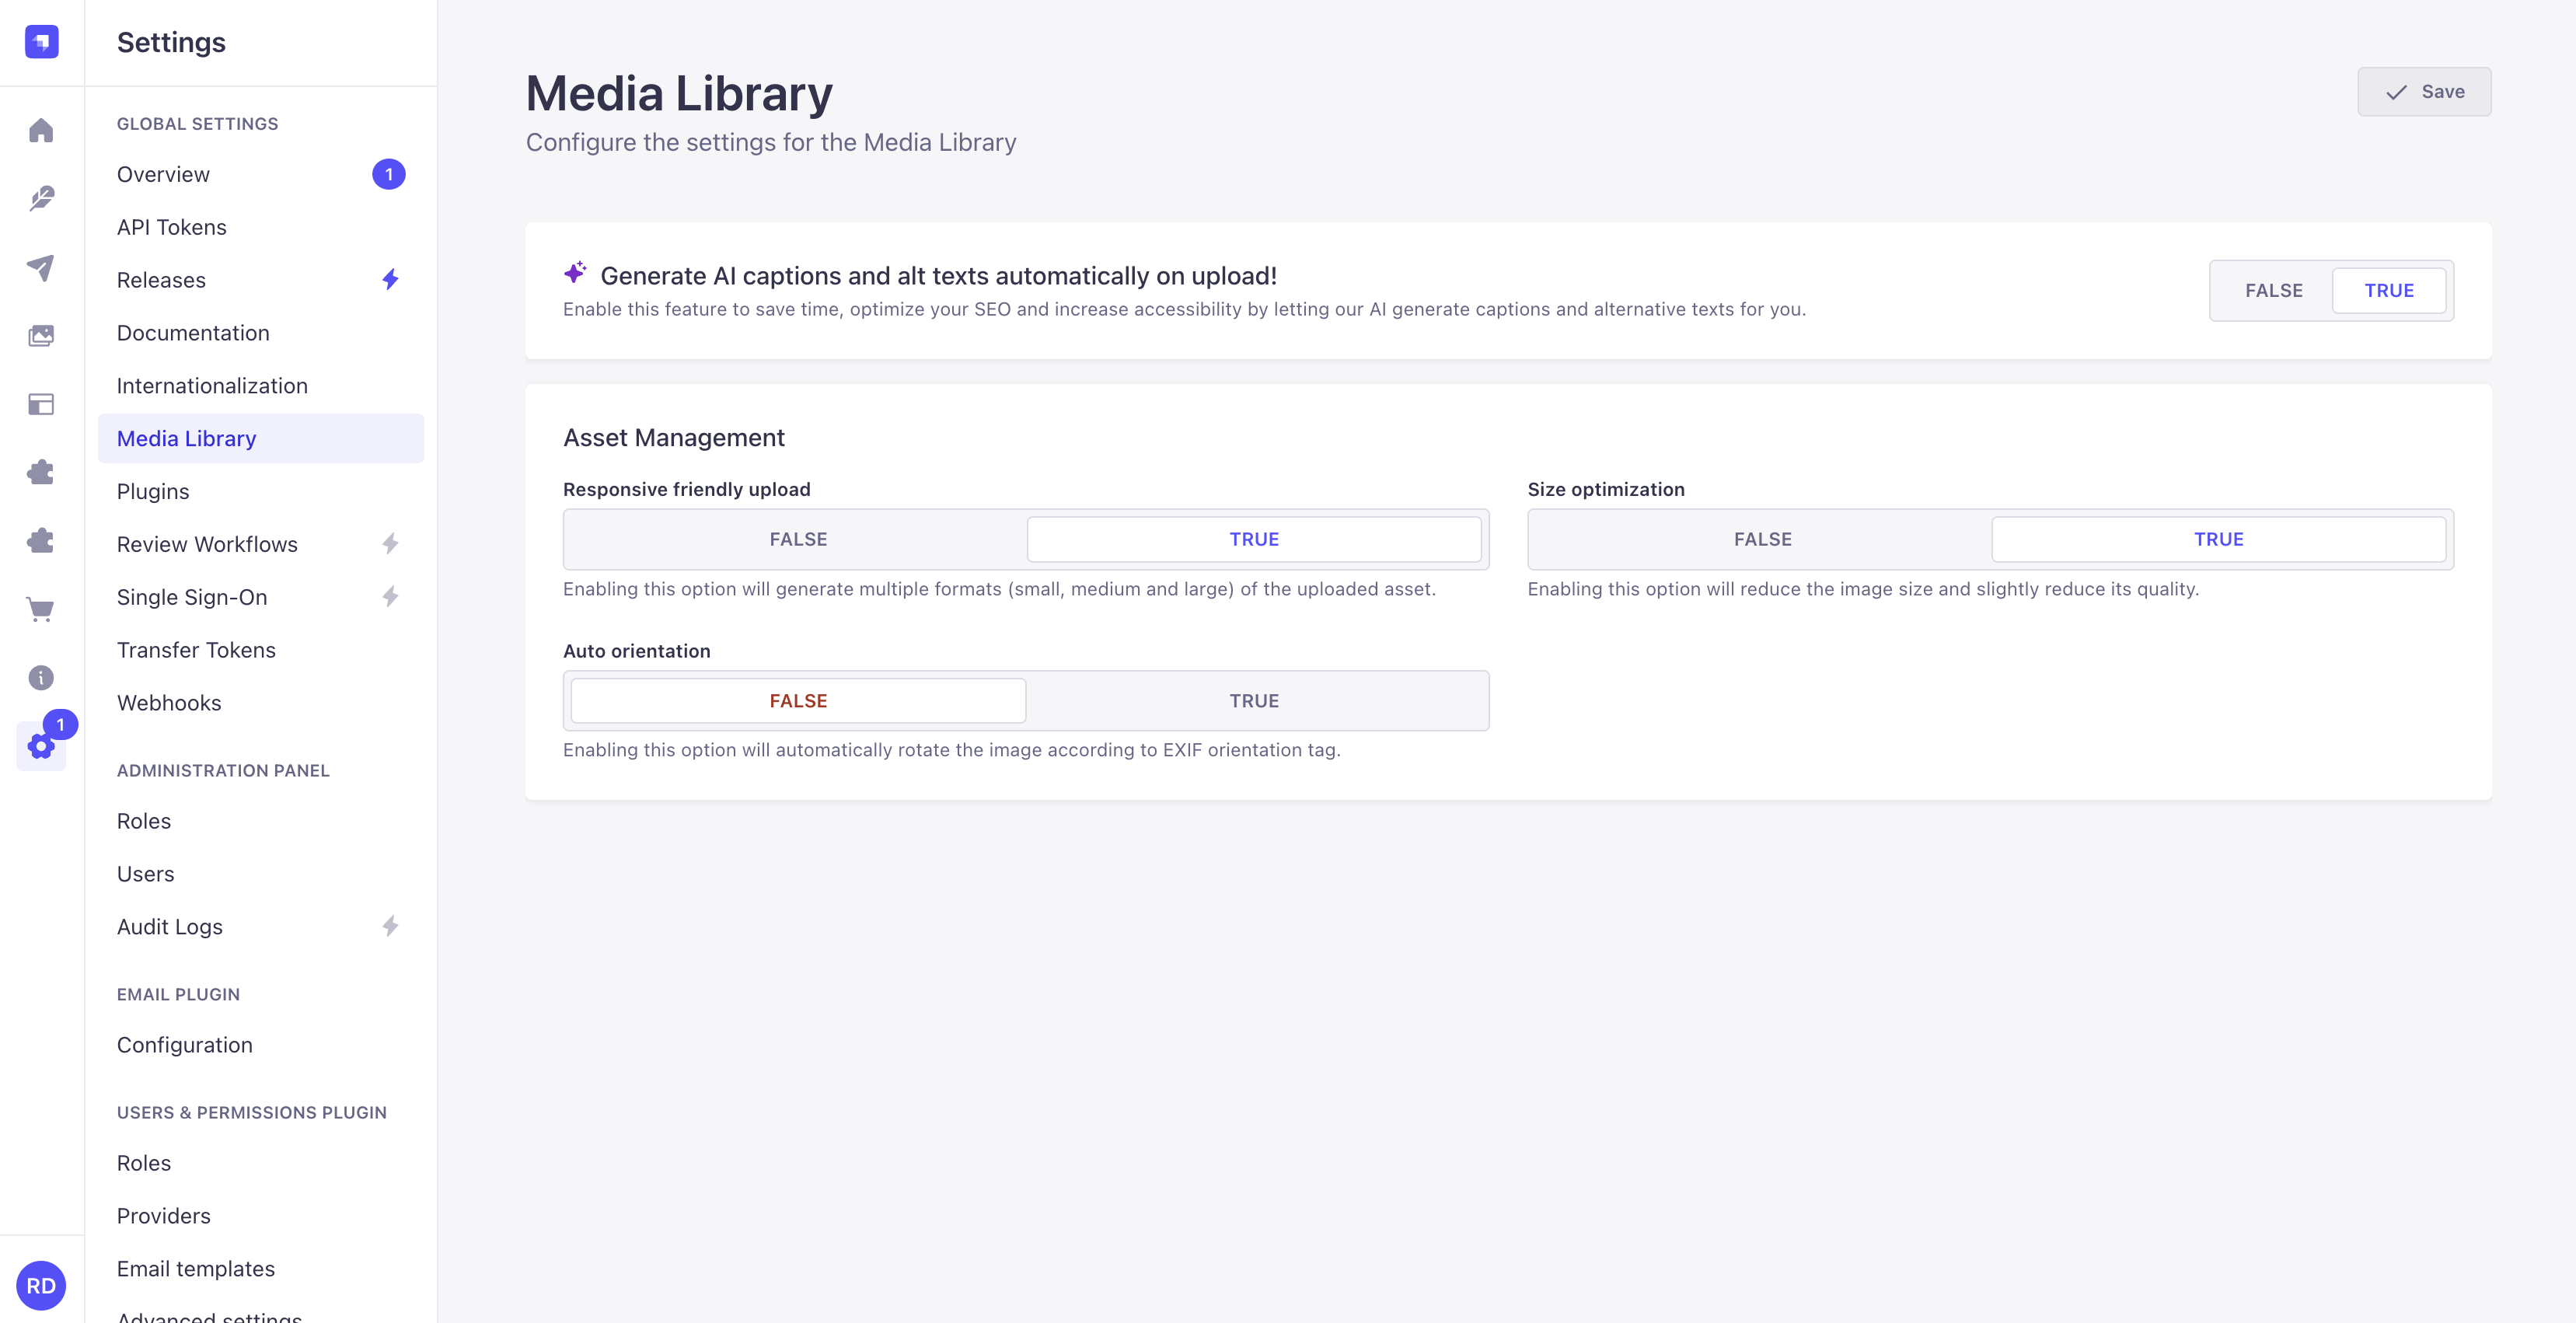
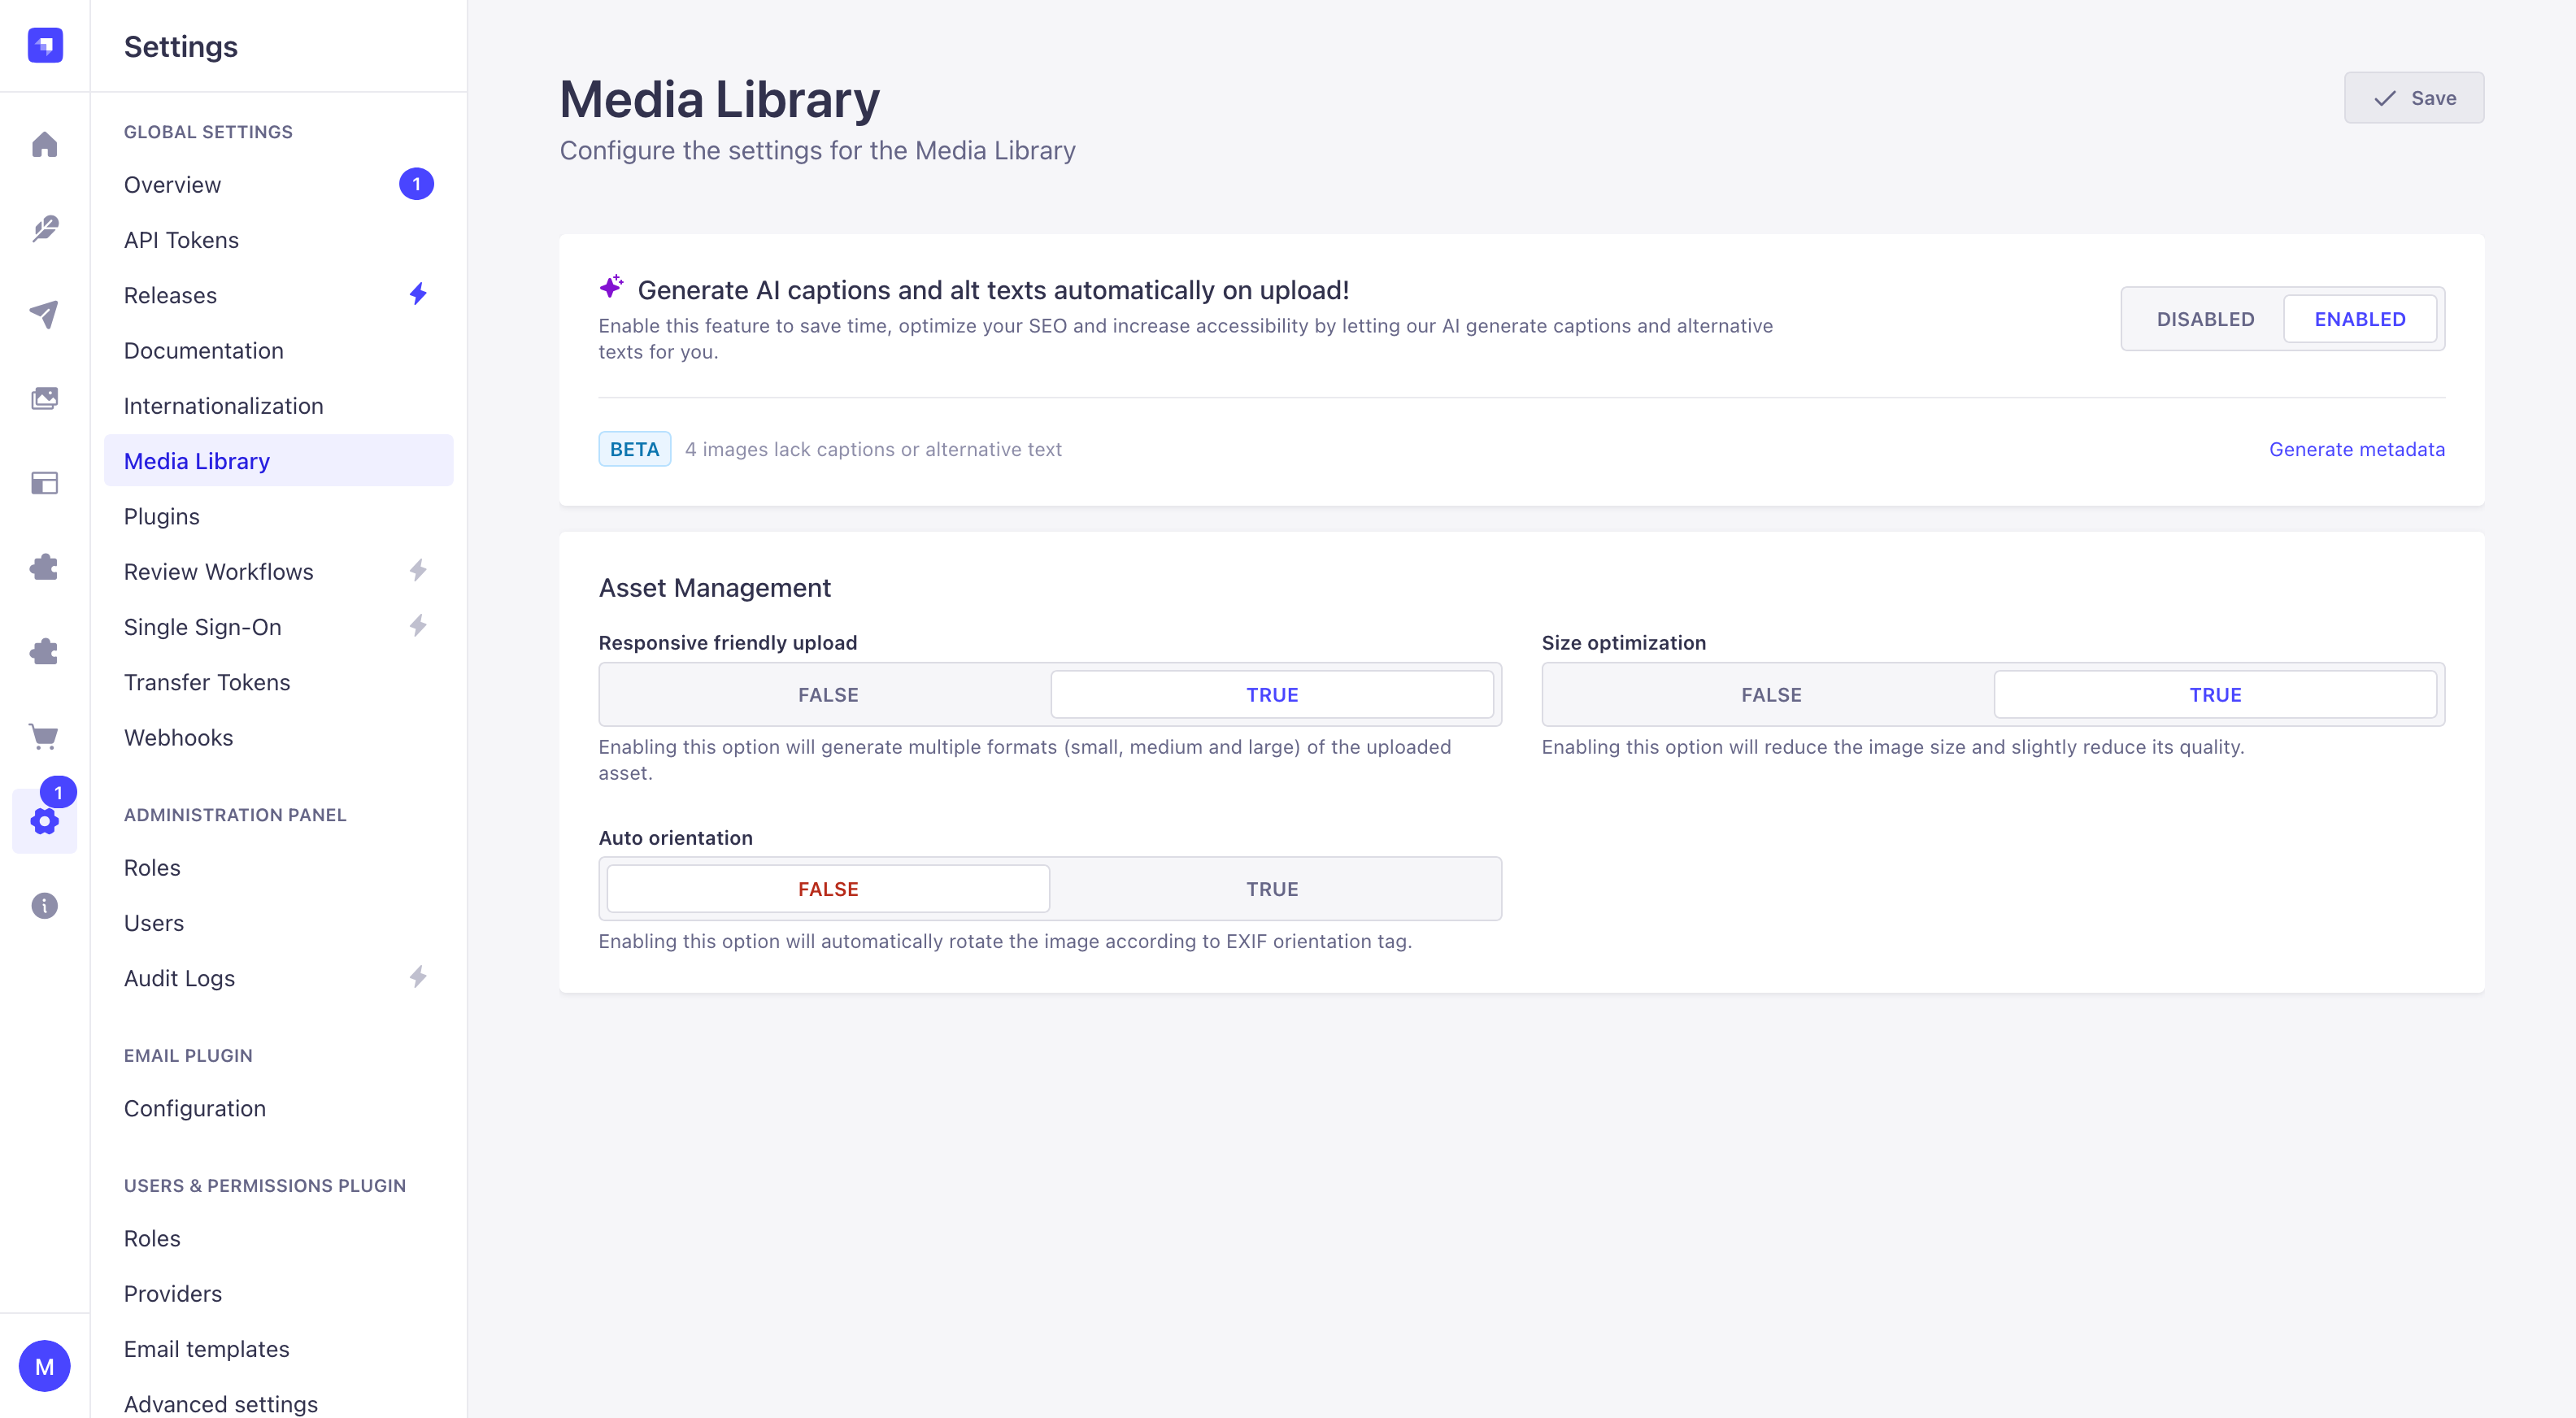
配置此功能的路径: 设置 > 全局设置 > 媒体库。
-
定义你选择的新媒体库设置:
| 设置名称 | 说明 | 默认值 || -------------------------- | ----------------------- |---------------|| 上传时自动生成 AI 字幕和替代文本! | 启用此选项将开启 AI 驱动的元数据生成 GrowthThis feature is available with a Growth plan. | True || 响应式友好上传 | 启用此选项将生成上传资源的多种格式(小、中、大)。
每种格式的默认尺寸可以通过 代码进行配置。 | True || 尺寸优化 | 启用此选项将减小图片尺寸,同时略微降低其质量。 | True || 自动方向 | 启用此选项将根据 EXIF 方向标签自动旋转图片。 | False | -
点击 保存 按钮。
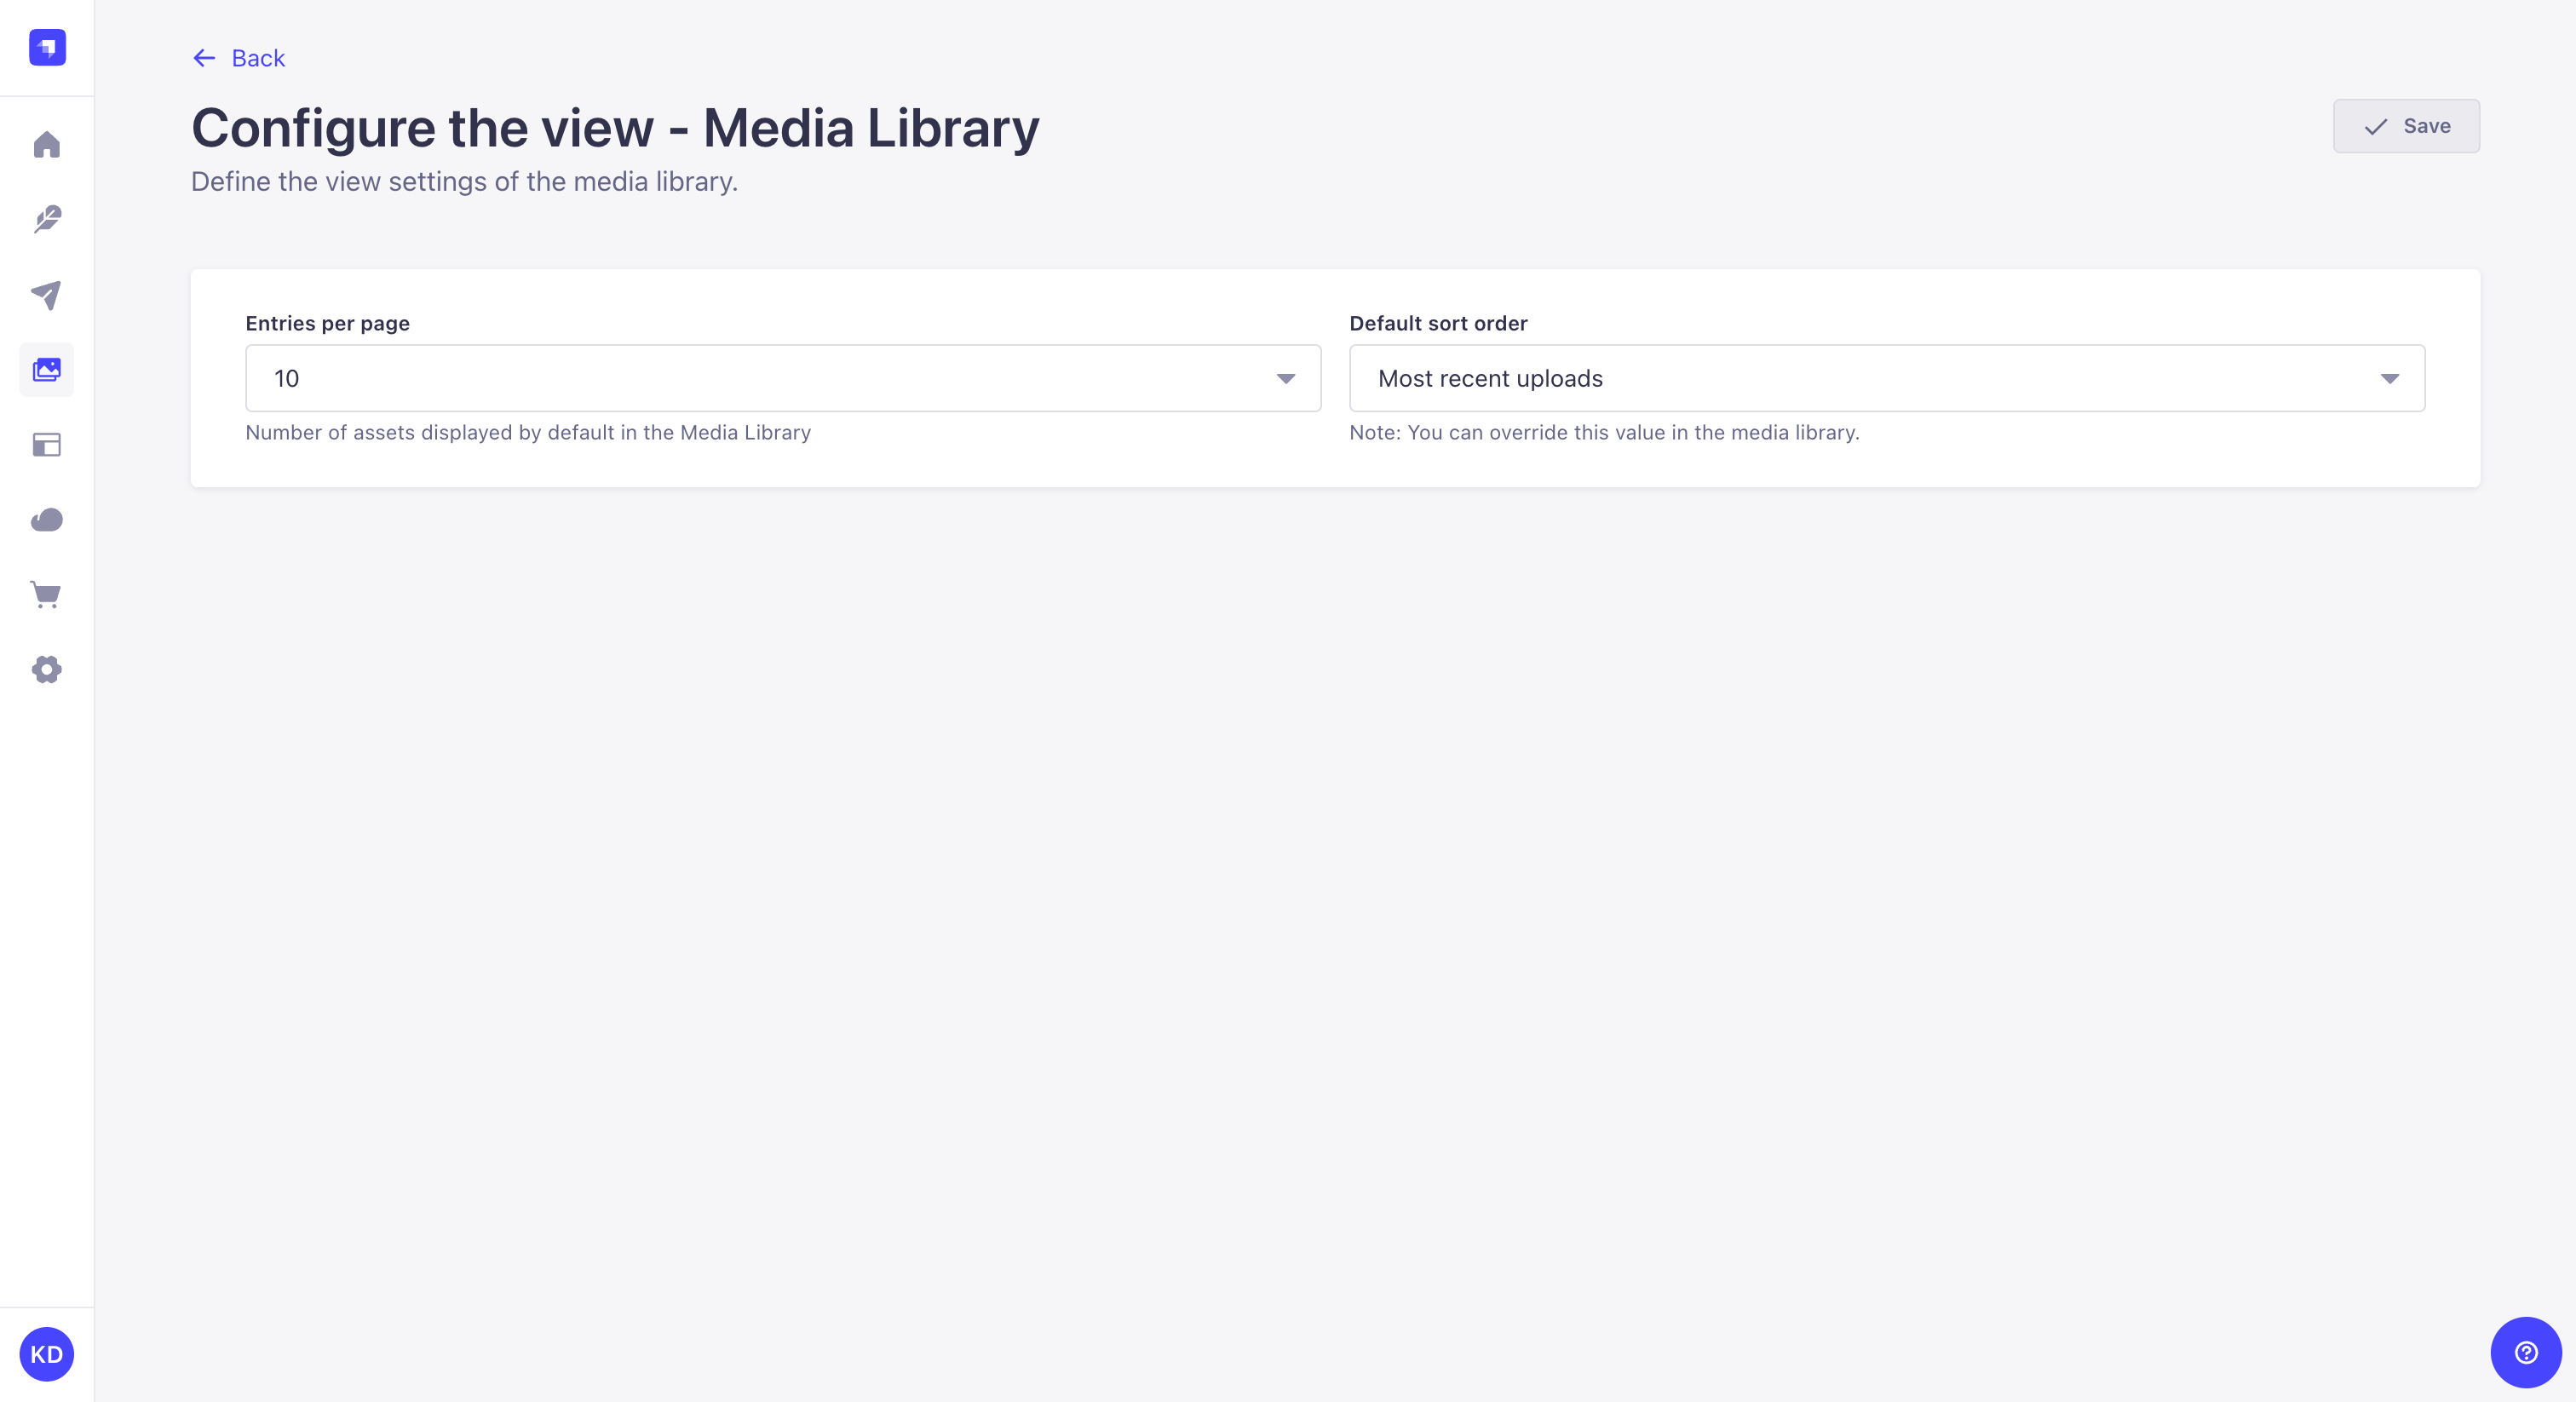
配置视图
🌐 Configuring the view
配置此功能的路径: 媒体库
- 点击界面右侧文件夹和资源列表上方的 按钮。
- 按照下面的说明配置媒体库视图: | 设置名称 | 说明 ||----------------|----------------------------------------------------------------------|| 每页条目数 | 使用下拉菜单定义每页默认显示的资源数量。 || 默认排序顺序 | 使用下拉菜单定义资源显示的默认顺序。在媒体库中排序资源时可以覆盖此设置。 |
这两个设置在媒体库和内容管理器的媒体上传模态中都用作默认值。这些设置在整个 Strapi 项目中对所有用户都是全局的。
🌐 Both settings are used as the defaults in the Media Library and in the Content Manager's media upload modal. These settings are global across the entire Strapi project for all users.
基于代码的配置
🌐 Code-based configuration
媒体库由上传包在后端服务器中提供支持,可以通过提供程序进行配置和扩展。
🌐 The Media Library is powered in the backend server by the Upload package, which can be configured and extended through providers.
提供者
🌐 Providers
Strapi 维护的提供者如下。点击卡片将重定向到带有配置示例的文档页面:
🌐 The providers maintained by Strapi are the following. Clicking on a card will redirect you to a docs page with a configuration example:
如果你需要安装其他提供商或创建自己的提供商,请参考以下指南:
🌐 If you need to install other providers or create your own, please refer to the following guide:
本页面上的基于代码的配置说明详细列出了默认上传提供商的选项。如果使用其他提�供商,请参阅该提供商文档中可用的配置参数。
🌐 Code-based configuration instructions on the present page detail options for the default upload provider. If using another provider, please refer to the available configuration parameters in that provider's documentation.
可用选项
🌐 Available options
在使用默认上传提供程序时,可以在 config/plugins 文件中的 upload.config 对象中声明以下特定配置选项。所有参数都是可选的:
🌐 When using the default upload provider, the following specific configuration options can be declared in an upload.config object within the config/plugins file. All parameters are optional:
| 参数 | 描述 | 类型 | 默认值 || --- | --- | --- | --- || providerOptions.localServer | 将传递给用于构建上传服务器的 koa-static 的选项(参见 本地服务器配置) | 对象 | - || sizeLimit | 最大文件大小(以字节为单位)(参见 最大文件大小) | 整数 | 209715200
(200 MB,以字节为单位,即 200 x 1024 x 1024 字节) || breakpoints | 允许在启用“响应式友好上传”选项为 true 时覆盖生成响应式图片的断点大小(参见 响应式图片) | 对象 | { large: 1000, medium: 750, small: 500 } || security | 配置上传文�件的验证规则以增强媒体安全性 | 对象 | - |
上传请求超时是在服务器选项中定义的,而不是在上传插件选项中定义的,因为它并不是上传插件特有的,而是应用于整个 Strapi 服务器实例(参见 上传请求超时)。
🌐 The Upload request timeout is defined in the server options, not in the Upload plugin options, as it's not specific to the Upload plugin but is applied to the whole Strapi server instance (see upload request timeout).
如果你希望覆盖图片功能以生成自定义文件名,请参考 Plugins 扩展 文档。
🌐 If you wish to override the image function to generate custom file names, please refer to the Plugins extension documentation.
示例自定义配置
🌐 Example custom configuration
以下是使用默认上传提供程序时上传插件的自定义配置示例:
🌐 The following is an example of a custom configuration for the Upload plugin when using the default upload provider:
- JavaScript
- TypeScript
module.exports = ({ env })=>({
  upload: {
    config: {
      providerOptions: {
        localServer: {
          maxage: 300000
        },
      },
      sizeLimit: 250 * 1024 * 1024, // 256mb in bytes
      breakpoints: {
        xlarge: 1920,
        large: 1000,
        medium: 750,
        small: 500,
        xsmall: 64
      },
      security: {
        allowedTypes: ['image/*', 'application/*'],
        deniedTypes: ['application/x-sh', 'application/x-dosexec']
      },
    },
  },
});
export default () => ({
  upload: {
    config: {
      providerOptions: {
        localServer: {
          maxage: 300000
        },
      },
      sizeLimit: 250 * 1024 * 1024, // 256mb in bytes
      breakpoints: {
        xlarge: 1920,
        large: 1000,
        medium: 750,
        small: 500,
        xsmall: 64
      },
      security: {
        allowedTypes: ['image/*', 'application/*'],
        deniedTypes: ['application/x-sh', 'application/x-dosexec']
      },
    },
  },
})
本地服务器
🌐 Local server
默认情况下,Strapi 接受用于本地上传文件的 localServer 配置。这些将作为 koa-static 的选项传递��。
你可以通过创建或编辑 /config/plugins 文件 来提供它们。以下示例设置了 max-age 头:
🌐 You can provide them by creating or editing the /config/plugins file. The following example sets the max-age header:
- JavaScript
- TypeScript
module.exports = ({ env })=>({
  upload: {
    config: {
      providerOptions: {
        localServer: {
          maxage: 300000
        },
      },
    },
  },
});
export default ({ env }) => ({
  upload: {
    config: {
      providerOptions: {
        localServer: {
          maxage: 300000
        },
      },
    },
  },
});
最大文件大小
🌐 Max file size
负责解析请求的 Strapi 中间件需要配置以支持大于默认 200MB 的文件大小。这必须在为 sizeLimit 传递给 Upload 包的提供者选项之外进行配置。
🌐 The Strapi middleware in charge of parsing requests needs to be configured to support file sizes larger than the default of 200MB. This must be done in addition to provider options passed to the Upload package for sizeLimit.
你可能还需要调整任何上游代理、负载均衡器或防火墙以允许更大的文件大小。例如, Nginx 有一个名为 client_max_body_size 的配置设置必须进行调整,因为其默认值仅为 1MB。
上传包使用的中间件是 the body middleware。你可以通过在 /config/middlewares 文件中设置,直接向中间件传递配置:
🌐 The middleware used by the Upload package is the body middleware. You can pass configuration to the middleware directly by setting it in the /config/middlewares file:
- JavaScript
- TypeScript
module.exports = [
  // ...
  {
    name: "strapi::body",
    config: {
      formLimit: "256mb", // modify form body
      jsonLimit: "256mb", // modify JSON body
      textLimit: "256mb", // modify text body
      formidable: {
        maxFileSize: 250 * 1024 * 1024, // multipart data, modify here limit of uploaded file size
      },
    },
  },
  // ...
];
export default [
  // ...
  {
    name: "strapi::body",
    config: {
      formLimit: "256mb", // modify form body
      jsonLimit: "256mb", // modify JSON body
      textLimit: "256mb", // modify text body
      formidable: {
        maxFileSize: 250 * 1024 * 1024, // multipart data, modify here limit of uploaded file size
      },
    },
  },
  // ...
];
除了中间件配置之外,你还可以在 /config/plugins 文件 中传递 sizeLimit,它是以字节为单位的整数:
🌐 In addition to the middleware configuration, you can pass the sizeLimit, which is an integer in bytes, in the /config/plugins file:
- JavaScript
- TypeScript
module.exports = {
  // ...
  upload: {
    config: {
      sizeLimit: 250 * 1024 * 1024 // 256mb in bytes
    }
  }
};
export default {
  // ...
  upload: {
    config: {
      sizeLimit: 250 * 1024 * 1024 // 256mb in bytes
    }
  }
};
安全 NewThis content is new.
🌐 Security NewThis content is new.
上传插件根据文件的实际 MIME 类型而不是声明的文件扩展名来验证文件。只有符合定义的安全规则的文件才会被上传。
🌐 The Upload plugin validates files based on their actual MIME type rather than the declared file extension. Only files matching the defined security rules are uploaded.
security 配置提供了两个选项:allowedTypes 或 deniedTypes,它们让你可以控制哪些文件类型可以或不能被上传。
🌐 The security configuration provides 2 options: allowedTypes or deniedTypes, which let you control which file types can or cannot be uploaded.
你可以单独使用 allowedTypes 和 deniedTypes,也可以一起使用,以微调接受哪些文件。文件必须符合允许的类型,并且不得符合任何拒绝的类型。如果你在 allowedTypes 中使用例如 * 的通配符,你可以通过在 deniedTypes 中指定例外来缩小验证范围。
🌐 You can use allowedTypes and deniedTypes separately or together to fine-tune which files are accepted. Files must match an allowed type and must not match any denied type. If you use a wildcard like * in allowedTypes, you can narrow down the validation by specifying exceptions in deniedTypes.
你可以通过创建或编辑 /config/plugins 文件 来提供它��们。以下是如何结合 allowedTypes 和 deniedTypes 的示例:
🌐 You can provide them by creating or editing the /config/plugins file. The following is an example of how to combine allowedTypes and deniedTypes:
- JavaScript
- TypeScript
module.exports = {
  // ...
  upload: {
    config: {
      security: {
        allowedTypes: ['image/*', 'application/*'],
        deniedTypes: ['application/x-sh', 'application/x-dosexec']
      },
    }
  }
};
export default {
  // ...
  upload: {
    config: {
      security: {
        allowedTypes: ['image/*', 'application/*'],
        deniedTypes: ['application/x-sh', 'application/x-dosexec']
      },
    }
  }
};
上传请求超时
🌐 Upload request timeout
默认情况下,strapi.server.httpServer.requestTimeout 的值设置为 330 秒。这包括上传。
🌐 By default, the value of strapi.server.httpServer.requestTimeout is set to 330 seconds. This includes uploads.
为了让网络连接缓慢的用户能够上传大文件,可能需要增加此超时限制。推荐的做法是通过在 config/servers 文件中设置 http.serverOptions.requestTimeout 参数来实现。
🌐 To make it possible for users with slow internet connection to upload large files, it might be required to increase this timeout limit. The recommended way to do it is by setting the http.serverOptions.requestTimeout parameter in the config/servers file.
另一种方法是在 Strapi 启动之前运行的 bootstrap 函数 中设置 requestTimeout 值。这在需要以程序方式更改它的情况下非常有用——例如,暂时禁用��然后重新启用它:
🌐 An alternate method is to set the requestTimeout value in the bootstrap function that runs before Strapi gets started. This is useful in cases where it needs to change programmatically—for example, to temporarily disable and re-enable it:
- JavaScript
- TypeScript
module.exports = {

  //...

  bootstrap({ strapi }) {
    // Set the requestTimeout to 1,800,000 milliseconds (30 minutes):
    strapi.server.httpServer.requestTimeout = 30 * 60 * 1000;
  },
};
export default {

  //...

  bootstrap({ strapi }) {
    // Set the requestTimeout to 1,800,000 milliseconds (30 minutes):
    strapi.server.httpServer.requestTimeout = 30 * 60 * 1000;
  },
};
响应式图片
🌐 Responsive Images
当启用 Responsive friendly upload 管理面板设置 时,插件将生成以下响应式图片尺寸:
🌐 When the Responsive friendly upload admin panel setting is enabled, the plugin will generate the following responsive image sizes:
| 名称 | 最大尺寸 || :------ | :--------- || 大型 | 1000px || 中型 | 750px || 小型 | 500px |
这些尺寸可以在 /config/plugins 中被覆盖:
🌐 These sizes can be overridden in /config/plugins:
- JavaScript
- TypeScript
module.exports = ({ env }) => ({
  upload: {
    config: {
      breakpoints: {
        xlarge: 1920,
        large: 1000,
        medium: 750,
        small: 500,
        xsmall: 64
      },
    },
  },
});
export default ({ env }) => ({
  upload: {
    config: {
      breakpoints: {
        xlarge: 1920,
        large: 1000,
        medium: 750,
        small: 500,
        xsmall: 64
      },
    },
  },
});
断点更改仅适用于新图片,现有图片不会调整大小或生成新尺寸。
🌐 Breakpoint changes will only apply to new images, existing images will not be resized or have new sizes generated.
使用
🌐 Usage
使用此功能的路径: 媒体库
Strapi 支持从管理面板或通过编程上传图片。在 API 中,你可以发送一个 multipart/form-data 请求到 /api/upload,并附上图片文件以及可选的 fileInfo 元数据用于标题和替代文本(更多信息请参见 REST API 文档)。
🌐 Strapi supports uploading images from the admin panel or programmatically. From the API, you can send a multipart/form-data request to /api/upload with the image file and optional fileInfo metadata for captions and alt text (see REST API documentation for more information).
媒体库显示应用中上传的所有资源,无论是通过 媒体库本身,还是在管理媒体字段时通过 内容管理器。
上传到媒体库的资源可以使用 内容管理器 插入到内容类型中。
🌐 Assets uploaded to the Media Library can be inserted into content-types using the Content Manager.
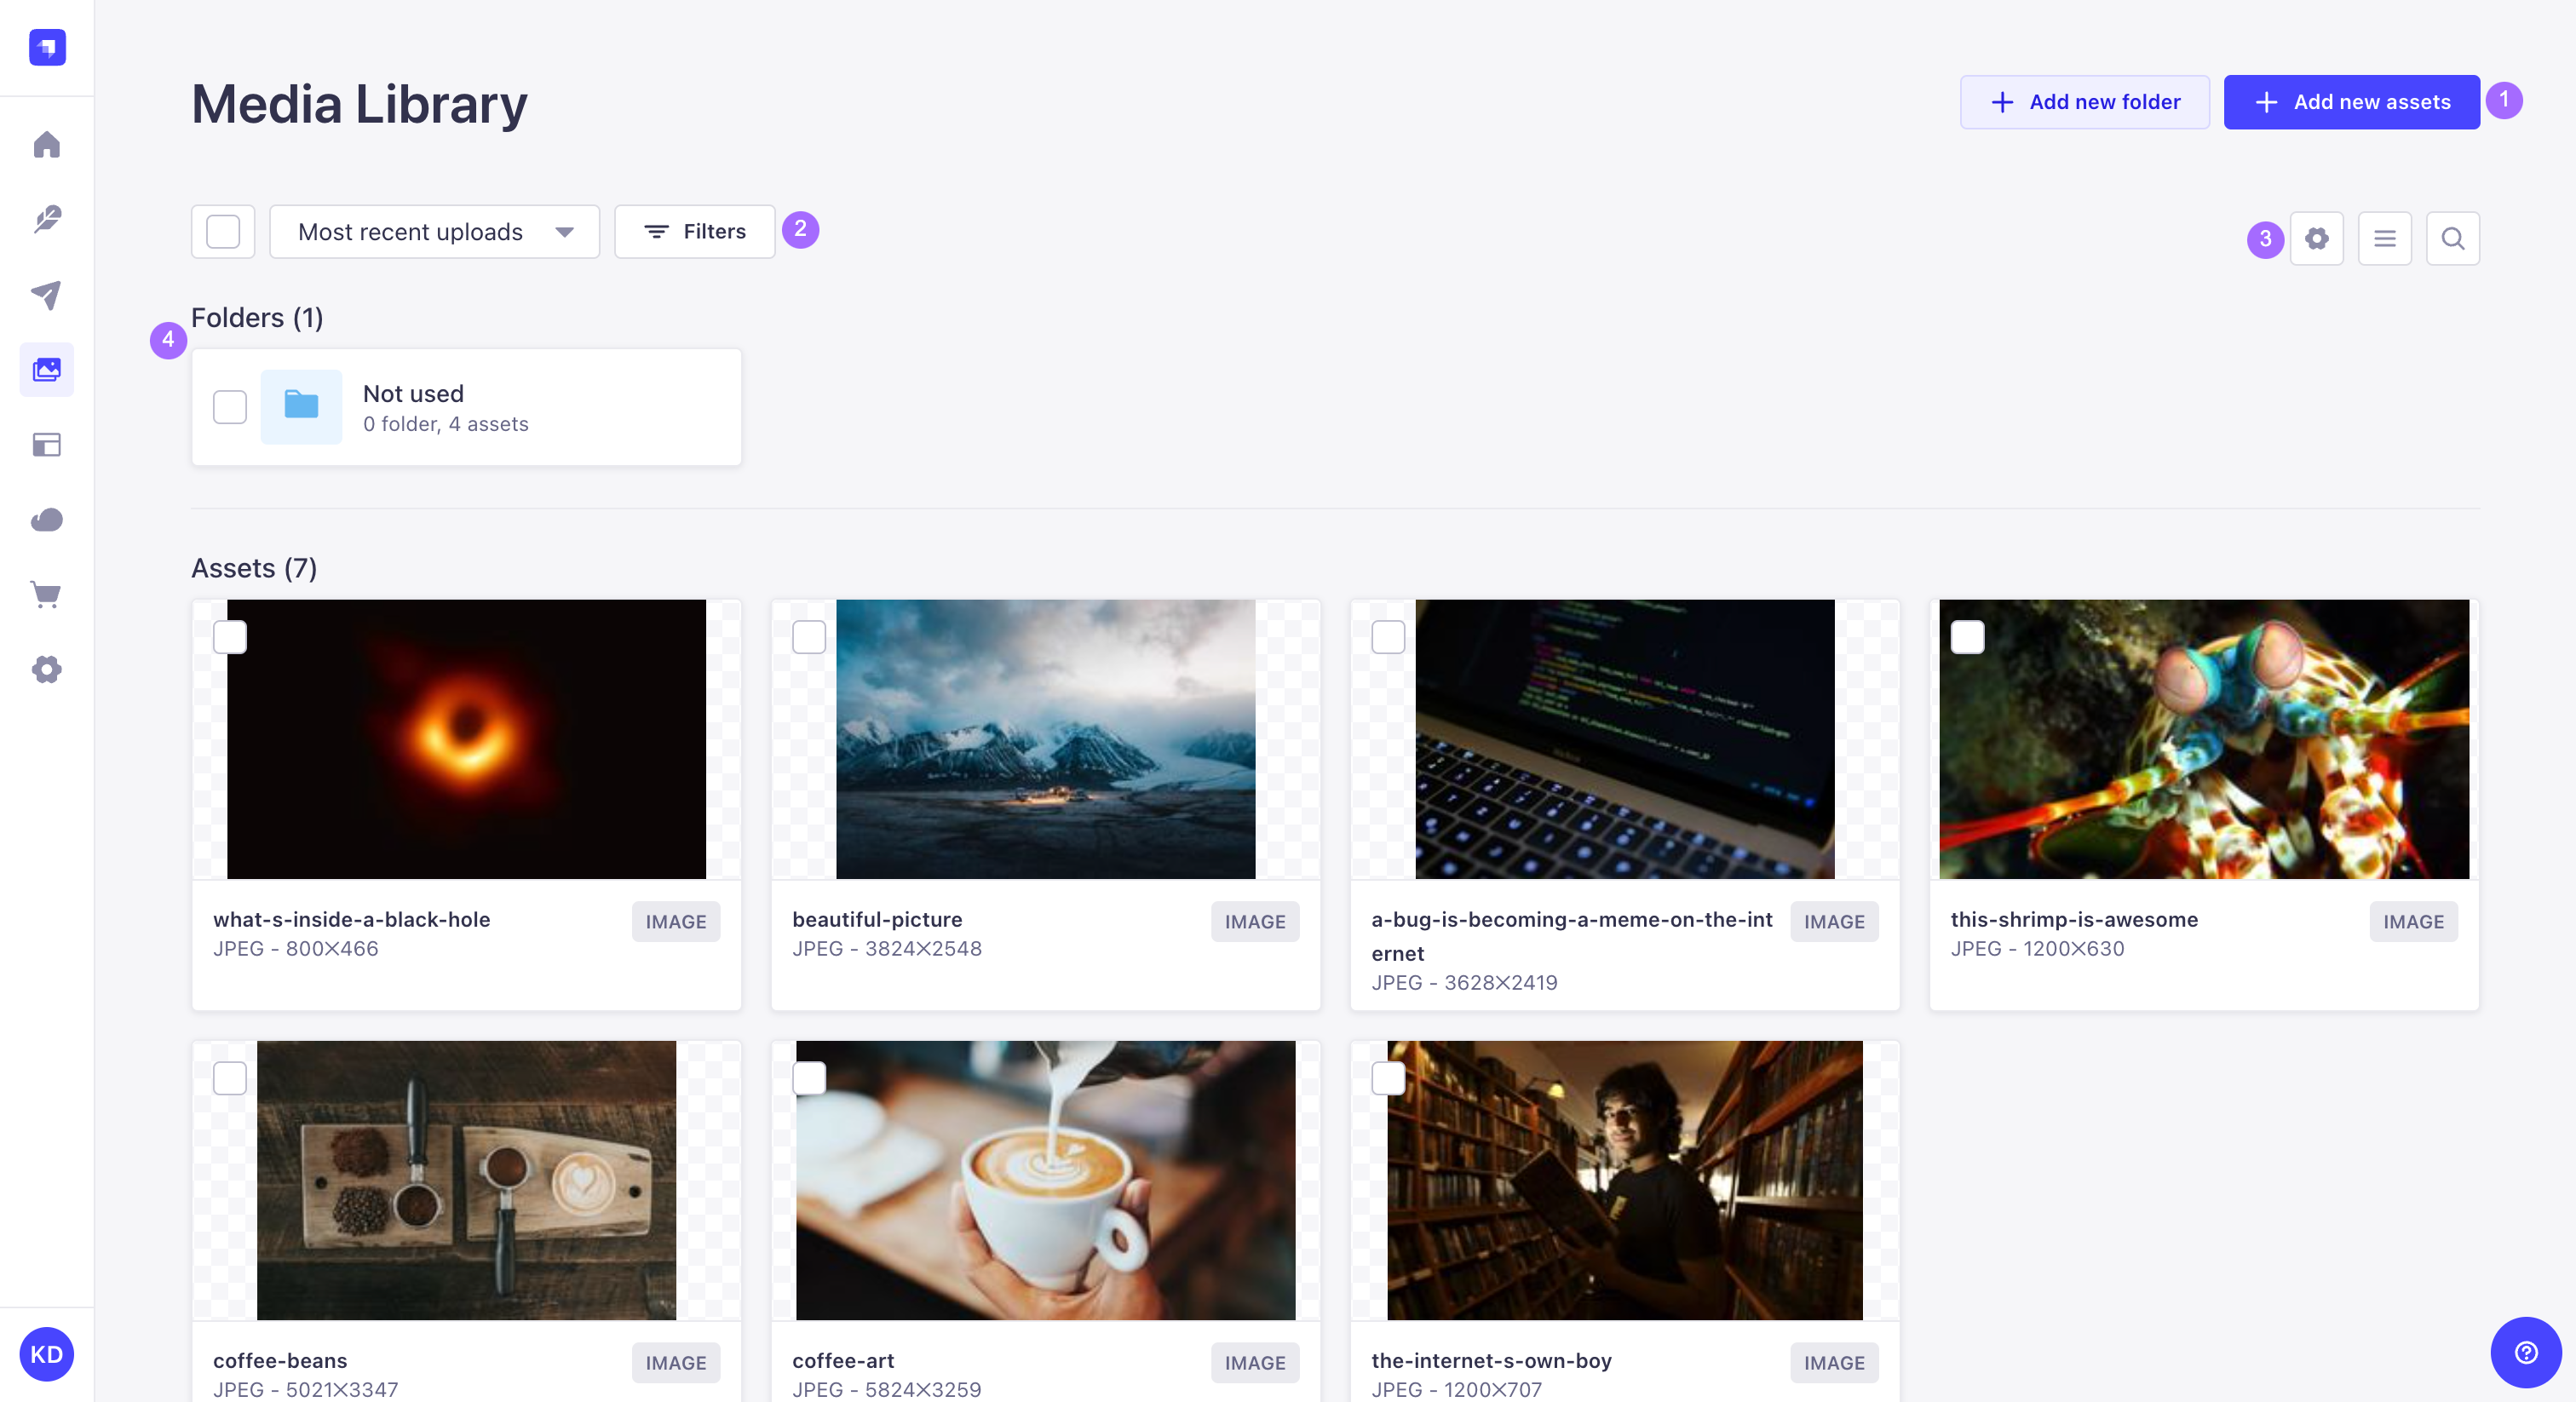
从媒体库中,可以:
🌐 From the Media Library, it is possible to:
- 上传一个新资源(参见 添加资源)或创建一个新文件夹(参见 使用文件夹组织资源) 1,
- 排序资源和文件夹或设置过滤器 2 以更容易地找到资源和文件夹,
- 在列表视图 和网格视图 之间切换以显示资源,访问设置 以配置视图,并进行文本搜索 3 以查找特定资源或文件夹,
- 并查看、浏览和管理文件夹 4。
点击用户界面右侧的搜索图标 ,使用文本搜索,更快速地找到你的资源或文件夹!
添加资源
🌐 Adding assets
Details
媒体库支持的媒体类型和扩展名列表
| 媒体类型 | 支持的扩展名 || --- | --- || 图片 | - JPEG- PNG
- GIF
- SVG
- TIFF
- ICO
- DVU || 视频 | - MPEG
- MP4
- MOV(Quicktime)
- WMV
- AVI
- FLV || 音频 | - MP3
- WAV
- OGG || 文件 | - CSV
- ZIP
- XLS, XLSX
- JSON |
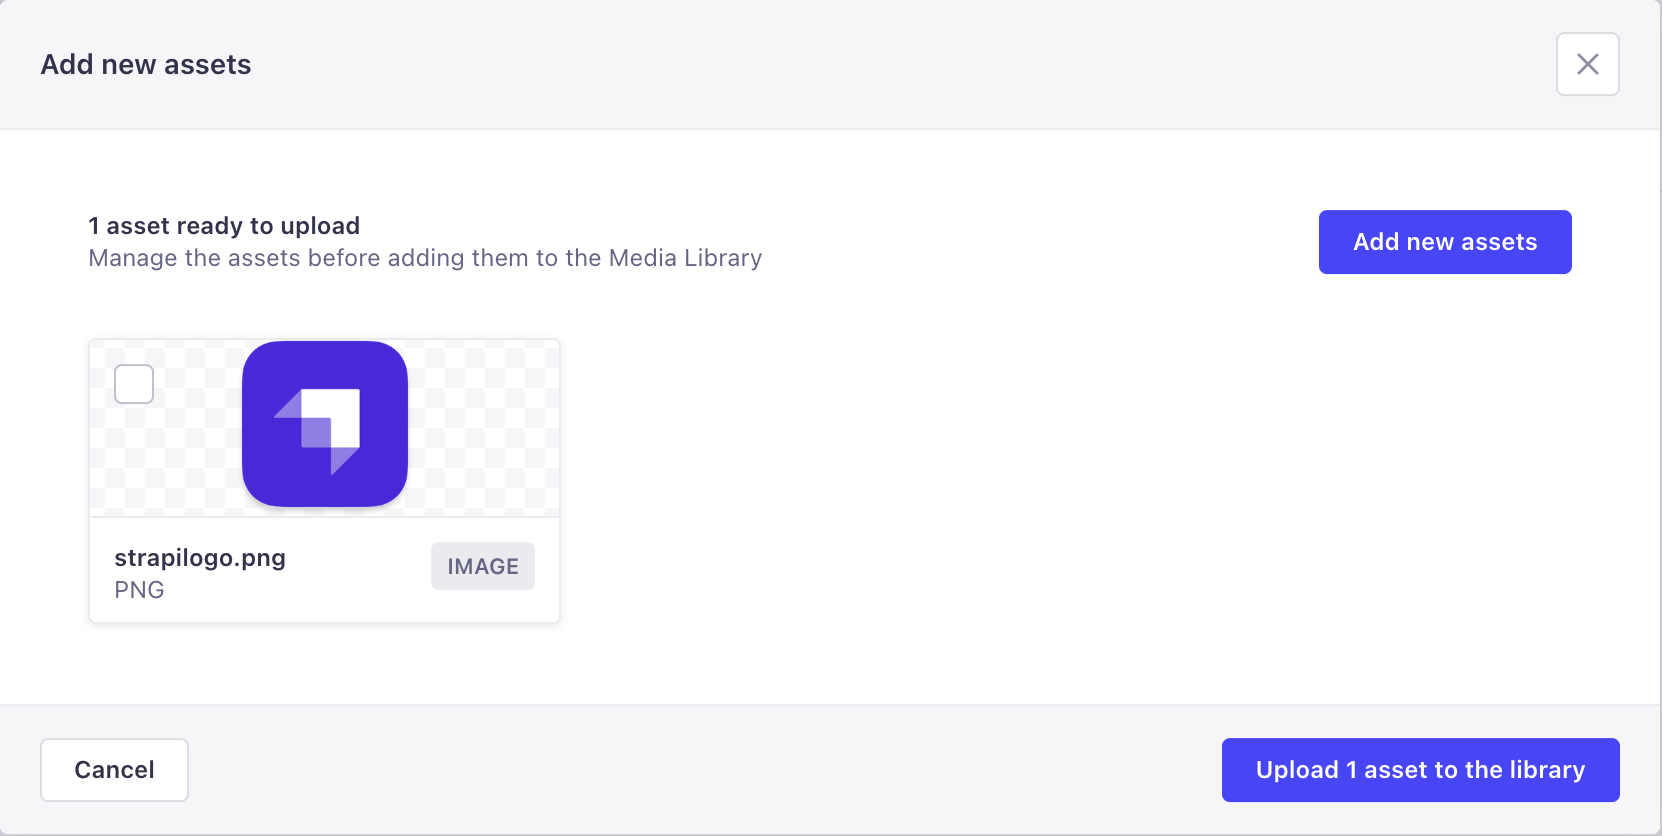
- 点击媒体库右上角的添加新资源按钮。
- 选择是要从计算机还是从 URL 上传新资源:
- 从计算机上,直接拖放资源或浏览系统上的文件,
- 从 URL,在 URL 字段中输入或粘贴一个或多个 URL,确保多个 URL 用回车分隔,然后点击 下一步。
- (可选) 点击编辑按钮 以查看资源元数据,并为资��源定义_文件名_、替代文本_和_标题(参见管理单个资源)。
- (可选) 通过点击 添加新资源 并返回第 2 步来添加更多资源。
- 点击上传资源到库。
使用 Strapi AI 自动生成元数据
🌐 Automatically generating metadata with Strapi AI
GrowthThis feature is available with a Growth plan.启用时,Strapi AI 会自动为上传到媒体库的图片生成替代文本和标题,帮助你提高内容的可访问性和 SEO。一个模态窗口会显示 AI 生成的替代文本和标题,允许你查看元数据并在需要时进行修改:
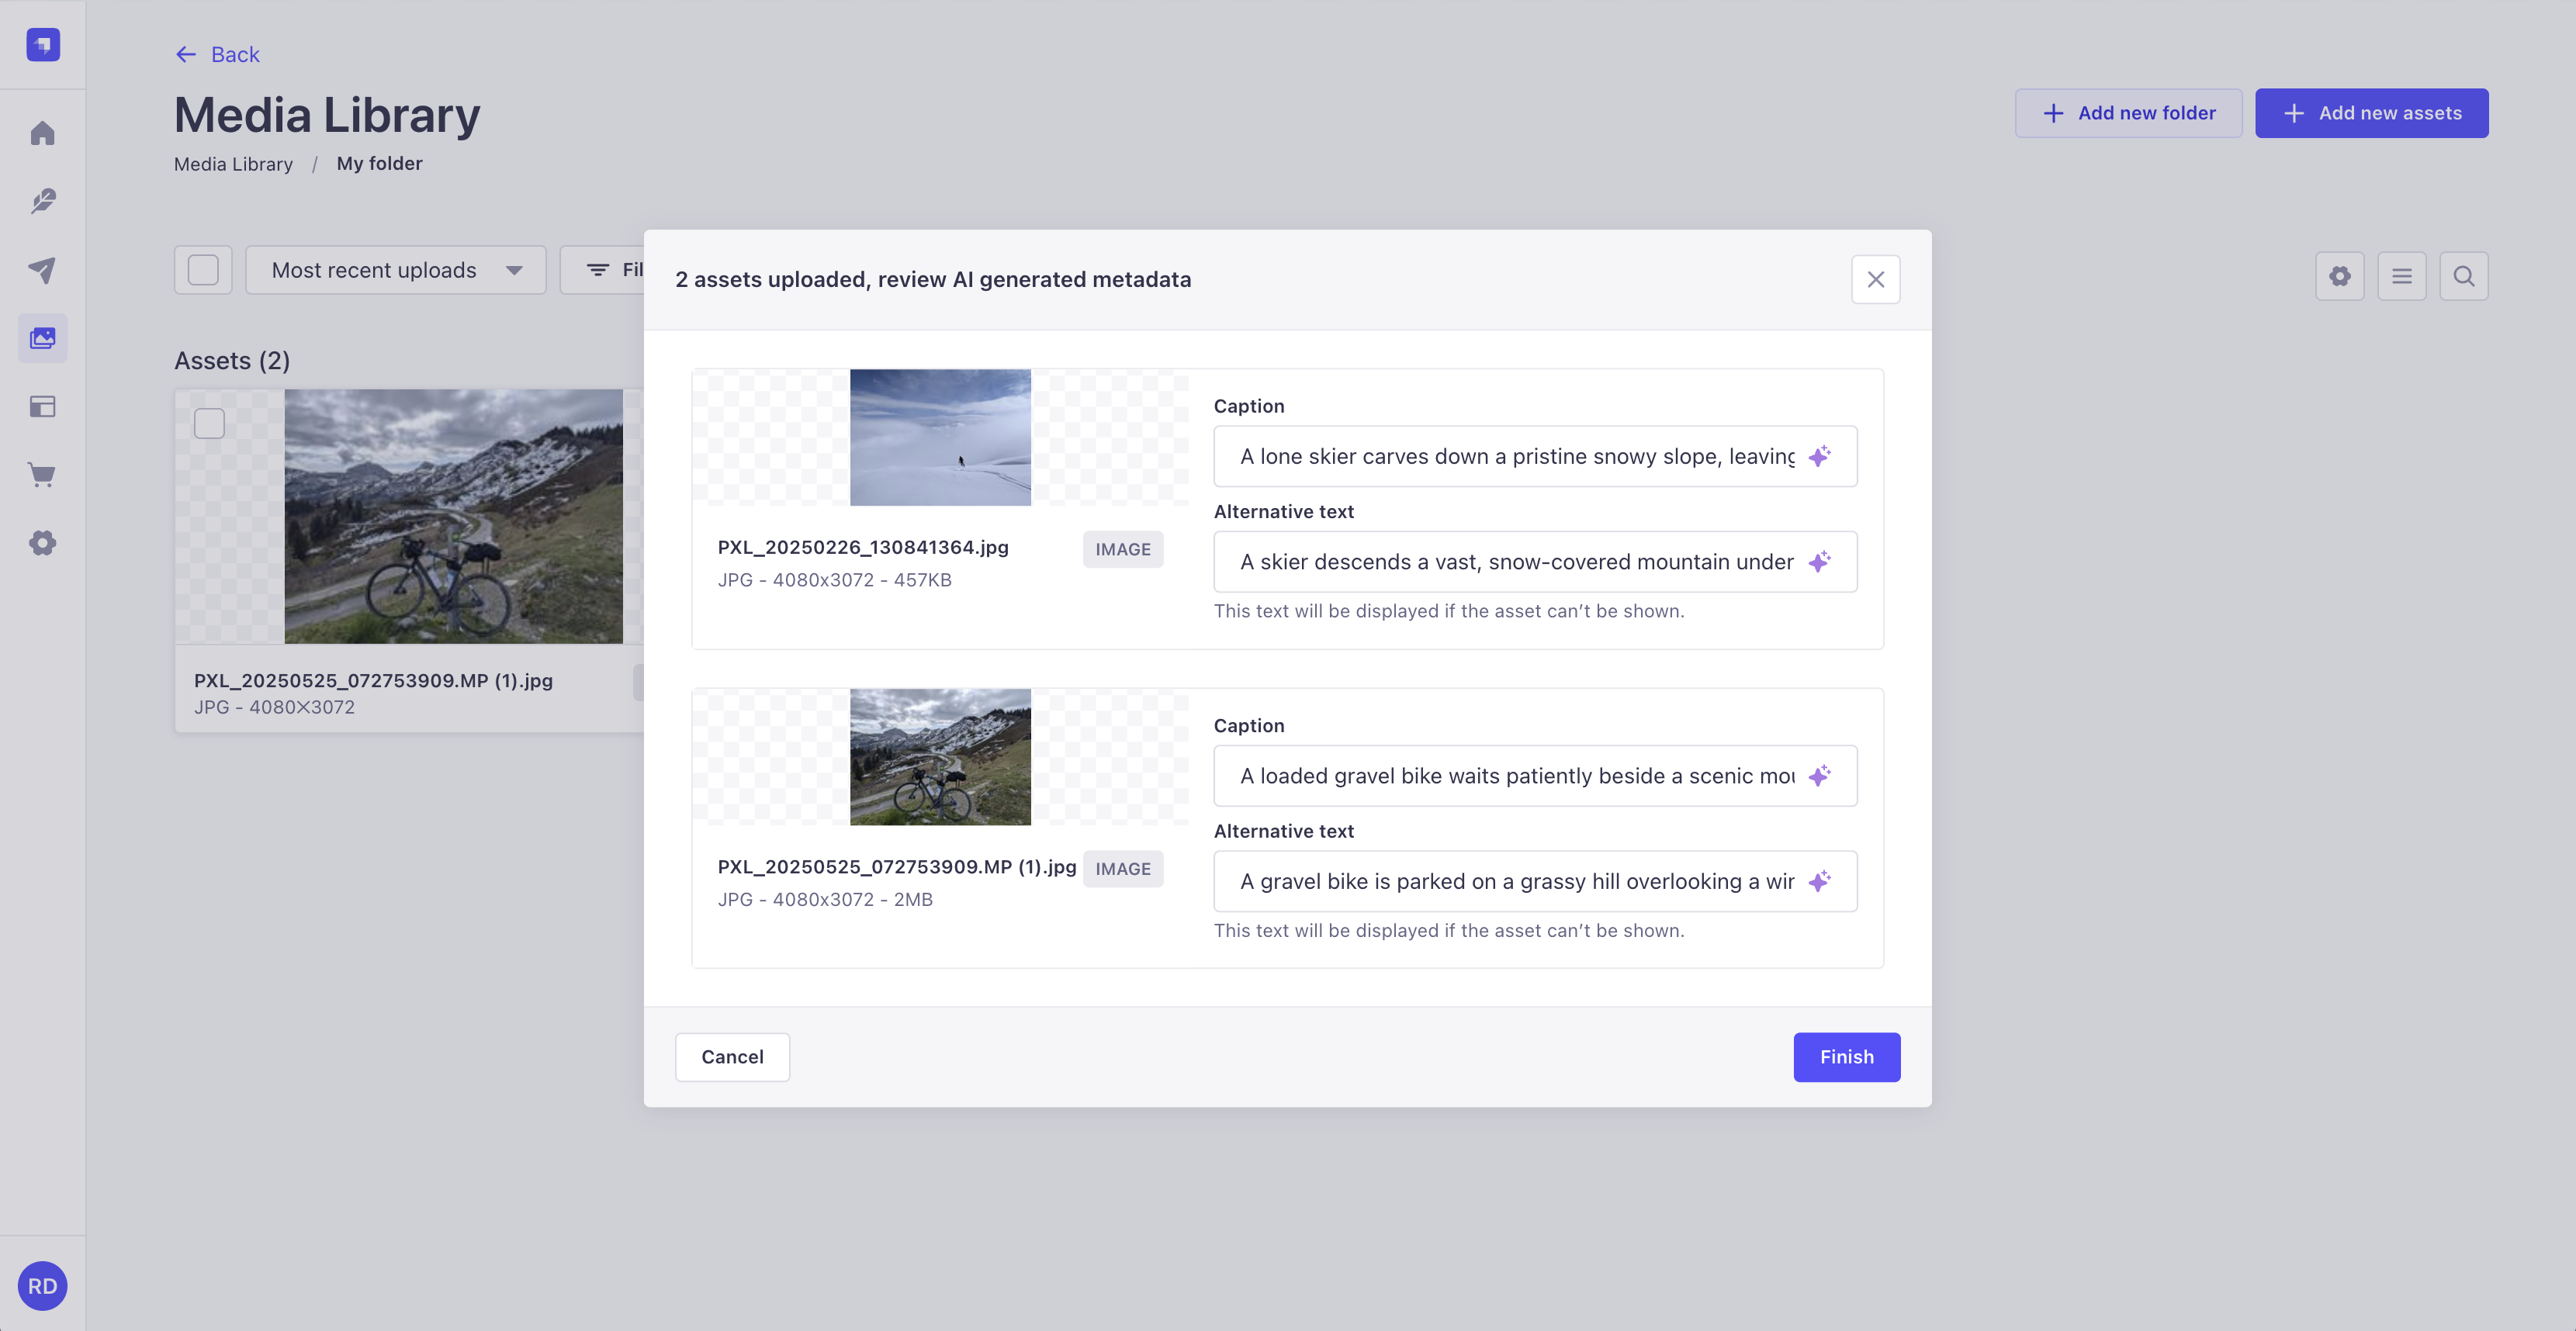
人工智能元数据生成仅适用于图片,而不适用于文件或视频。该功能默认启用,但如果需要,可以��在媒体库设置中禁用。
🌐 AI metadata generation only works with images, not files or videos. The feature is enabled by default, but can be disabled in the Media Library settings if needed.
媒体库设置 还允许为缺少替代文本或标题的现有图片生成元数据。此功能目前处于 Beta阶段。
Strapi AI 在 Growth 计划中每月包含 1,000 个积分,并且在免费试用期间提供 10 个免费积分。轻量级操作使用较少积分,而更复杂的操作使用更多积分。
你可以在管理面板的 Settings Overview 中查看你的信用使用情况。当你的使用量达到月度配额的80%、90%和100%时,将会发送通知。
当你的 Growth 套餐积分用完后,你可以继续使用 Strapi AI,超出部分将按月计费。
有关 Strapi AI 的更多信息,请参阅专门的支持文章。
🌐 For more information about Strapi AI, please refer to the dedicated support article.
管理个人资源
🌐 Managing individual assets
媒体库允许管理资源,包括修改资源的文件详细信息和位置、下载和复制资源文件的链接以及删除资源。图片文件还可以进行裁剪。
🌐 The Media Library allows managing assets, which includes modifying assets' file details and location, downloading and copying the link of the assets file, and deleting assets. Image files can also be cropped.
编辑资源
🌐 Editing assets
点击某个资源的编辑 按钮以打开“详细信息”窗口,在那里可以使用所有可用的资源管理选项。
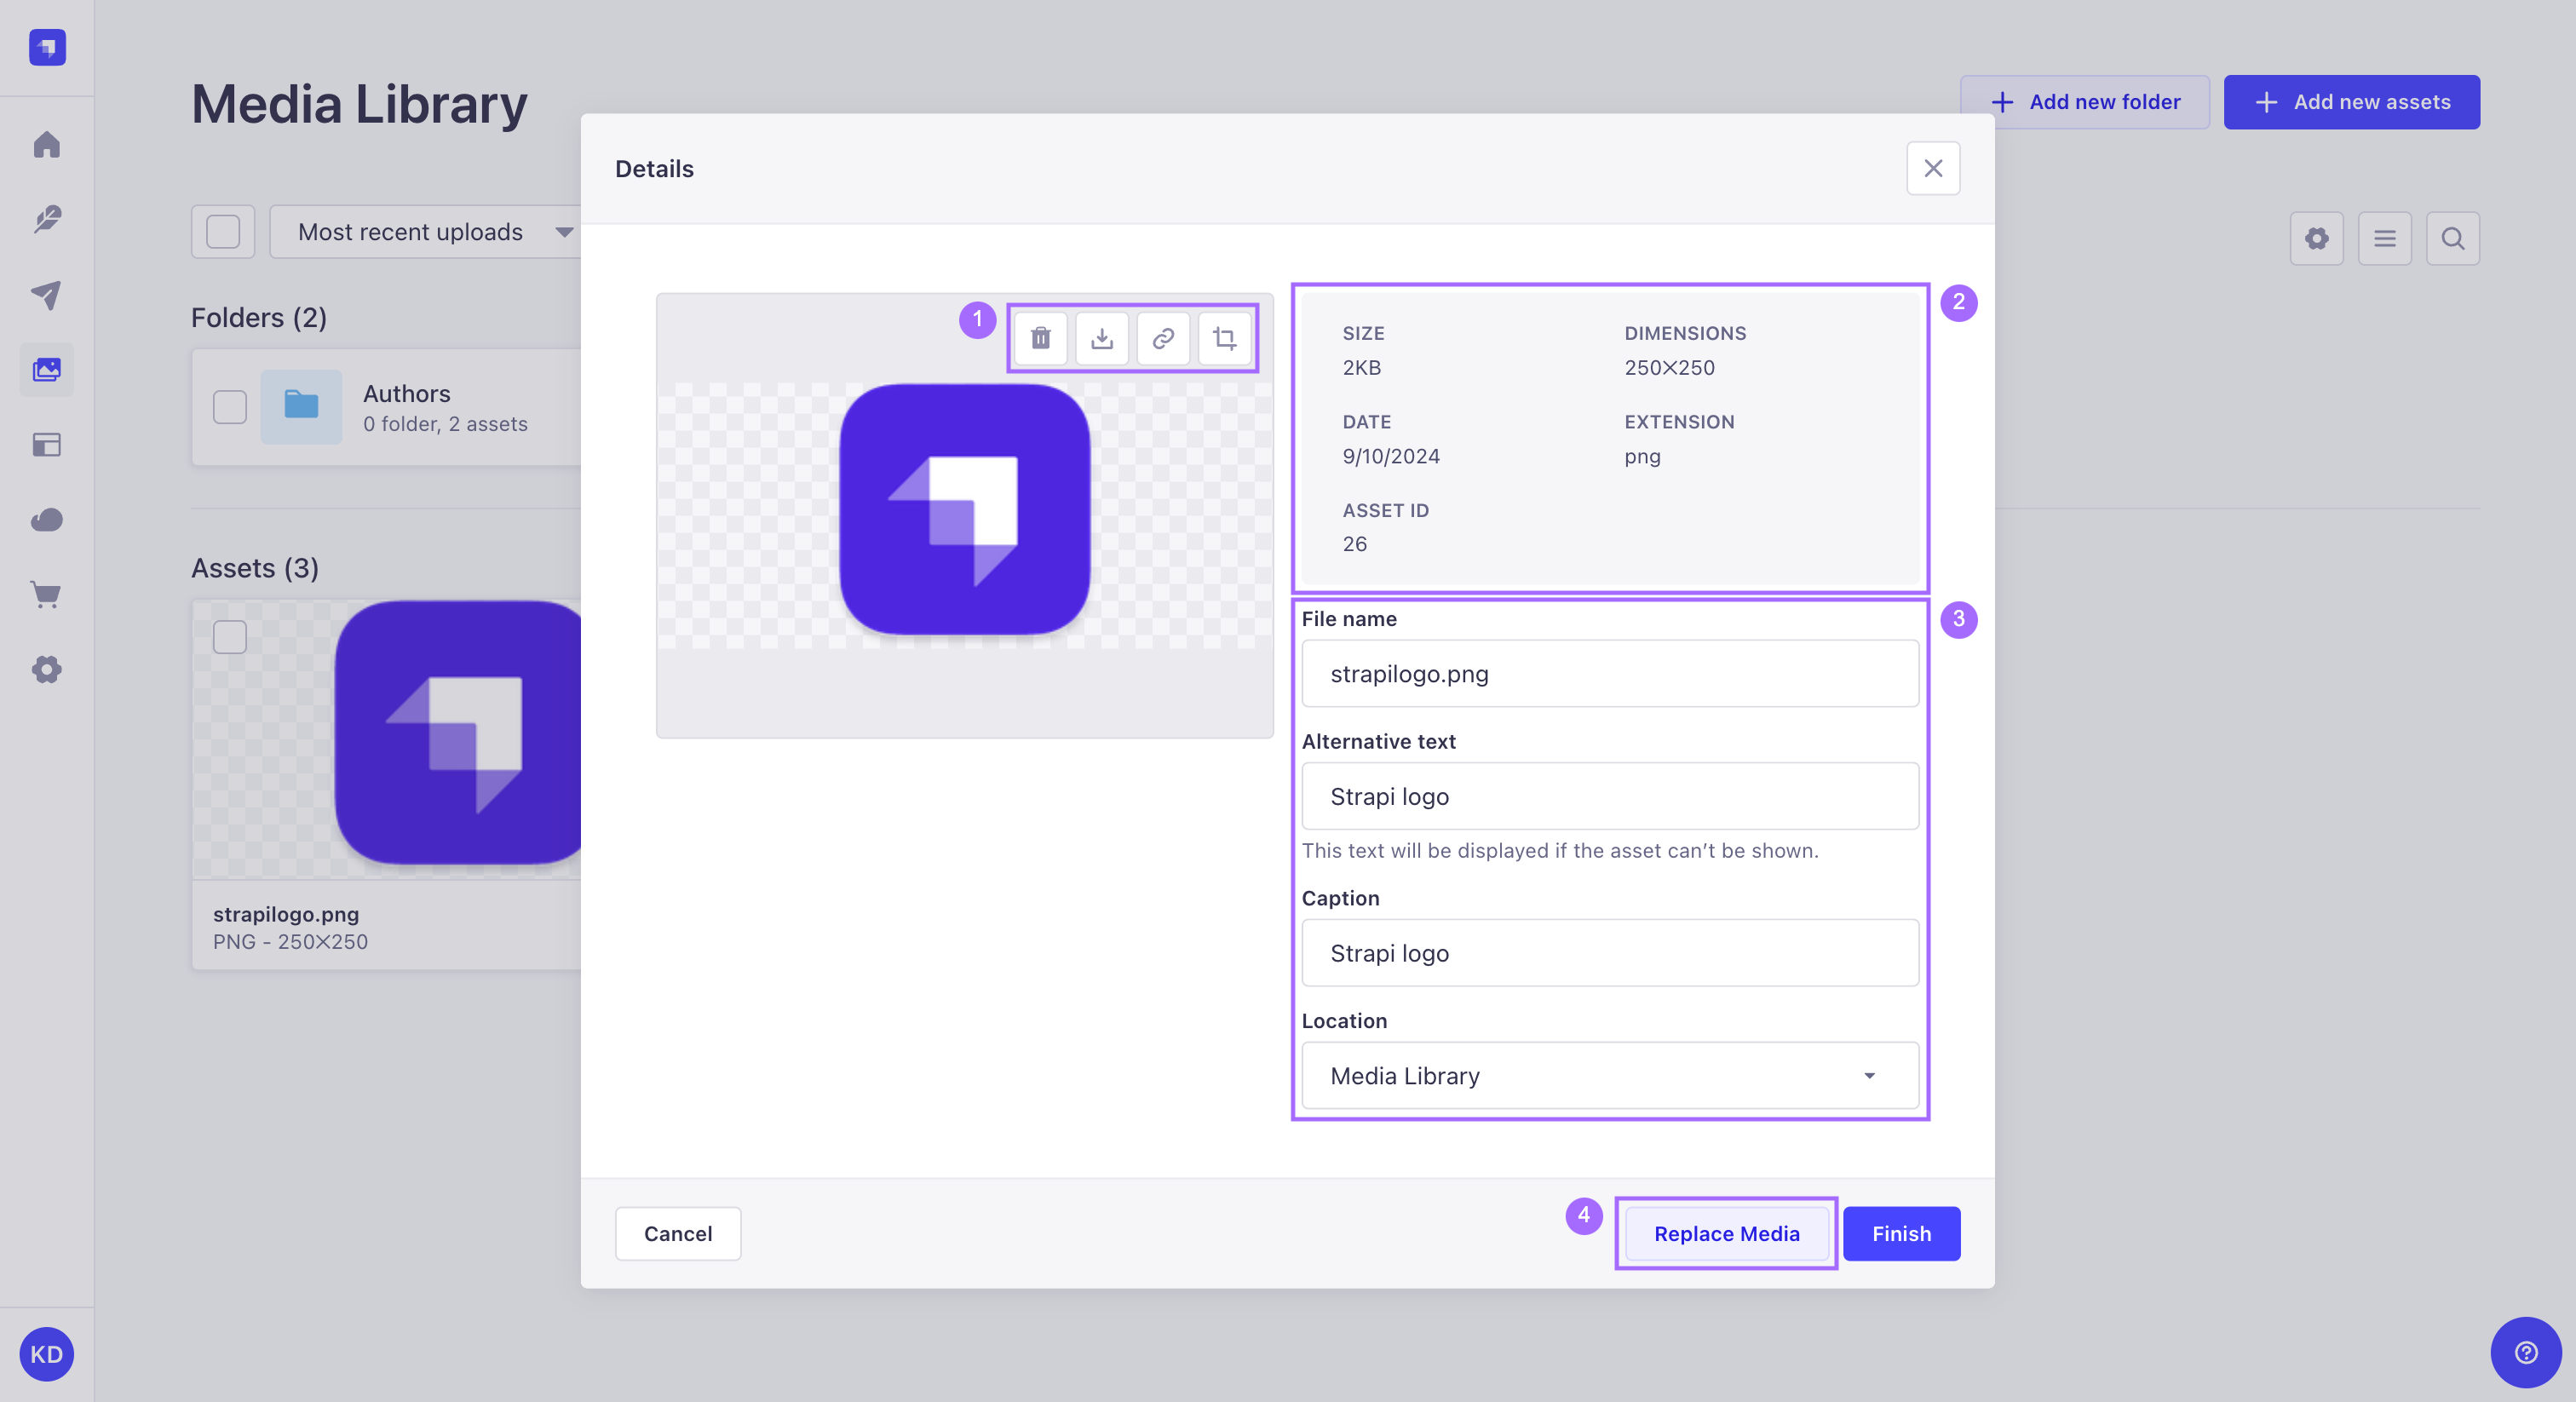
- 在左边,资源预览的上方,控制按钮 1 允许执行各种操作:
- 在右侧,资源的元数据显示在窗口顶部 2 ,下方的字段可用于更新资源的_文件名_、替代文本、说明_和_位置(请参见使用文件夹组织资源) 3。
- 在底部,替换媒体按钮 4 可以用来替换资源文件,但保留其他可编辑字段的现��有内容,而完成按钮用于确认对字段的任何更新。
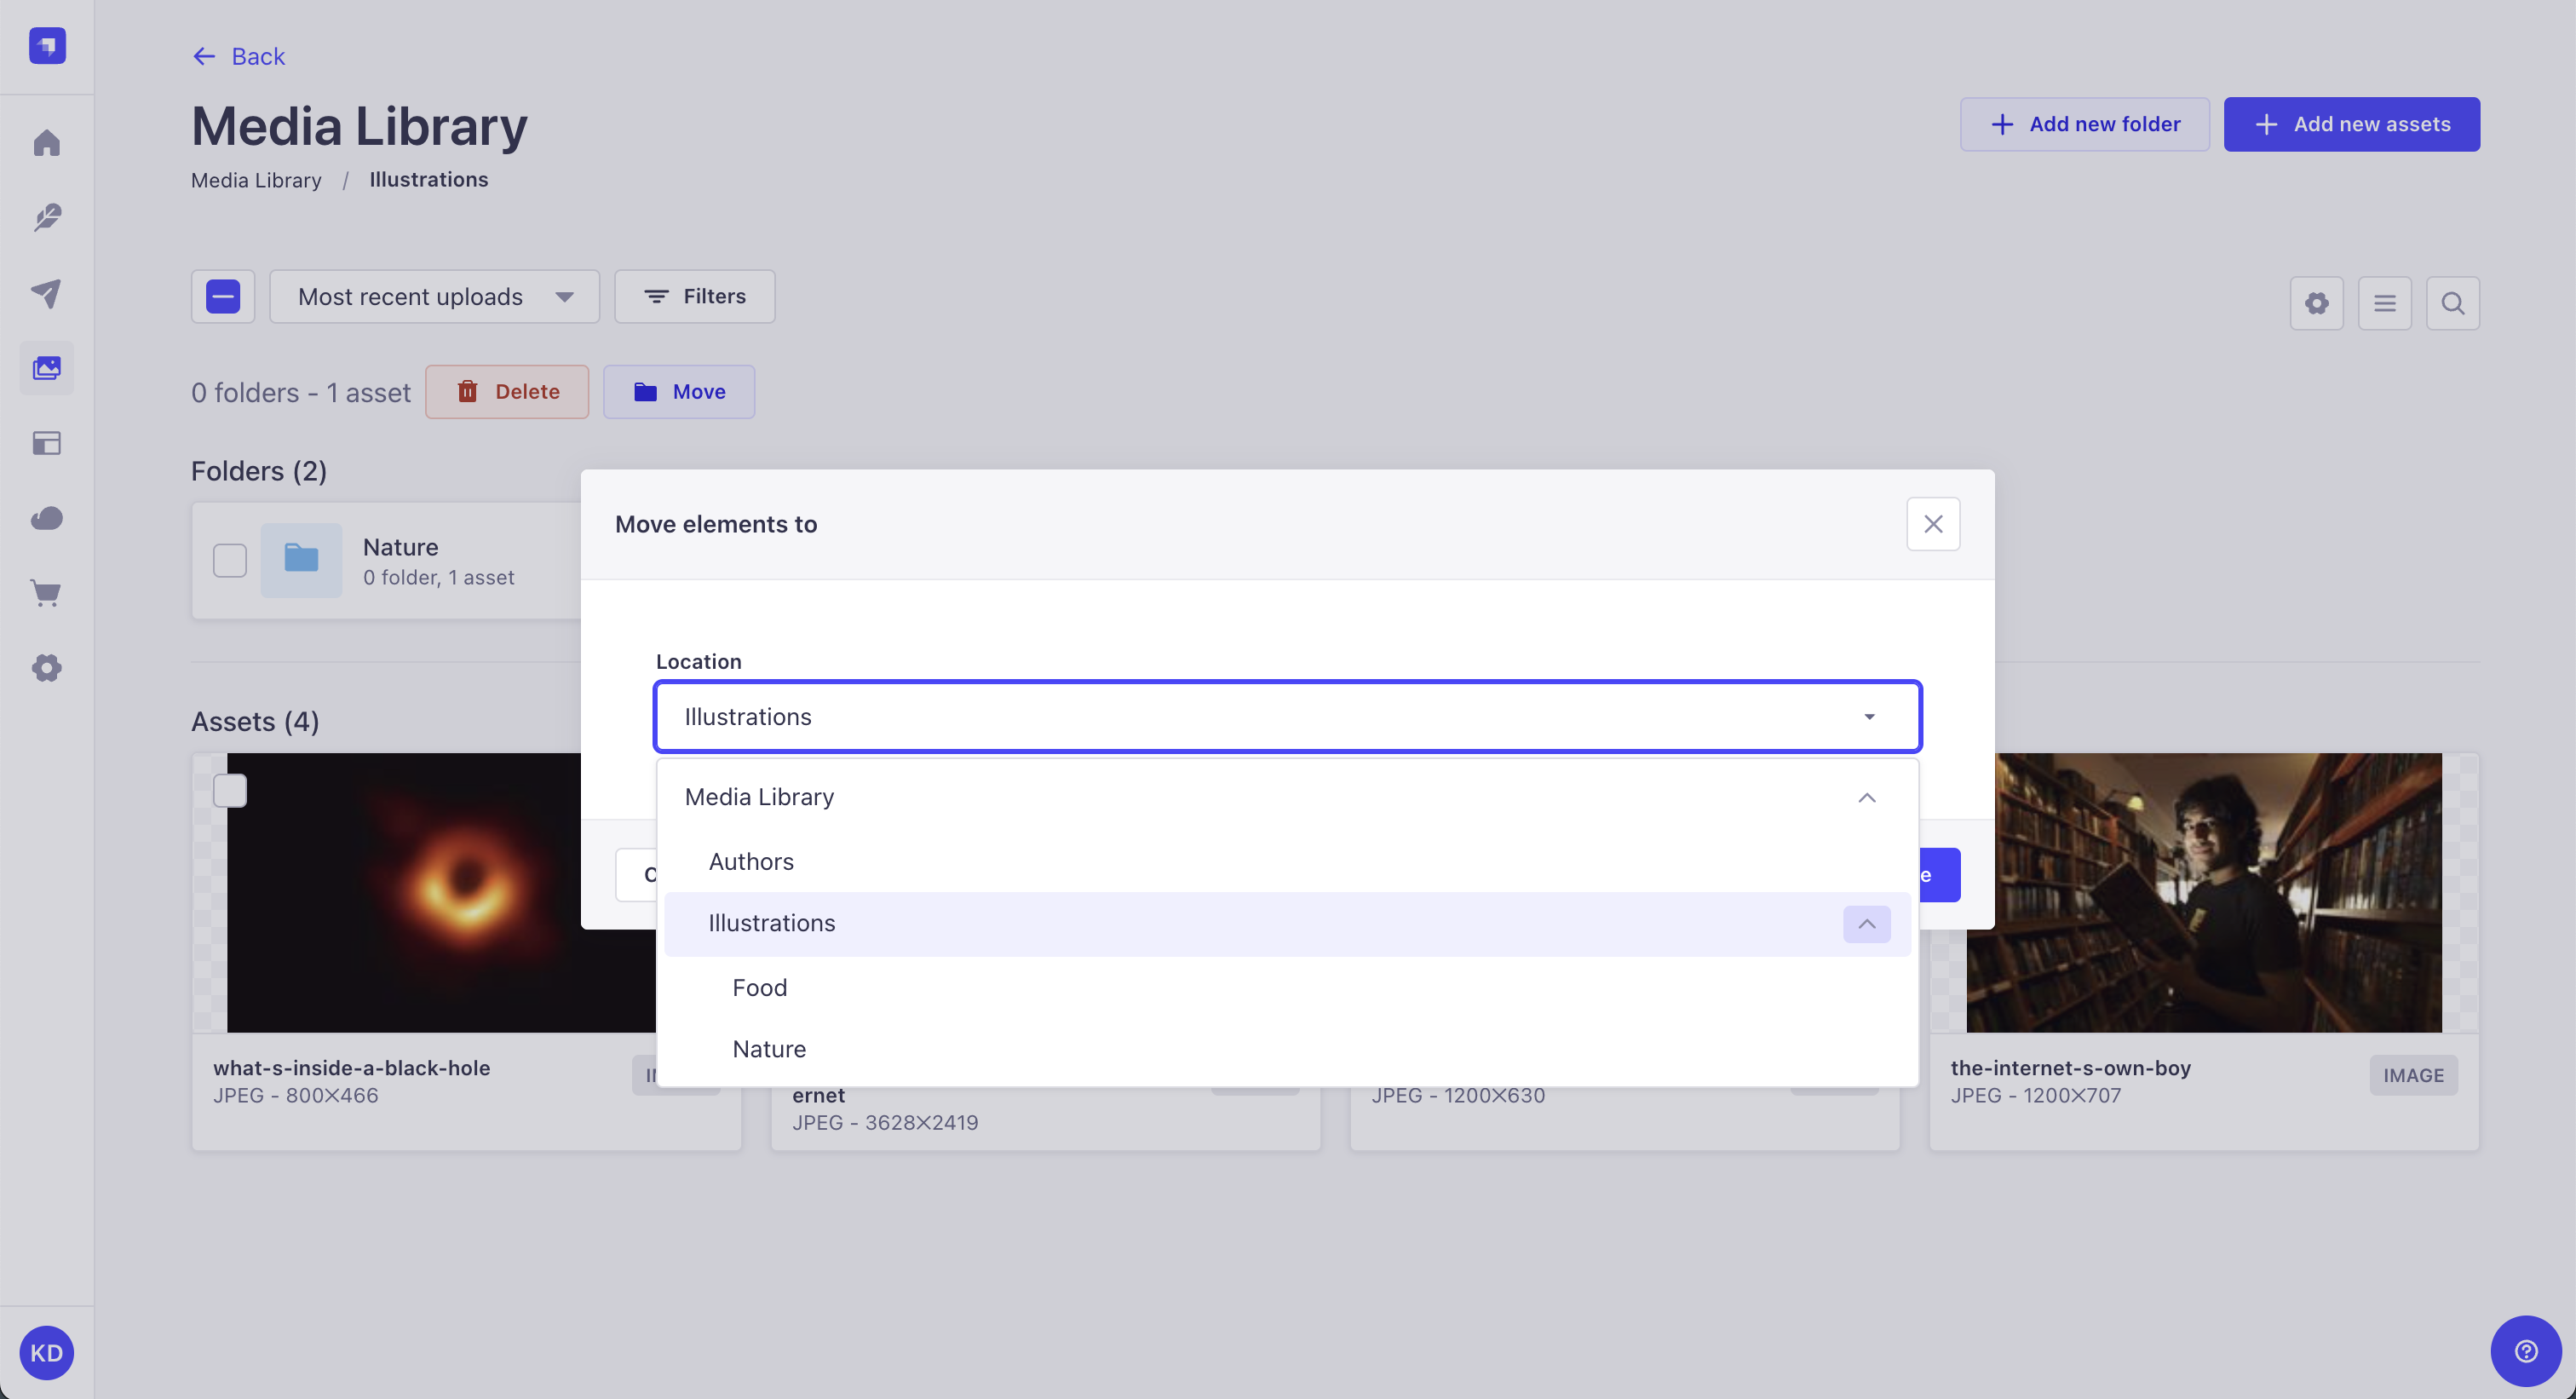
移动资源
🌐 Moving assets
- 点击要移动的资源的编辑 按钮。
- 在弹出的窗口中,点击 位置 字段,并从下拉列表中选择一个不同的文件夹。
- 点击 保存 以确认。
资源也可以从媒体库的主视图移动到其他文件夹(参见使用文件夹组织资源)。这包括同时移动多个资源的功能。
🌐 Assets can also be moved to other folders from the main view of the Media Library (see Organizing assets with folders). This includes the ability to move several assets simultaneously.
裁剪图片
🌐 Cropping images
- 点击要裁剪的资源的编辑 按钮。
- 在弹出的窗口中,点击裁剪按钮 进入裁剪模式。
- 使用角上的控制点裁剪图片以调整框架大小。框架也可以通过拖放来移动。
- 点击裁剪 按钮以验证新的尺寸,并选择 裁剪原始资源 或 复制并裁剪资源(即在保持原始资源不变的情况下创建一个具有新尺寸的副本)。或者,点击停止裁剪 按钮以取消并退出裁剪模式。
- 点击 完成 保存对文件的更改。
添加一个焦点
🌐 Adding a focal point
焦点确保在图片被裁剪或在不同环境中调整大小时,图片中最重要的部分仍然可见。
🌐 A focal point ensures the most important part of an image remains visible when the image is cropped or resized in different contexts.
为图片添加一个焦点:
🌐 To add a focal point to an image:
- 点击编辑 按钮。
- 在弹出的窗口中,点击固定 按钮进入焦点模式。
- 将十字准线移动到所需位置,然后点击以设置焦点。
- 点击检查 按钮以验证新的焦点。或者,点击取消 按钮以放弃更改并退出焦点模式。
- 点击重置 按钮将焦点重置到图片的中心。
- 点击 完成 保存对文件的更改。
删除资源
🌐 Deleting assets
- 点击要删除的资源的编辑 按钮。
- 在弹出的窗口中,点击资源预览上方控制按钮栏中的删除按钮 。
- 点击 确认。
资源也可以在媒体库的主视图中单独或批量删除。通过点击左上角的复选框选择资源,然后点击窗口顶部、筛选和排序选项下方的删除图标 。
使用文件夹整理资源
🌐 Organizing assets with folders
媒体库中的文件夹可以帮助你组织上传的资源。文件夹位于媒体库视图的顶部,或者在使用内容管理器时,可以从媒体字段弹出窗口访问。
🌐 Folders in the Media Library help you organize uploaded assets. Folders sit at the top of the Media Library view or are accessible from the Media field popup when using the Content Manager.
在媒体库中,可以查看文件夹列表并浏览文件夹内容、创建新文件夹、编辑现有文件夹、将资源移动到文件夹以及删除文件夹。
🌐 From the Media Library, it is possible to view the list of folders and browse a folder's content, create new folders, edit an existing folder, move assets to a folder, and delete a folder.
文件夹遵循资源的权限系统(参见 用户与权限功能)。目前还无法为文件夹定义特定权限。
🌐 Folders follow the permission system of assets (see Users & Permissions feature). It is not yet possible to define specific permissions for a folder.
默认情况下,媒体库显示在根目录创建的文件夹和资源。点击一个文件夹可进入该文件夹,并显示以下元素:
🌐 By default, the Media Library displays folders and assets created at the root level. Clicking a folder navigates to this folder, and displays the following elements:
- 文件夹标题和面包屑用于导航到上级文件夹 1
- 子文件夹 2 当前文件夹包含
- 此文件夹中的所有资源 3
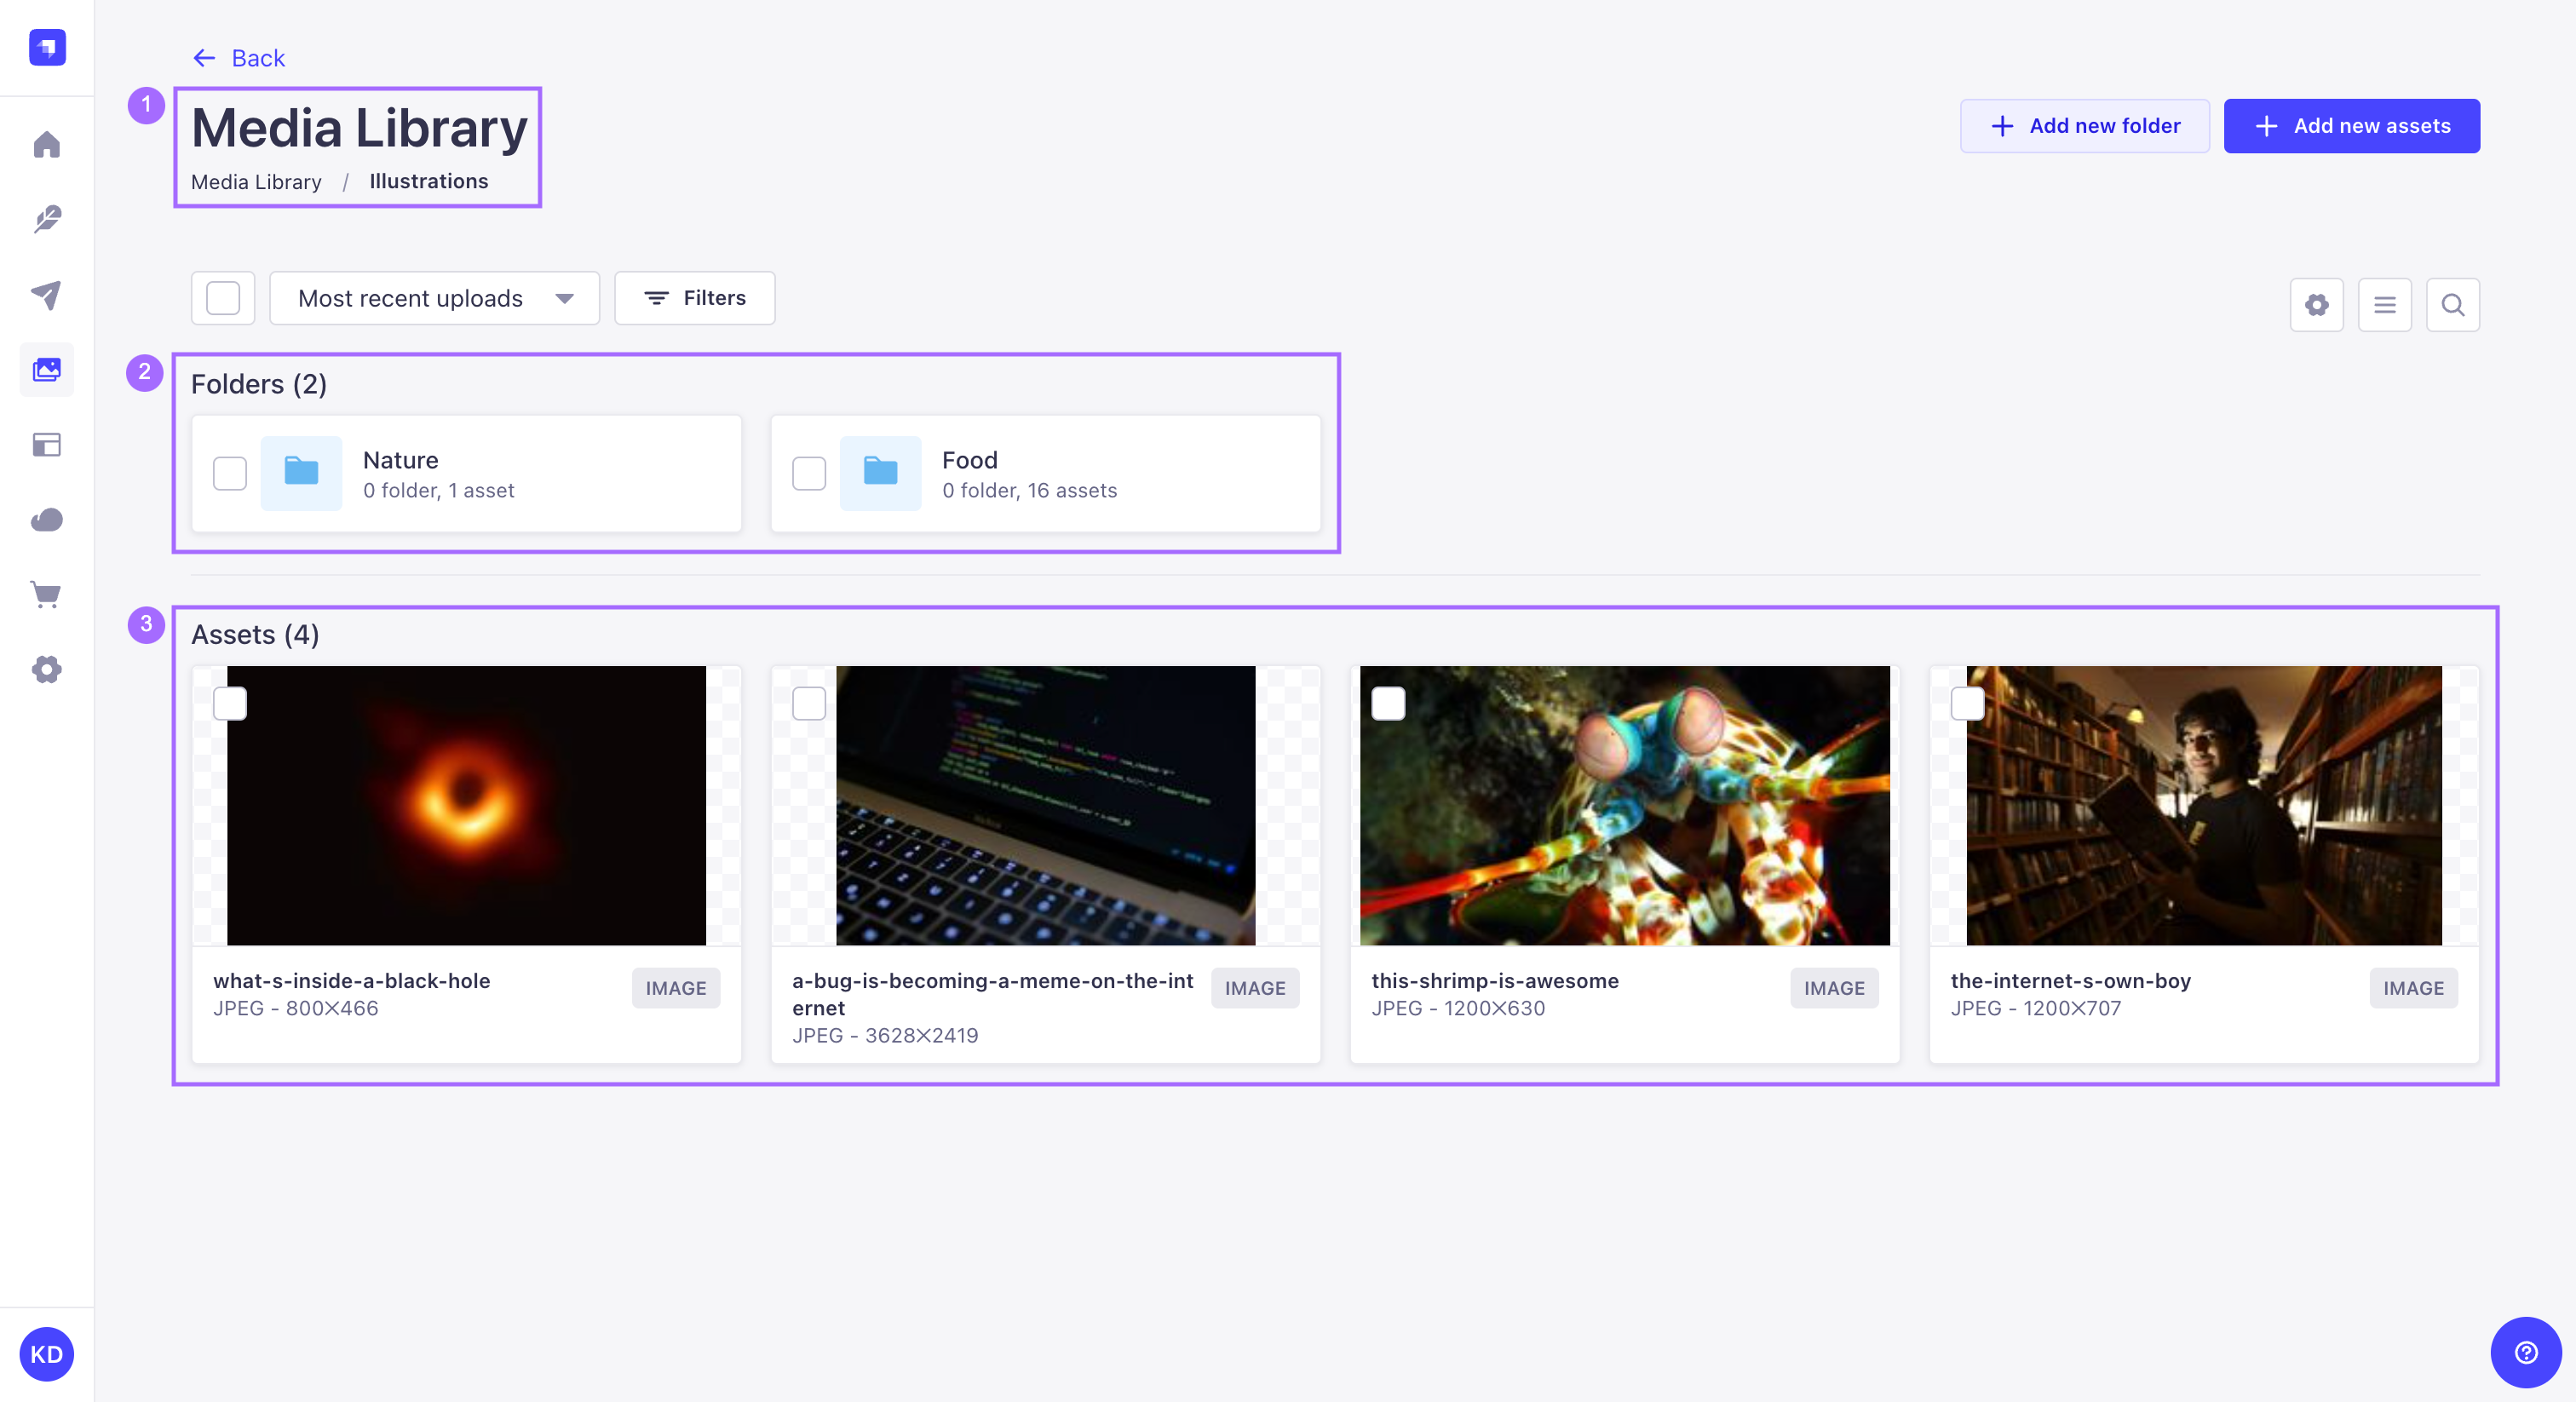
从这个专�用文件夹视图,可以像在主媒体库中一样管理、过滤、排序和搜索文件夹和资源。
🌐 From this dedicated folder view, folders and assets can be managed, filtered, sorted and searched just like from the main Media Library.
要返回到上一级文件夹,请使用界面顶部的返回按钮。
🌐 To navigate back to the parent folder, one level up, use the Back button at the top of the interface.
面包屑导航也可以用于返回上级文件夹:点击文件夹名称即可直接跳转,或点击三个点 /img. 并从下拉列表中选择上级文件夹。
🌐 The breadcrumb navigation can also be used to go back to a parent folder: click on a folder name to directly jump to it or click on the 3 dots /img. and select a parent folder from the drop-down list.
添加文件夹
🌐 Adding folders
- 在媒体库界面右上角点击 添加新文件夹。
- 在弹出的窗口中,在_名称_字段中输入新文件夹的名称。
- (可选)在 Location 下拉列表中,为新文件夹选择一个位置。默认位置是活动文件夹。
- 点击 创建。
你的文件夹层级可以无限深入,但请记住,访问深层嵌套的子文件夹可能需要一些努力,因为媒体库目前没有视觉�层级指示。使用用户界面右侧的 搜索文件,可能是找到所需资源的更快捷方法。
将资源移动到文件夹
🌐 Moving assets to a folder
可以从媒体库的根视图或专用文件夹的任何视图将资源和文件夹移动到另一个文件夹。
🌐 Assets and folders can be moved to another folder from the root view of the Media Library or from any view for a dedicated folder.
- 通过单击文件夹名称左侧的复选框或单击资源本身,选择要移动的资源和文件夹。
- 点击界面顶部的 移动按钮。
- 在“移动元素到”弹出窗口中,从“位置”下拉列表中选择新文件夹。
- 点击 移动。
编辑文件夹
🌐 Editing folders
创建后,可以重命名、移动或删除文件夹。
🌐 Once created, a folder can be renamed, moved or deleted.
- 在媒体库的文件夹部分,将鼠标悬停在要编辑的文件夹上,然后点击其编辑按钮 。
- 在弹出的窗口中,分别使用 Name 字段和 Location 下拉列表更新名称和位置。
- 点击 保存。
删除文件夹
🌐 Deleting folders
删除文件夹可以从媒体库的文件夹列表中完成,也可以在编辑单个文件夹时完成。
🌐 Deleting a folder can be done either from the list of folders of the Media Library, or when editing a single folder.
- 点击文件夹名称左侧的复选框。可以选择多个文件夹。
- 点击文件夹列表上方的 删除按钮。
- 在“确认”对话框中,点击确认。
编辑文件夹时也可以删除单个文件夹:将鼠标悬停在文件夹上,点击其编辑图标 ,在弹出的窗口中,点击 删除文件夹 按钮并确认删除。
与 REST API 的使用
🌐 Usage with the REST API
媒体库功能有一些可以通过 Strapi 的 REST API 访问的端点:
🌐 The Media Library feature has some endpoints that can accessed through Strapi's REST API:
在你的代码中使用公共资源
🌐 Use public assets in your code
公共资源是指你希望外部访问的静态文件(例如,图片、视频、CSS 文件等)。
🌐 Public assets are static files (e.g., images, video, CSS files, etc.) that you want to make accessible to the outside world.
因为 API 可能需要提供静态资源,每个新的 Strapi 项目默认都会包含一个名为 /public 的文件夹。位于该目录中的任何文件,如果请求的路径不匹配任何其他已定义的路由,并且它匹配一个公共文件名(例如在 ./public/ 中名为 company-logo.png 的图片可通过 /company-logo.png URL 访问),则可以被访问。
🌐 Because an API may need to serve static assets, every new Strapi project includes by default a folder named /public. Any file located in this directory is accessible if the request's path doesn't match any other defined route and if it matches a public file name (e.g. an image named company-logo.png in ./public/ is accessible through /company-logo.png URL).
index.html 文件会在请求对应于文件夹名称时提供(/pictures URL 会尝试提供 public/pictures/index.html 文件)。
点文件未被公开。这意味着每个以 . 开头的文件名,例如 .htaccess 或 .gitignore,都不会被提供服务。
🌐 The dotfiles are not exposed. It means that every file name that starts with ., such as .htaccess or .gitignore, are not served.