内容经理
🌐 Content Manager
Page summary:
内容管理器是 Strapi 用于浏览和编辑条目的界面。本档提供了内容管理器的概述,并解释了视图以及如何在字段、组件、动态区域和关联字段中编写内容。
从 内容管理器,用户可以通过管理员面板的主导航访问,撰写和管理他们的内容。
概览
🌐 Overview
内容管理器包含可用的集合和单个内容类型,这些内容类型是之前使用 Content-type Builder 创建的。
可以从 内容管理器子导航中显示的两个类别创建、管理和发布内容:
- 集合类型�,列出了可用于管理多个条目的内容类型。对于每个可用的集合类型,可以创建多个条目,这就是为什么每个集合类型分为两个界面:
- 列表视图,显示一个表格,其中包含为该集合类型创建的所有条目。
- 编辑视图,重点关注你集合类型的所选条目,你可以从中实际管理内容。
- 单类型,列出只有一个条目的可用内容类型。与具有多个条目的集合类型不同,单类型不是为多次使用而创建的。换句话说,每个可用的单类型只能有一个默认条目。因此,单类型类别中没有列表视图。
点击搜索图标 使用文本搜索,更快速地找到你的内容类型和/或条目!
特别针对你的集合类型条目,你还可以使用 筛选器按钮来设置基于条件的筛选,这些条件是相互叠加的(即,如果你设置了多个条件,只有符合所有条件的条目才会显示)。
当内容类型启用 草稿与发布 时,筛选器 菜单将包含一个 状态 字段。你可以按以下方式筛选条目:
🌐 When Draft & Publish is enabled for the content type, the Filters menu includes a Status field. You can filter entries by:
- 草稿(从未发表)(从未发表的条目),
- 已发布(全部)(所有已发布条目),
- 已发布(已修改)(已发布条目中尚��未发布的草稿更改)
- 或已发布(未修改)(发布的条目无草稿更改)。
配置
🌐 Configuration
列表视图和编辑视图都可以配置。
🌐 Both the list view and the edit view can be configured.
配置列表视图
🌐 Configuring the list view
列表视图表格可以通过两种方式进行配置:通过列表视图直接进行快速配置,或者通过永久的高级配置以获取更多选项。两种配置都会保留,并且针对每种内容类型都是特定的。
🌐 The list view table can be configured in 2 ways: with a quick configuration directly from the list view, or with a permanent and advanced configuration for more options. Both configurations persist and are specific to each content type.
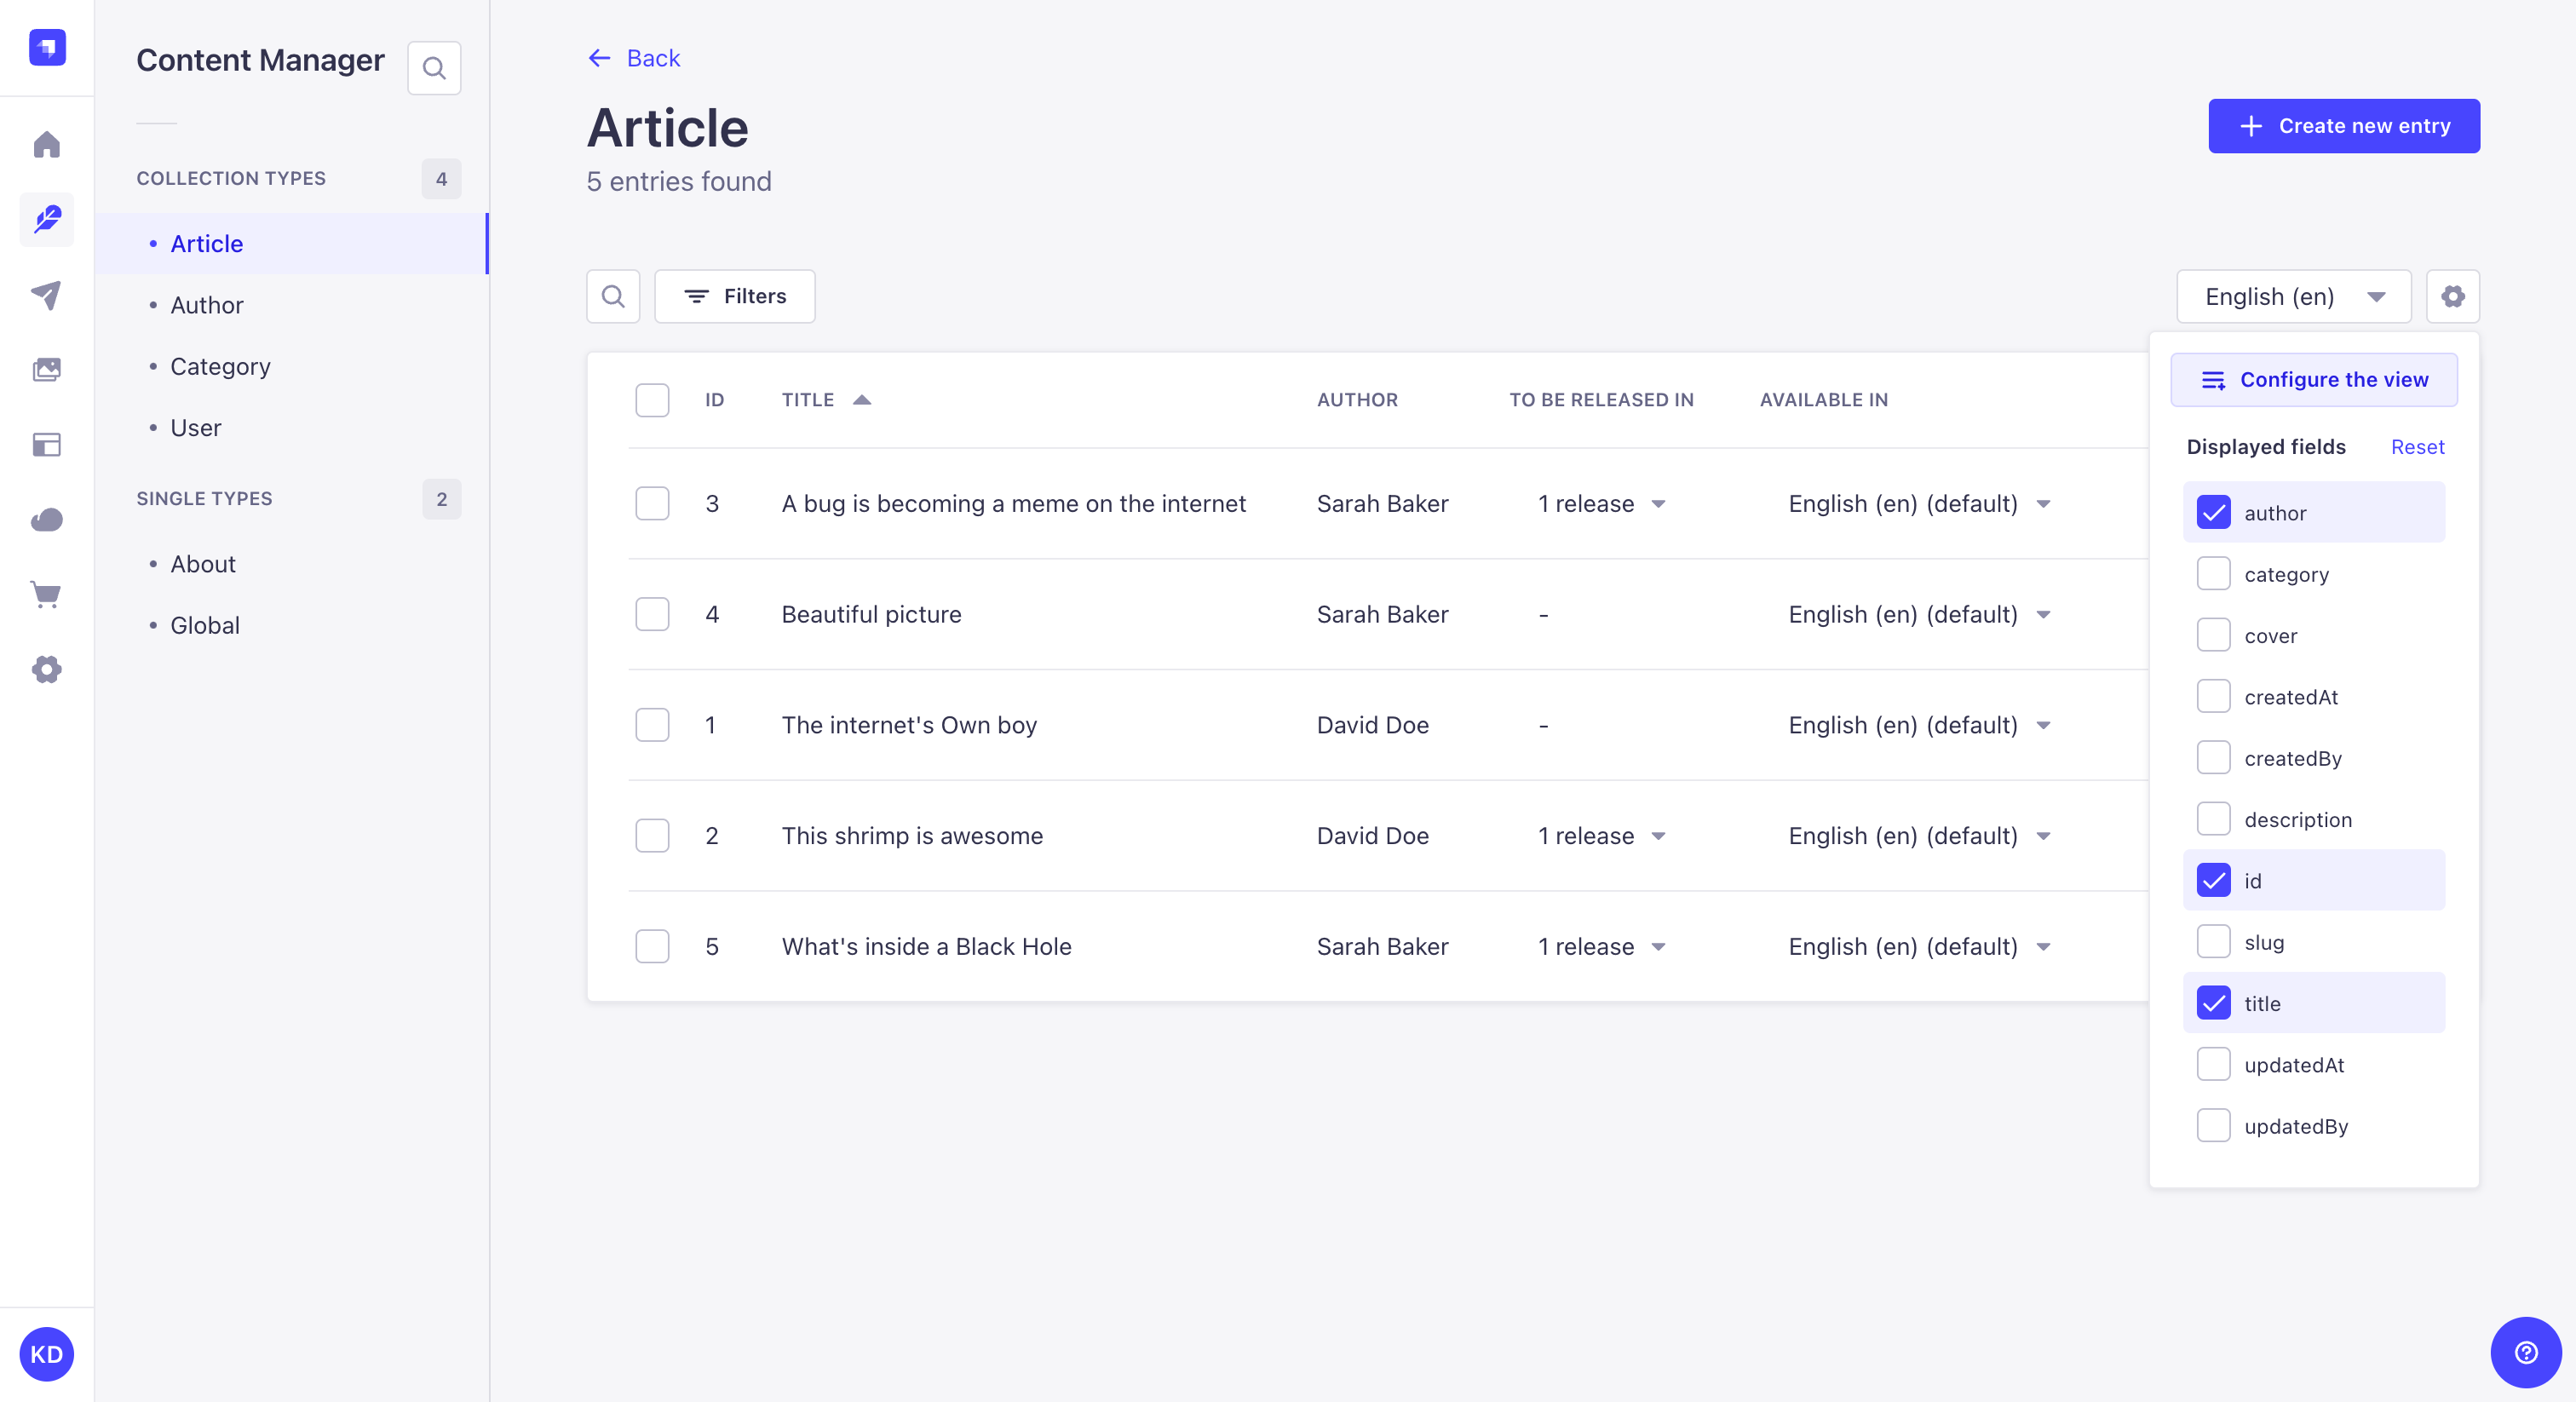
快速配置
🌐 Quick configuration
列表视图可以动态配置,以选择在表格中显示哪些字段。这些显示偏好保存在浏览器中,并在页面刷新和导航时持续存在。
🌐 The list view can be configured on the fly to choose which fields to display in the table. These display preferences are saved in the browser and persist across page refreshes and navigation.
- 点击设置按钮 。
- 勾选与要在表中显示的字段关联的框。
- 取消勾选与你不想在表中显示的字段相关的框。
永久与高级配置
🌐 Permanent & advanced configuration
对于更高级的列表视图选项(例如,启用/禁用搜索、过滤器和批量操作,重新排序列表视图表的字段等),请使用完整的配置界面。
🌐 For more advanced list view options (e.g., enablement/disablement of search, filters and bulk actions, reordering of the list view table's fields etc.), use the full configuration interface.
配置仅适用于访问设置的集合类型的列表视图(即,禁用集合类型的过滤器或搜索选项不会自动禁用所有其他集合类型的这些相同选项)。
🌐 The configurations only apply to the list view of the collection type from which the settings are accessed (i.e., disabling the filters or search options for a collection type will not automatically also disable these same options for all other collection types).
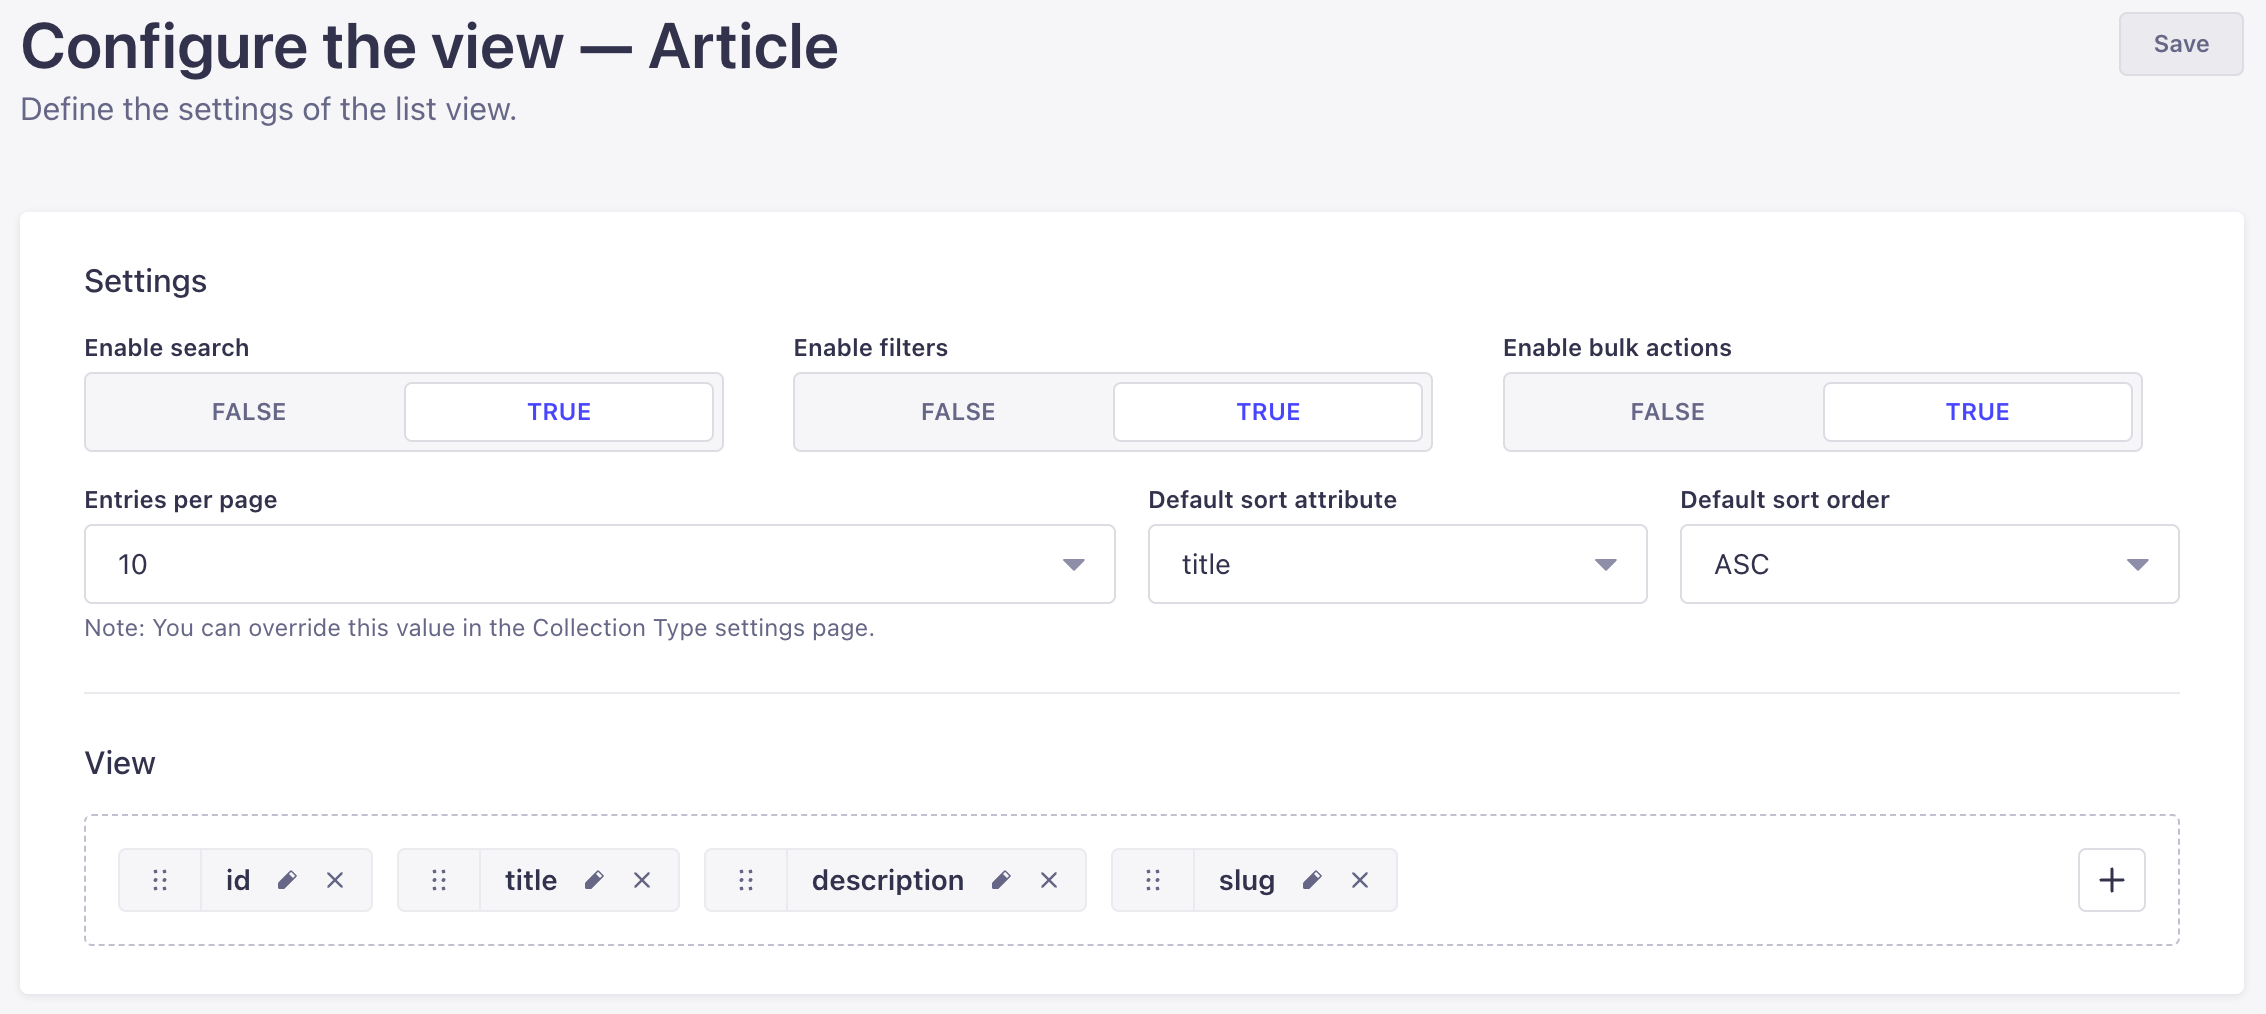
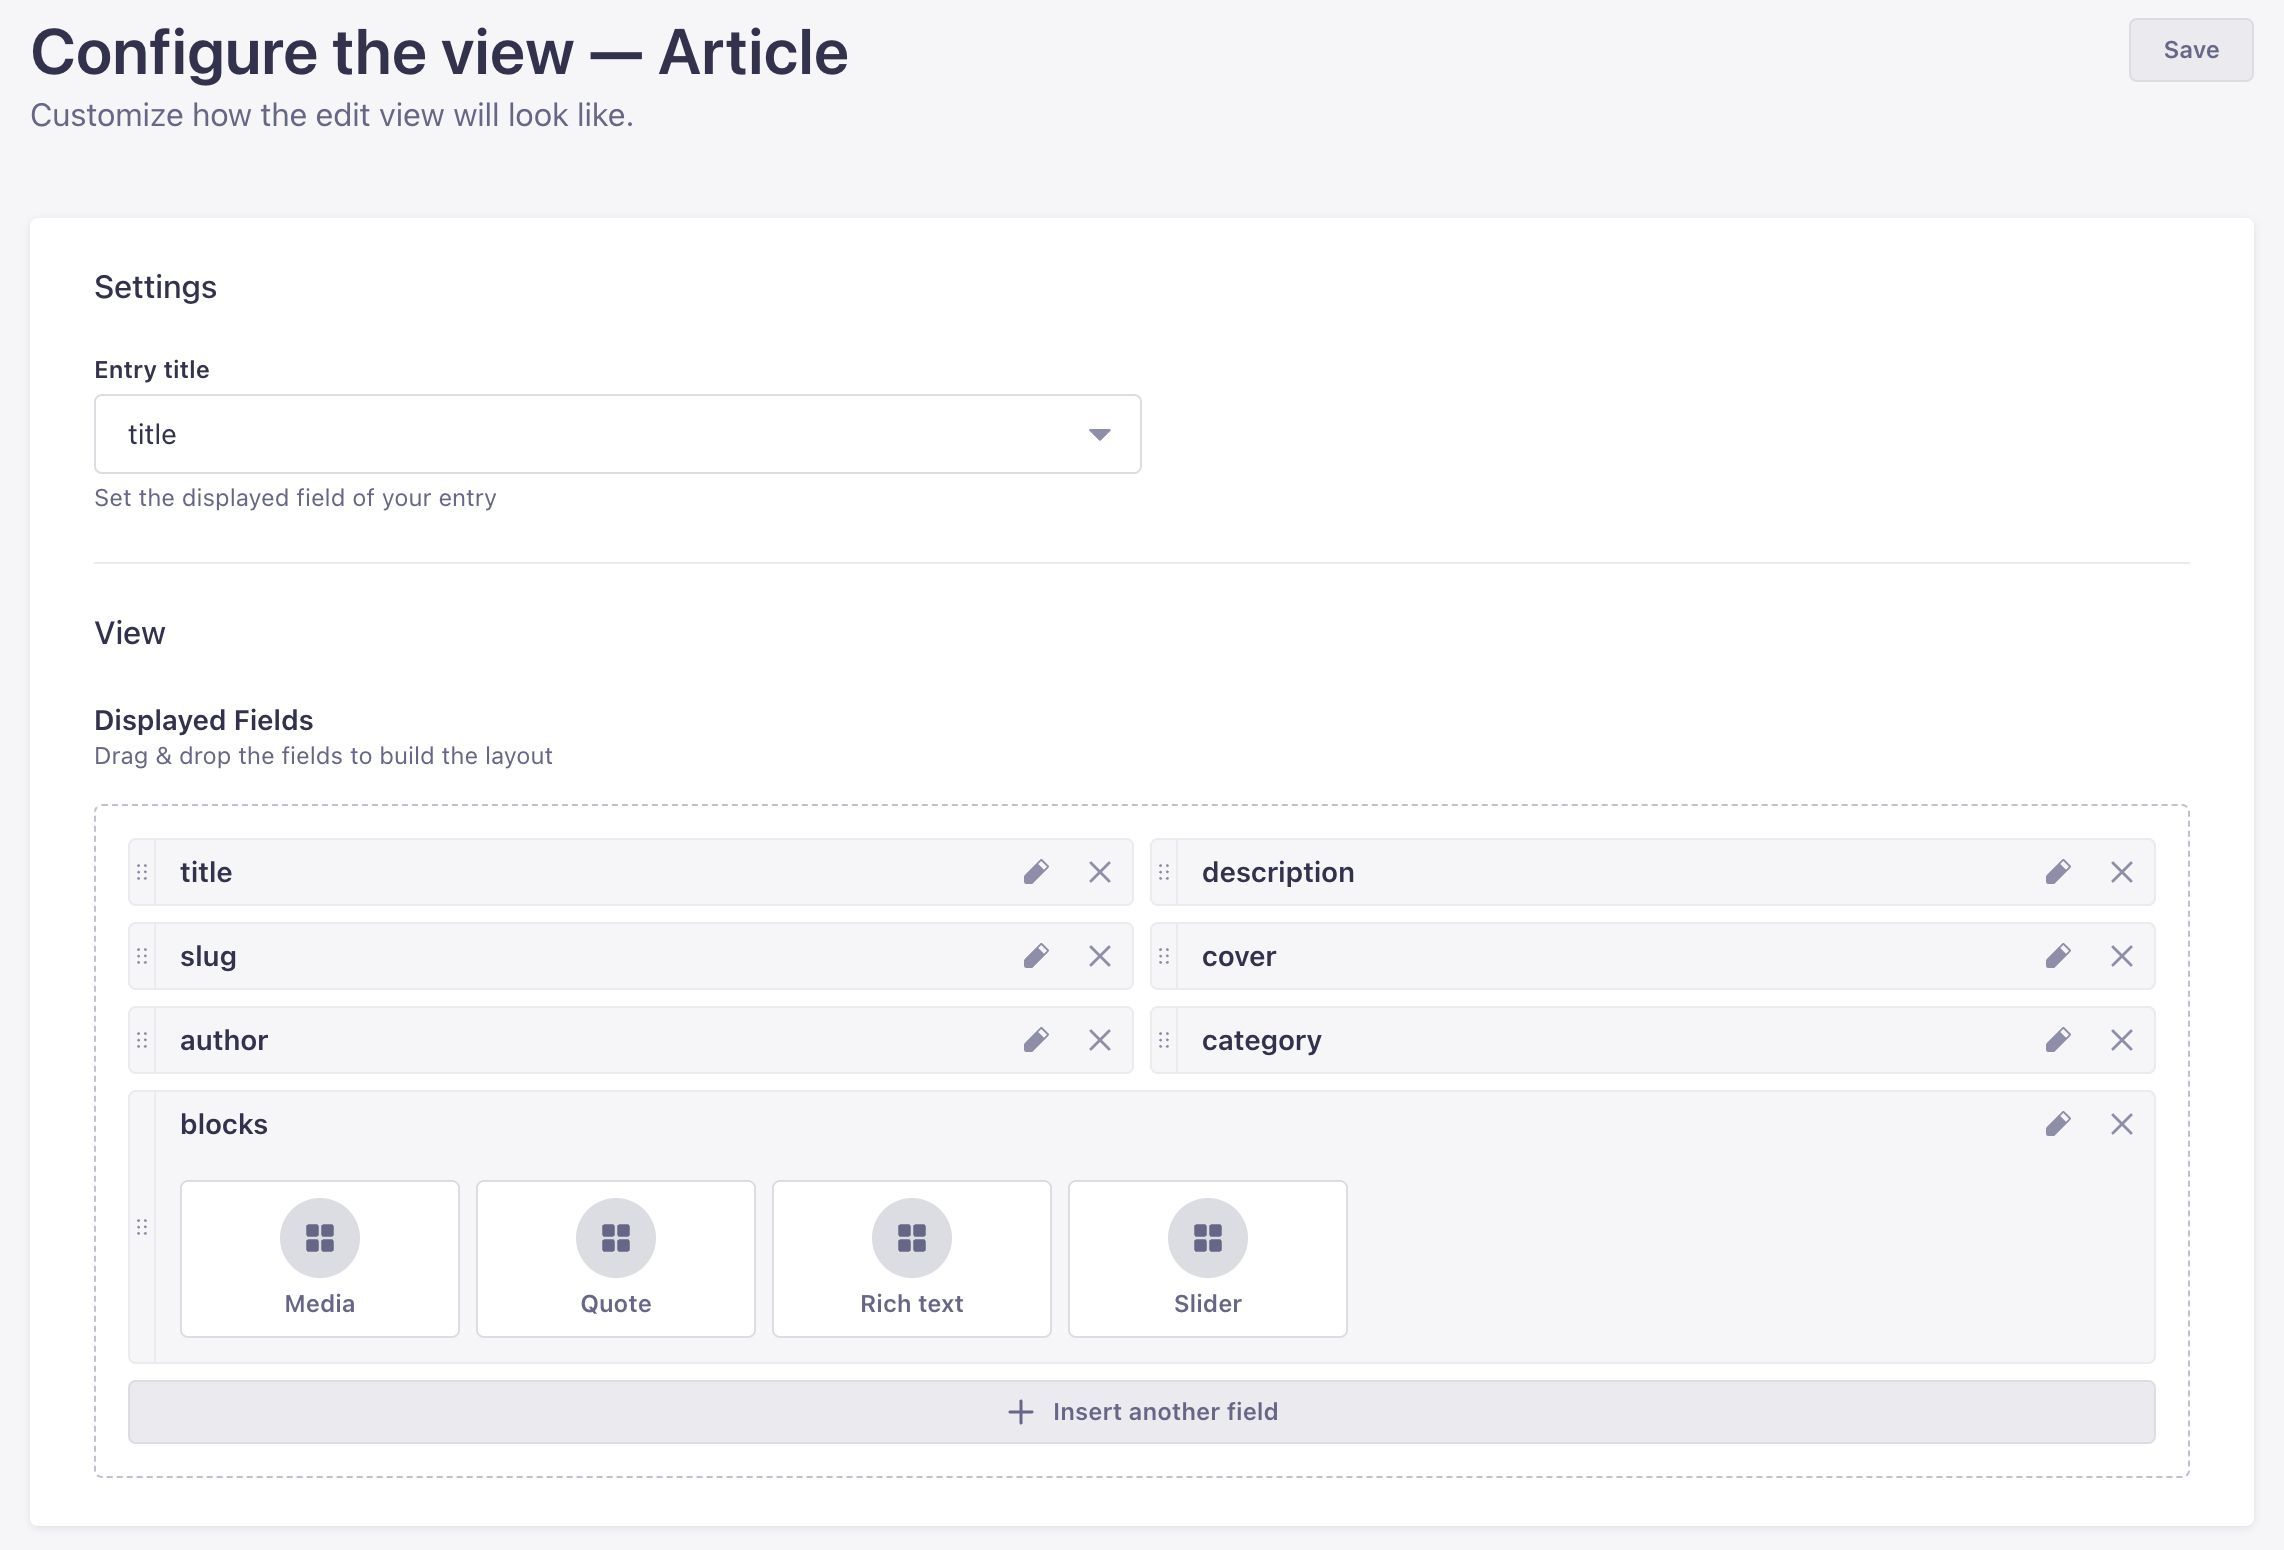
- Settings
- View
-
在你的集合类型的列表视图中,点击设置按钮 然后 配置视图,将被重定向到列表视图配置界面。
-
在“设置”区域中,定义你选择的新设置: | 设置名称 | 说明 || --- | --- || 启用搜索 | 点击 TRUE 或 FALSE 以启用或禁用搜索。 || 启用筛选 | 点击 TRUE 或 FALSE 以启用或禁用筛选。 || 启用批量操作 | 点击 TRUE 或 FALSE 以启用或禁用列表视图表格中的多选框。 || 每页条目数 | 从下拉列表中选择每页显示的条目数。 || 默认排序属性 | 选择默认使用的排序字段。 || 默认排序顺序 | 选择默认应用的排序类型。 |
-
点击 保存 按钮。
-
在你的集合类型的列表视图中,点击设置按钮 然后 配置视图,将被重定向到列表视图配置界面。
-
在“视图”区域中,定义要在列表视图�表中显示的字段以及显示顺序:
- 点击添加按钮 以添加新字段。
- 点击删除按钮 以移除字段。
- 点击重新排序按钮 ,然后将其拖放到你希望它在其他字段中显示的位置。
-
点击编辑按钮 以访问其可用的自定义设置: | 设置名称 | 说明 || --- | --- || 标签 | 输入将在列表视图表格中用于该字段的标签。 || 启用此字段的排序 | 点击 TRUE 或 FALSE 来启用或禁用该字段的排序。 |
-
点击 保存 按钮。
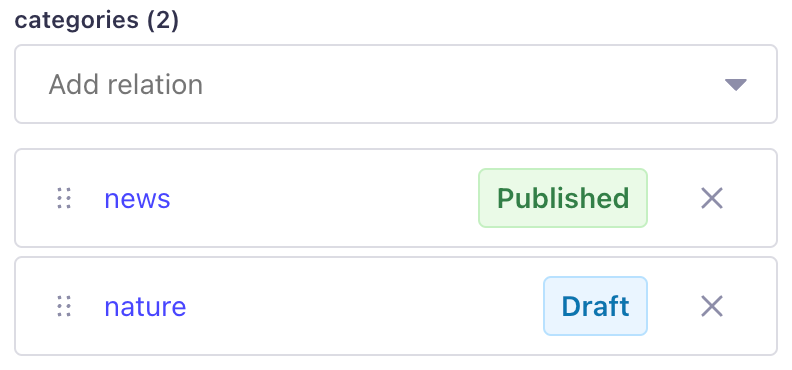
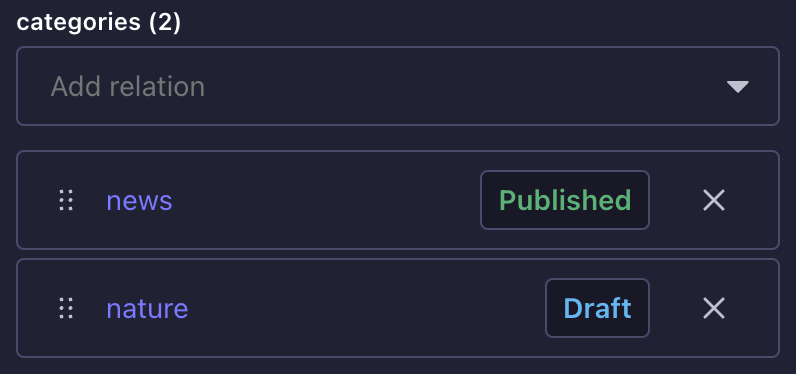
关系字段也可以在列表视图中显示。然而,有一些特定情况需要注意:
🌐 Relational fields can also be displayed in the list view. There are however some specificities to keep in mind:
- 每个关系字段只能显示一个字段。
- 只能显示第一级字段(即无法显示关系的关系中的字段)。
- 如果显示的字段包含多个值,并不是所有值都会显示,而是显示一个指示值数量的计数器。你可以将鼠标悬停在此计数器上,以查看显示关系字段前10个值的工具提示。
还请注意,关系字段在排序选项方面有几个限制:
🌐 Note also that relational fields have a couple limitations when it comes to sorting options:
- 无法为显示多个字段的关系字段启用排序。
- 关系字段不能设置为默认排序。
配置编辑视图
🌐 Configuring the edit view
- Settings
- View
-
在你的内容类型的编辑视图中,点击 按钮,然后 配置视图。
-
在“设置”区域中,定义你选择的新设置: | 设置名称 | 说明 || --- | --- || 条目标题 | 从下拉列表中选择应作为条目标题的字段。 || 关联打开行为 | 选择点击关联条目时的打开方式。弹出窗口(默认) 在覆盖弹窗中打开条目。导航到页面 导航到条目的完整编辑页面。在新标签页中打开 在新的浏览器标签中打开它。 |
-
点击 保存 按钮。
-
在你的内容类型的编辑视图中,点击 按钮,然后 配置视图。
-
在“视图”区域中,定义要在列表视图表中显示的字段(包括关系字段)、显示顺序和大小:
- 点击 插入另一个字段按钮以添加新字段。
- 点击删除按钮 以移除字段。
- 点击重新排序按钮 ,然后将其拖放到你希望它在其他字段中显示的位置。
-
点击字段上的编辑按钮 以访问其可用设置: | 设置名称 | 说明 || --- | --- || 标签 | 写出该字段应使用的标签。 || 描述 | 为该字段写一个描述,以帮助其他管理员正确填写。 || 占位符 | 写出在该字段中默认显示的占位符。 || 可编辑字段 | 点击 TRUE 或 FALSE 来启用或禁用管理员对该字段的编辑。 || 大小 | 选择字段在内容管理器中显示的大小。请注意,此设置不适用于 JSON 和富文本字段,也不适用于动态区域和组件。 || 条目标题 | (仅限关联字段) 写出应为该关联字段使用的条目标题。建议仔细选择关联字段的条目标题,因为标题越全面,管理员在编辑视图中管理关联字段内容就越容易。 |
-
点击 保存 按钮。
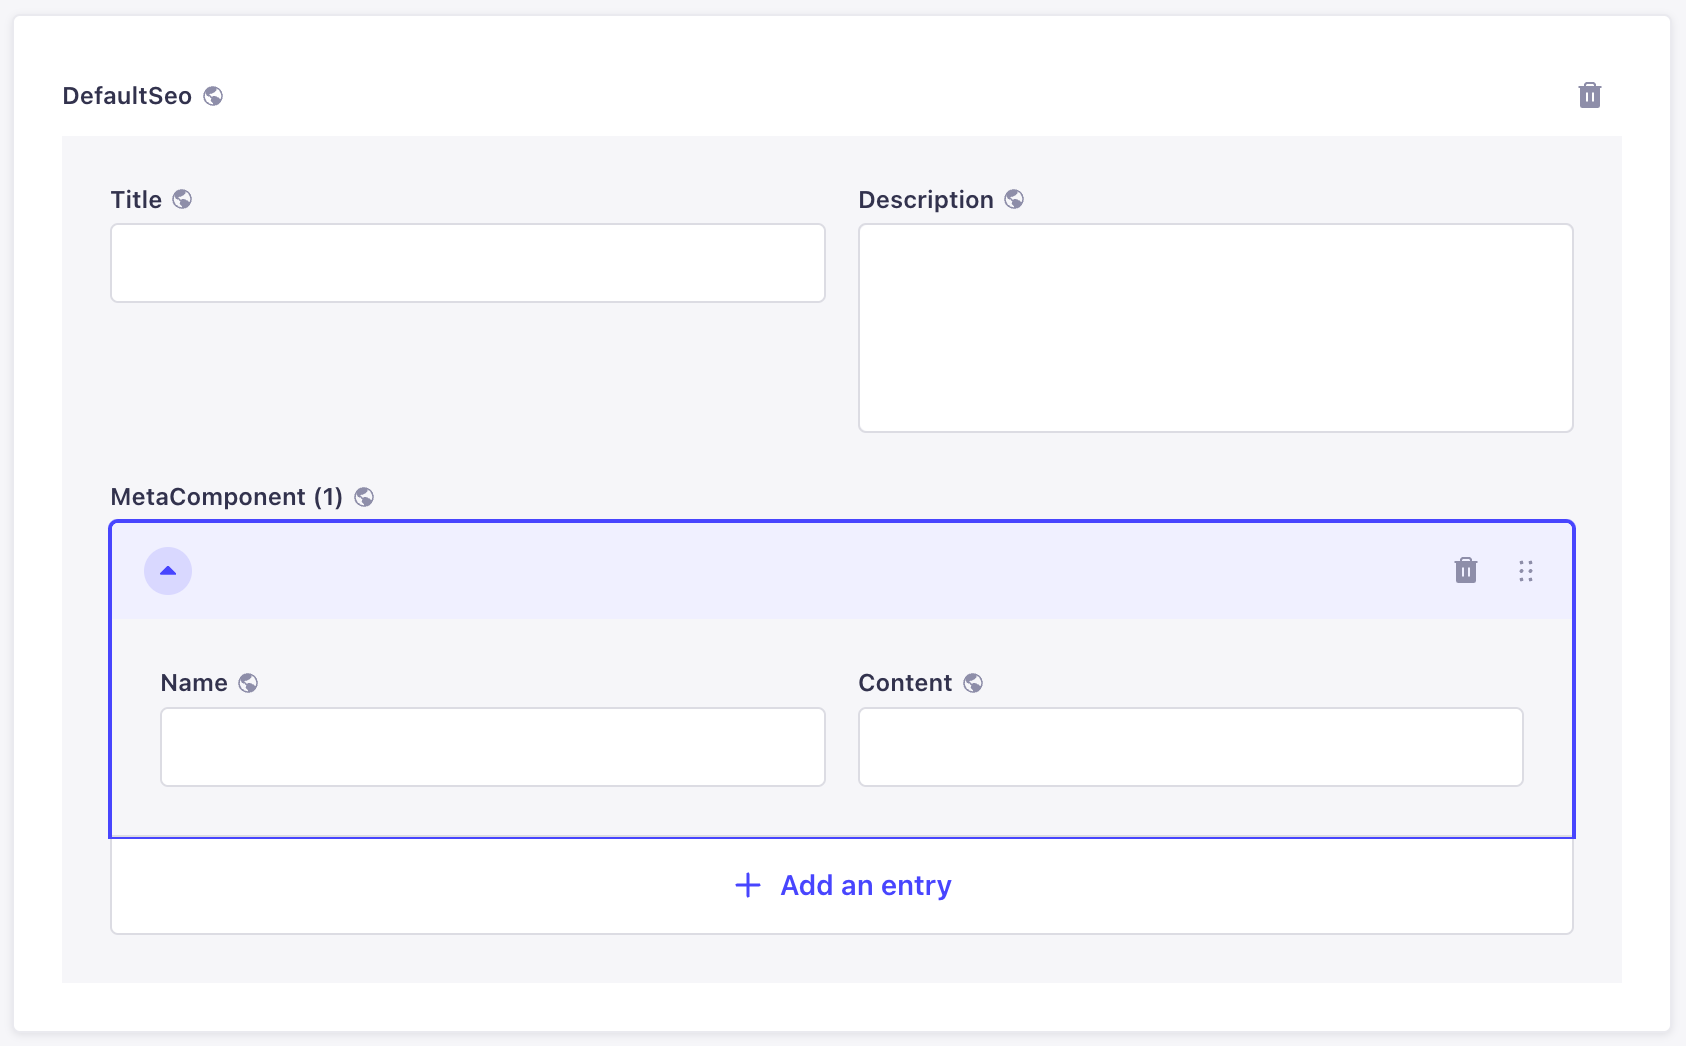
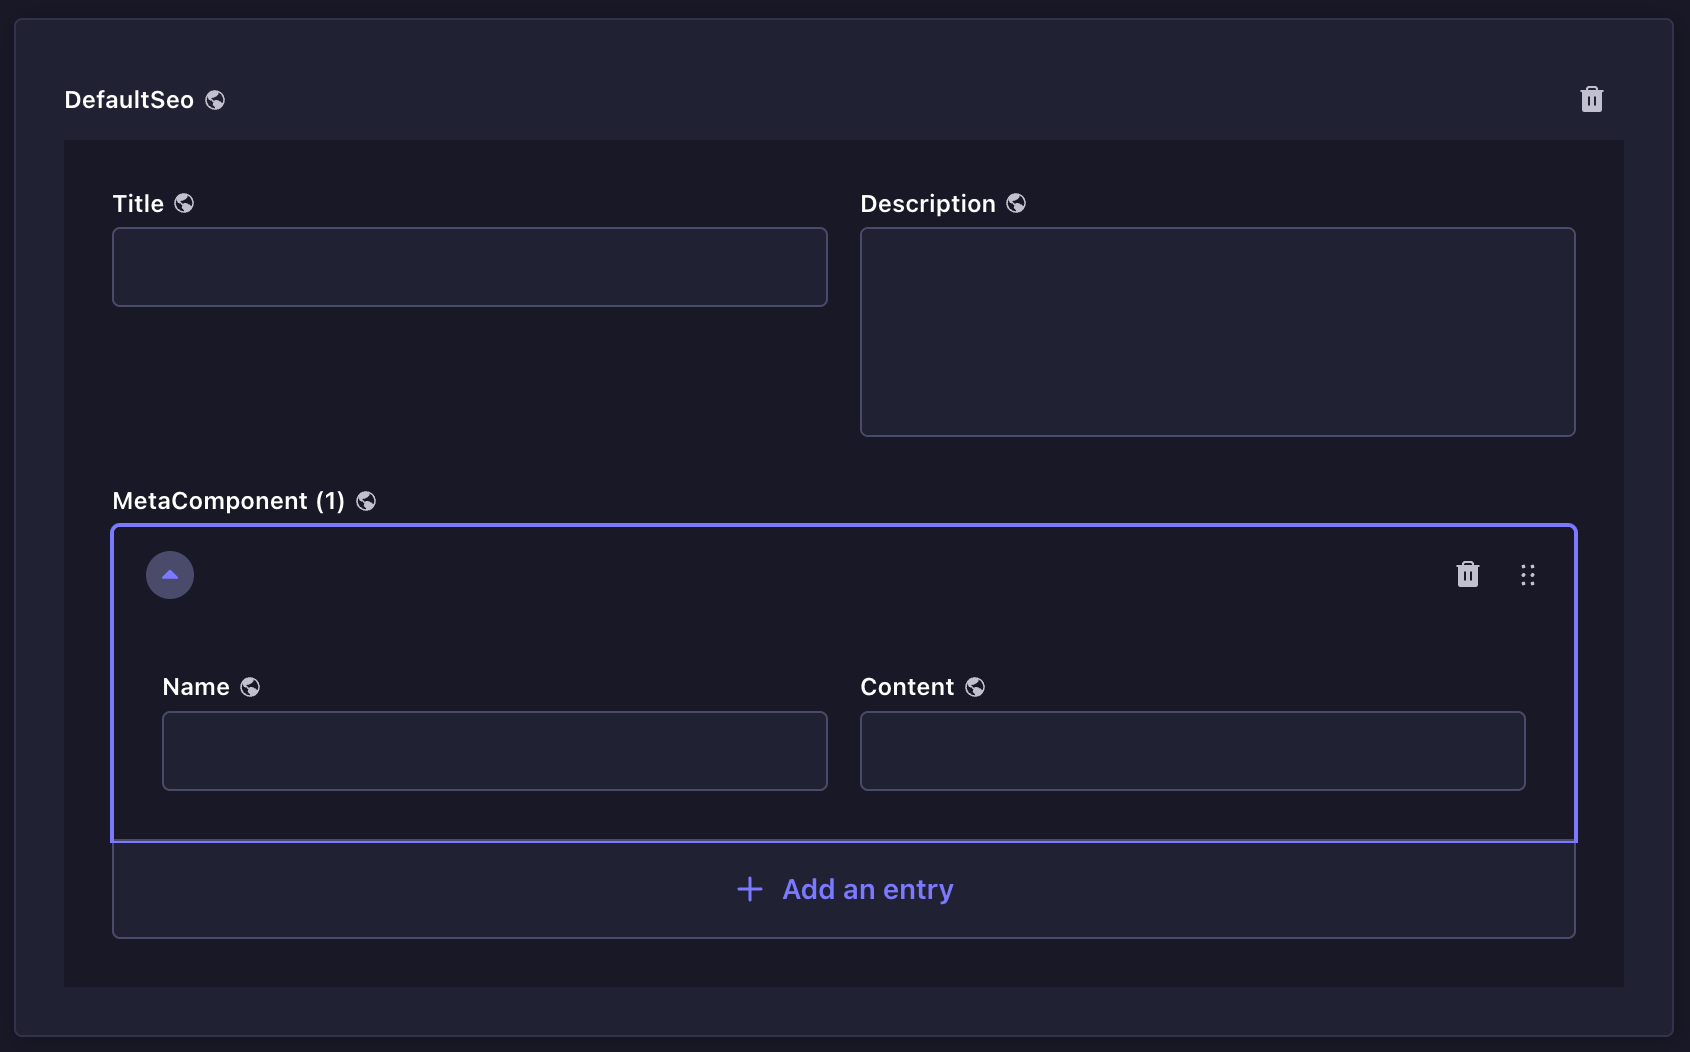
组件字段的设置和显示不能通过条目的编辑视图配置页面进行管理和重新排序。点击组件的 设置组件布局 按钮可以访问组件自身的配置页面。你将在这里找到与条目相同的设置和显示选项,但这些选项将专门适用于你的组件。
🌐 The settings and display of a component's fields cannot be managed and reordered through the entry's edit view configuration page. Click on the Set the component's layout button of a component to access the component's own configuration page. You will find the exact same settings and display options as for the entry, but that will specifically apply to your component.
另请注意,这些设置是为组件本身定义的,这意味着这些设置将自动应用于使用该组件的每个其他内容类型。
🌐 Note also that the settings are defined for the component itself, which means that the settings will automatically be applied for every other content-type where the component is used.
使用
🌐 Usage
创建与撰写内容
🌐 Creating & Writing content
在 Strapi 中,编写内容包括填写字段,这些字段用于包含特定内容(例如文本、数字、媒体等)。这些字段已经通过 内容类型构建器 为集合或单一类型预先配置好。
🌐 In Strapi, writing content consists in filling up fields, which are meant to contain specific content (e.g. text, numbers, media, etc.). These fields were configured for the collection or single type beforehand, through the Content-type Builder.
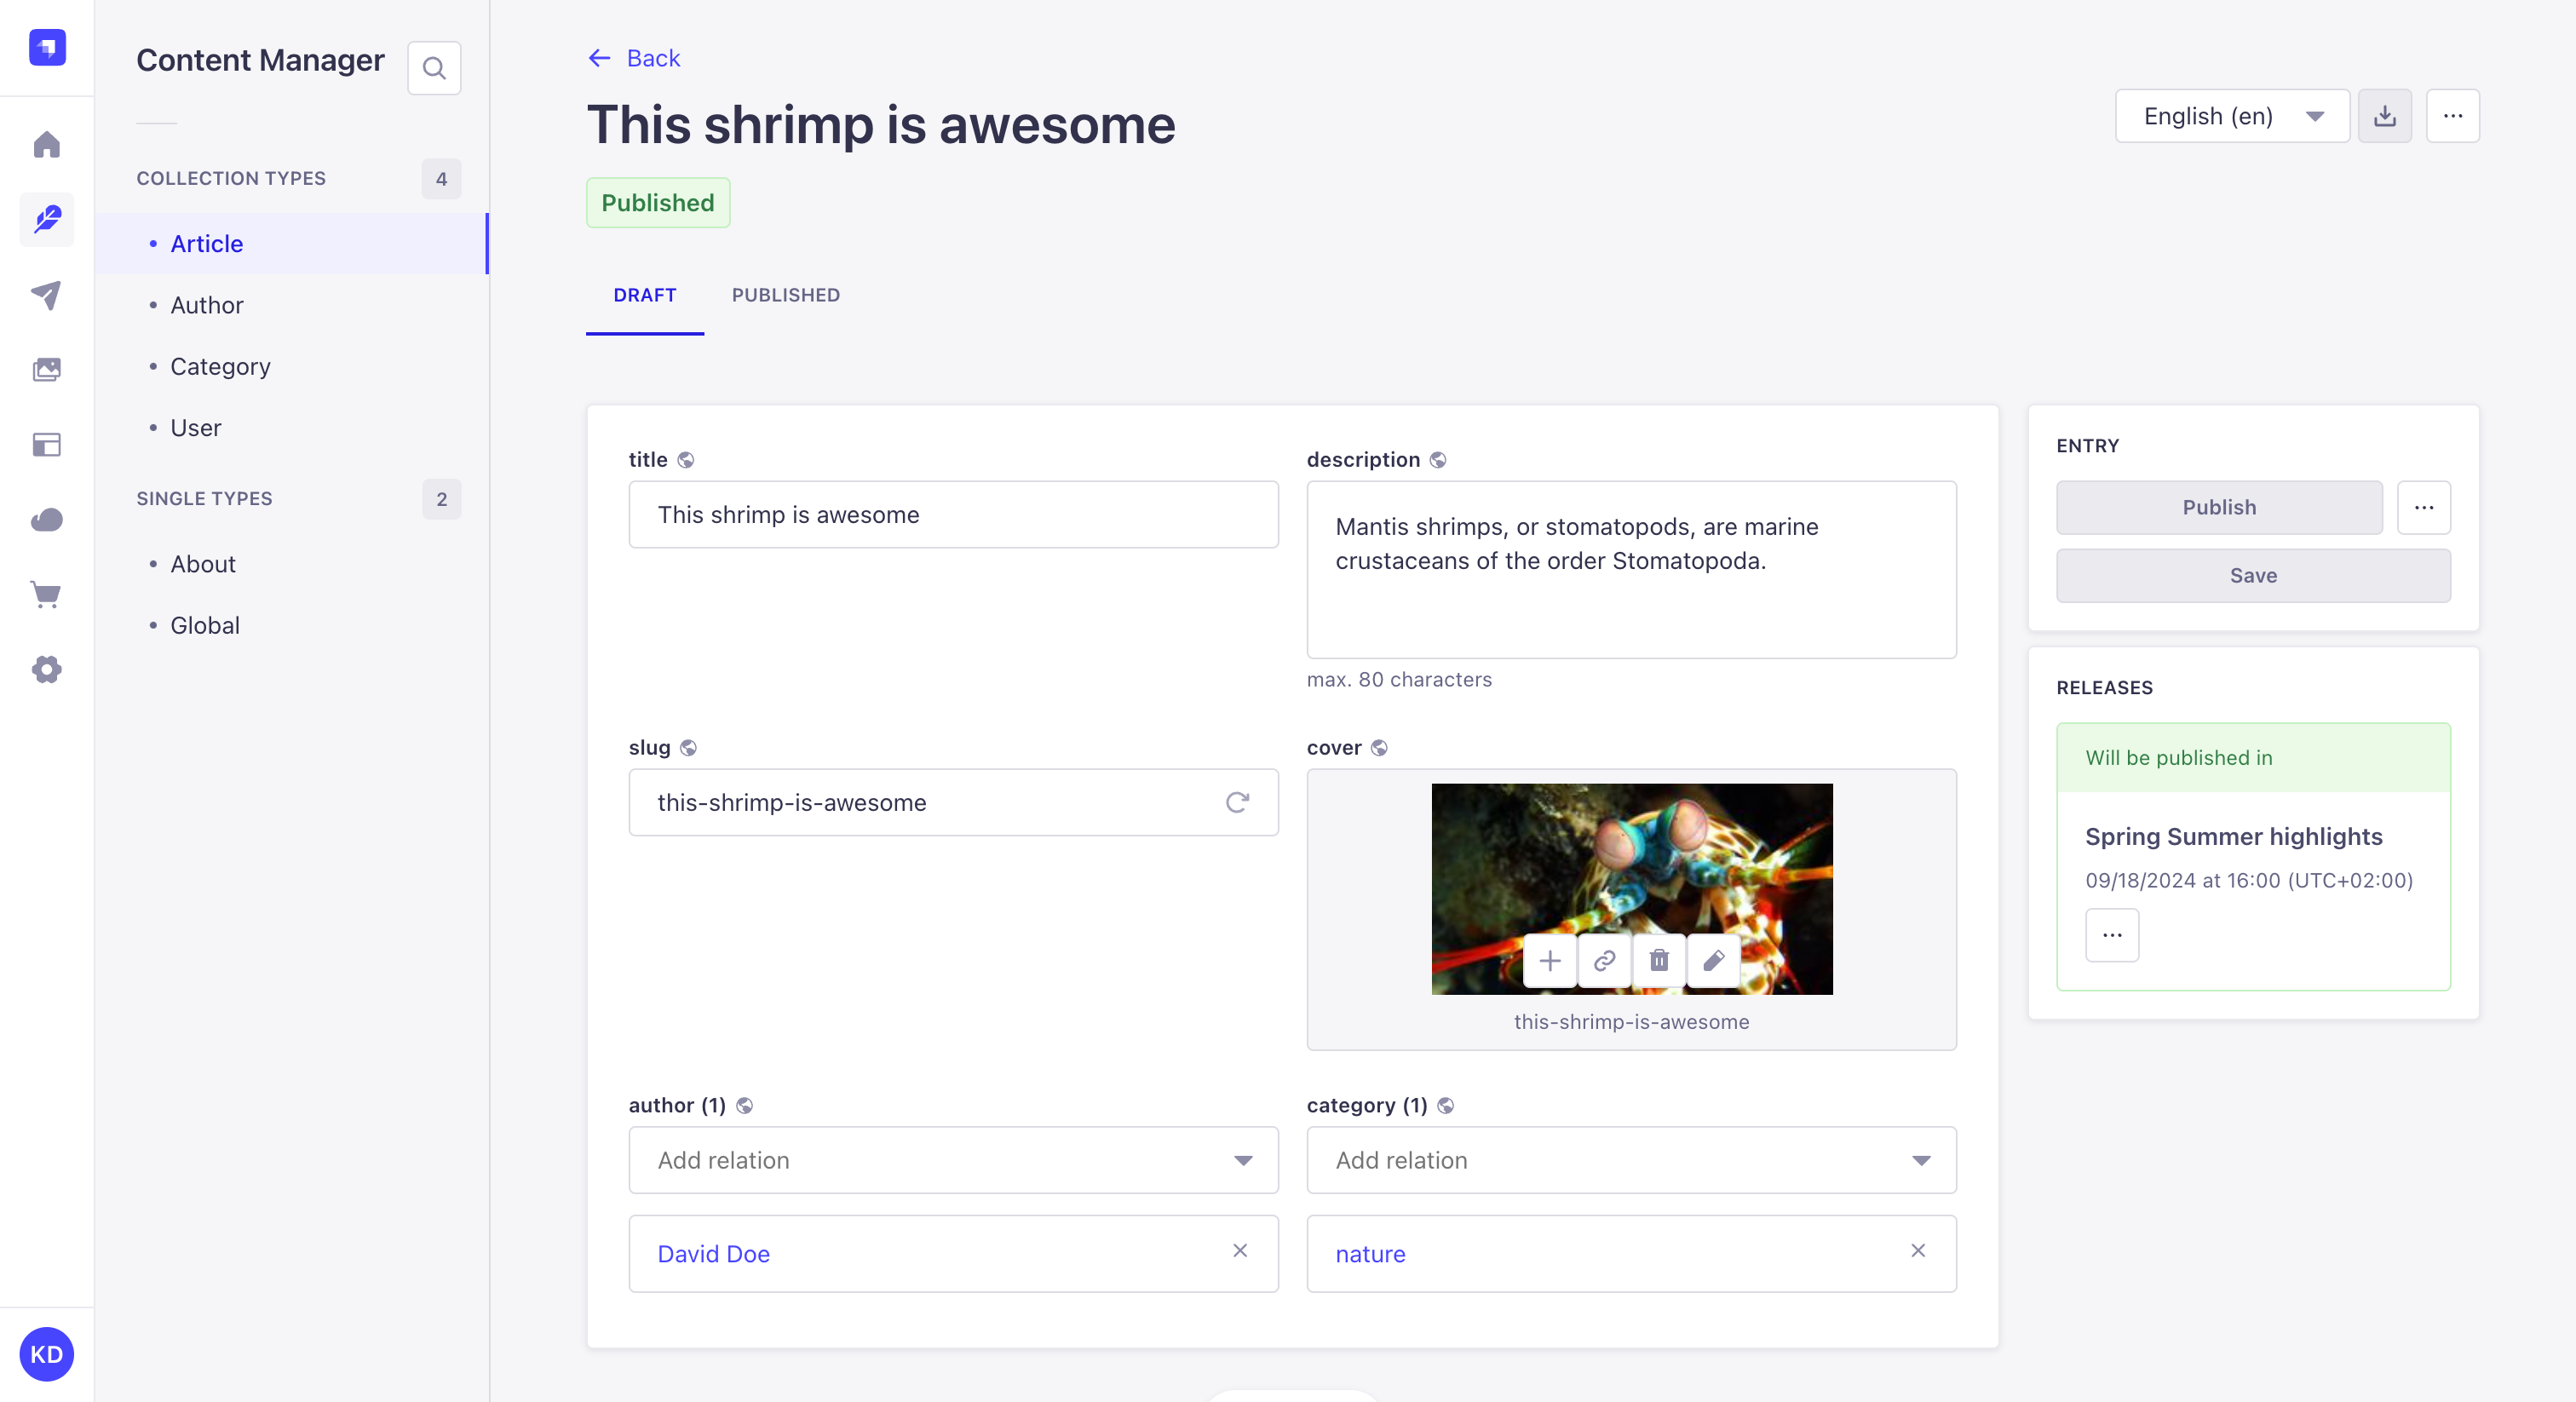
编写或编辑内容:
🌐 To write or edit content:
- 在 内容管理器中:
- 要么点击你选择的集合类型右上角的创建新条目按钮来创建新条目,
- 或者访问你已创建的集合类型的条目或单一类型的编辑视图。
- 根据可用的字段模式编写你的内容。你可以参考下表以获取更多信息以及关于如何填写每种字段类型的说明。
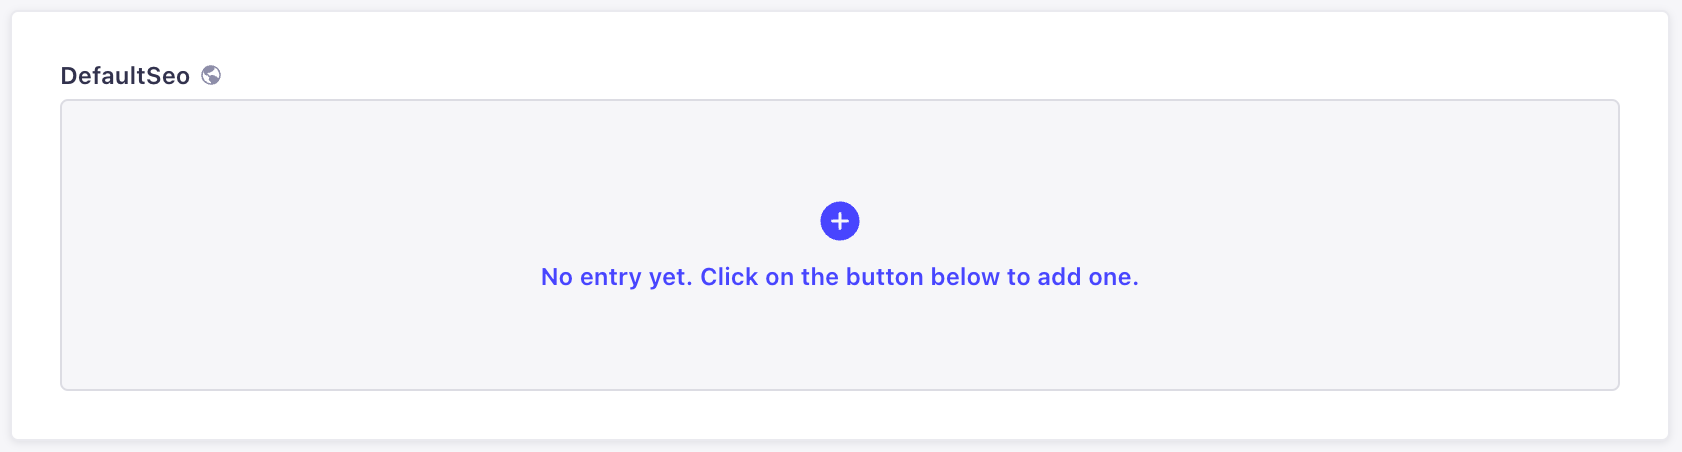
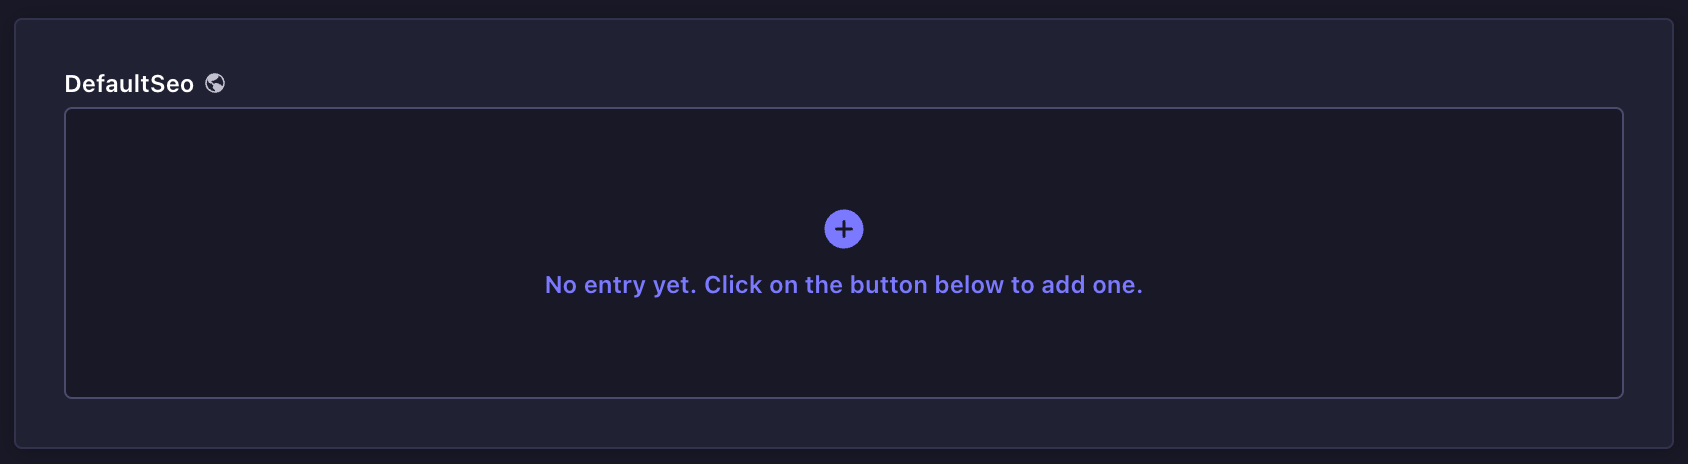
新的条目只有在其中的一些内容被写入并保存一次后才会被视为已创建。只有那时,新的条目才会出现在列表视图中。
🌐 New entries are only considered created once some of their content has been written and saved once. Only then will the new entry be listed in the list view.
| 字段名称 | 说明 |
|---|---|
| 文本 | 在文本框中写入你的内容。 |
| 富文本(Markdown) | 在编辑器中以 Markdown 格式编写文本内容。编辑器顶部栏提供了一些基本的格式选项(标题、加粗、斜体、下划线),可以应用于所选文本。同时也提供了一个 预览模式/Markdown 模式 按钮,用于在两种模式间切换。 💡 可通过点击底部栏的 展开 扩展该框。它可以并排显示可编辑的文本框和预览。 |
| 富文本(块) | 在编辑器中撰写和管理你的内容,所有新增/更新内容都会实时呈现。在块编辑器中,段落以文本块的形式呈现:将鼠标悬停在段落上会显示一个图标 ,点击该图标即可重新排序内容。通过编辑器顶部栏也可以访问格式化或丰富内容的选项(基础格式选项、代码、链接、图片等)。 💡 你可以在块编辑器中使用文本格式化快捷键(例如加粗、斜体、下划线以及粘贴链接)。 |
| 数字 | 在文本框中输入你的数字。文本框右侧显示的上下箭头可用于增加或减少文本框中显示的当前数字。 |
| 日期 | 1. 点击日期和/或时间框。 2. 输入日期和时间,或使用日历选择日期和/或从列表中选择时间。日历视图完全支持基于键盘的导航。 |
| 媒体 | 1. 点击媒体区域。 2. 从 媒体库 中选择一个资源,或者从你创建的 文件夹 中选择,或者点击 添加更多资源 按钮将新文件添加到媒体库。 💡 可以将选中的文件拖拽到媒体区域。 |
| 关系 | 从下拉列表中选择一个条目。更多信息请参见 关系字段。 |
| 布尔值 | 点击 TRUE 或 FALSE。 |
| JSON | 在代码文本框中以 JSON 格式编写你的内容。 |
| 电子邮件 | 写一个完整且有效的电子邮件地址。 |
| 密码 | 输入密码。 💡 点击显示在输入框右侧的 图标以显示密码。 |
| 枚举 | 1. 点击下拉列表。 2. 从列表中选择一项。 |
| UID | 在文本框中输入一个唯一标识符。文本框右侧显示的“重新生成”按钮可以根据内容类型名称自动生成 UID。 |
填写自定义字段取决于字段处理的内容类型。请参阅托管在 Marketplace上的每个自定义字段的专用文档。
组件
🌐 Components
组件是多个字段的组合,它们在编辑视图中被分组在一起。编写它们的内容的方式与独立字段完全相同,但组件有一些特定的特点。
🌐 Components are a combination of several fields, which are grouped together in the edit view. Writing their content works exactly like for independent fields, but there are some specificities to components.
组件有两种类型:不可重复组件和可重复组件。
🌐 There are 2 types of components: non-repeatable and repeatable components.
- Non-repeatable components
- Repeatable components
不可重复组件是只能使用一次的字段组合。
🌐 Non-repeatable components are a combination of fields that can be used only once.
默认情况下,字段组合不会直接显示在编辑视图中:
🌐 By default, the combination of fields is not directly displayed in the edit view:
- 点击添加按钮 以添加组件。
- 填写组件的字段。
要删除不可重复的组件,请点击组件区域右上角的删除按钮 。
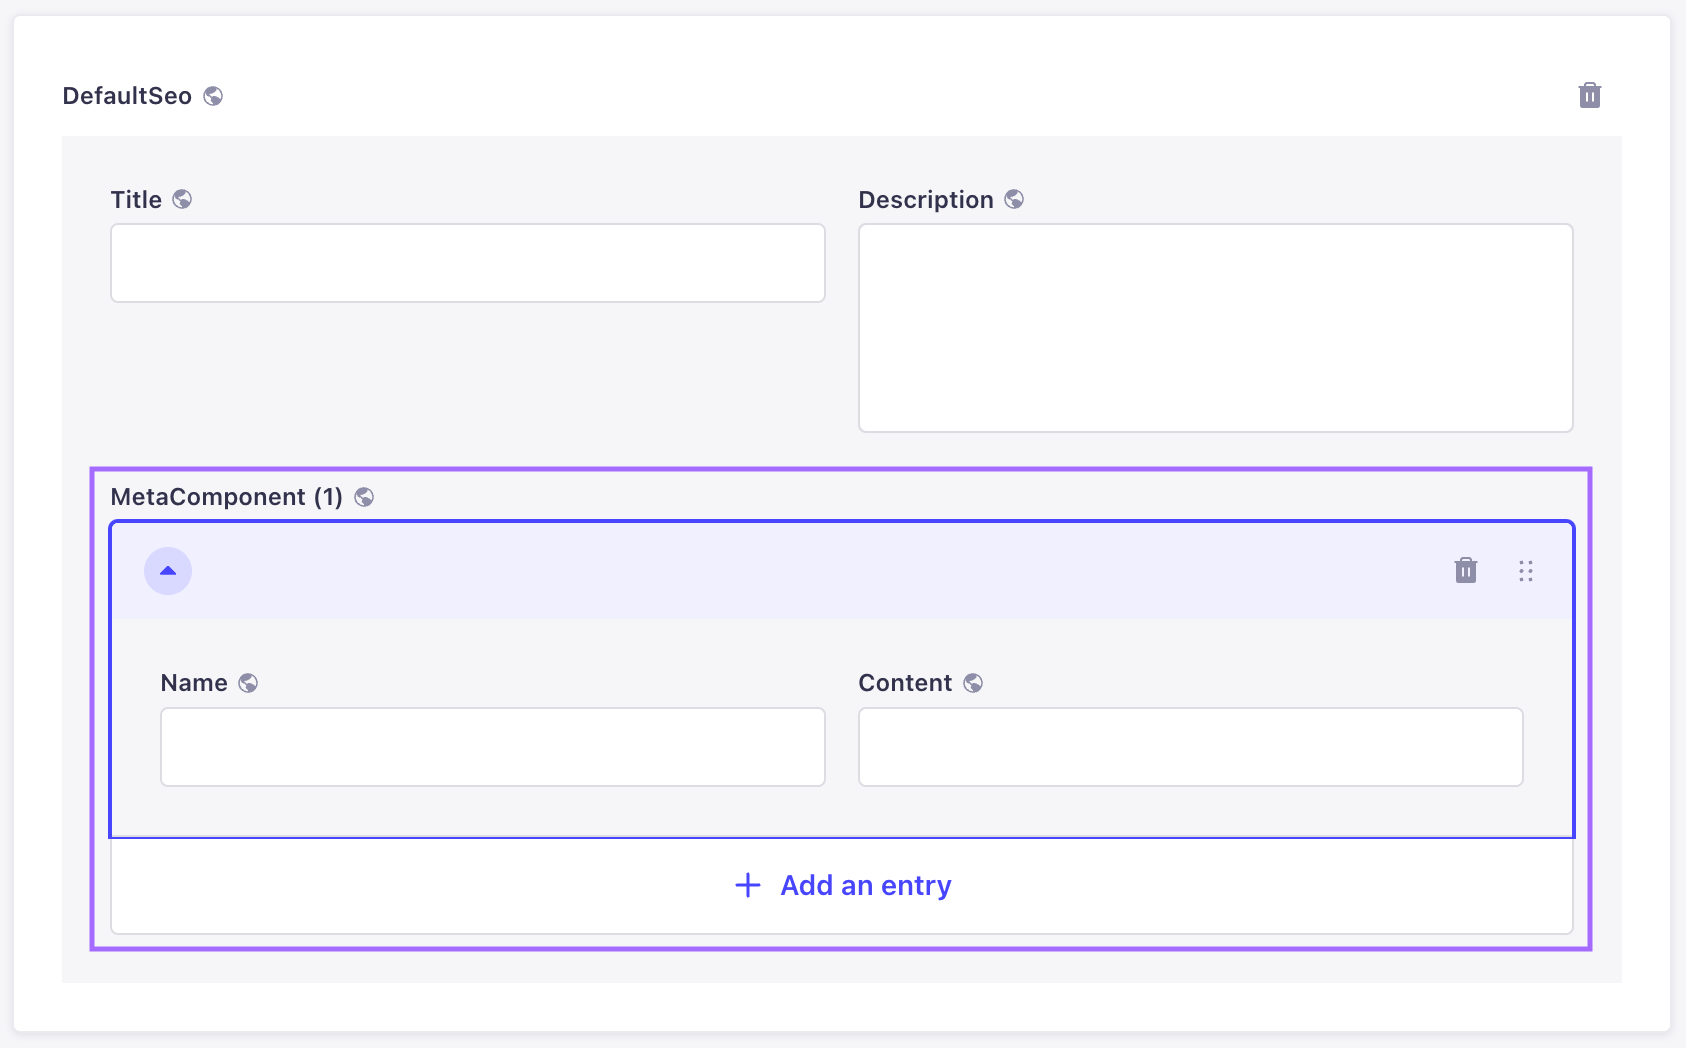
可重复组件也是字段的组合,但它们允许创建多个组件条目,所有组件条目都遵循相同的字段组合。
🌐 Repeatable components are also a combination of fields, but they allow the creation of multiple component entries, all following the same combination of fields.
要添加新条目并显示其字段组合:
🌐 To add a new entry and display its combination of fields:
- 点击添加按钮 以添加组件。
- 填写组件的字段。
- (可选) 点击 添加条目 按钮,然后再次填写字段。
使用输入区域右侧显示的按钮,可以在编辑视图中直接重新排序或删除可重复的组件条目。
🌐 The repeatable component entries can be reordered or deleted directly in the edit view, using buttons displayed on the right of the entry area.
- 使用拖放按钮 重新排序可重复组件的条目。
- 使用删除按钮 从可重复组件中删除条目。
与常规字段不同,可重复组件的条目顺序很重要。它应与终端用户阅读/查看内容的顺序完全一致。
🌐 Unlike regular fields, the order of the entries of a repeatable component is important. It should correspond exactly to how end users will read/see the content.
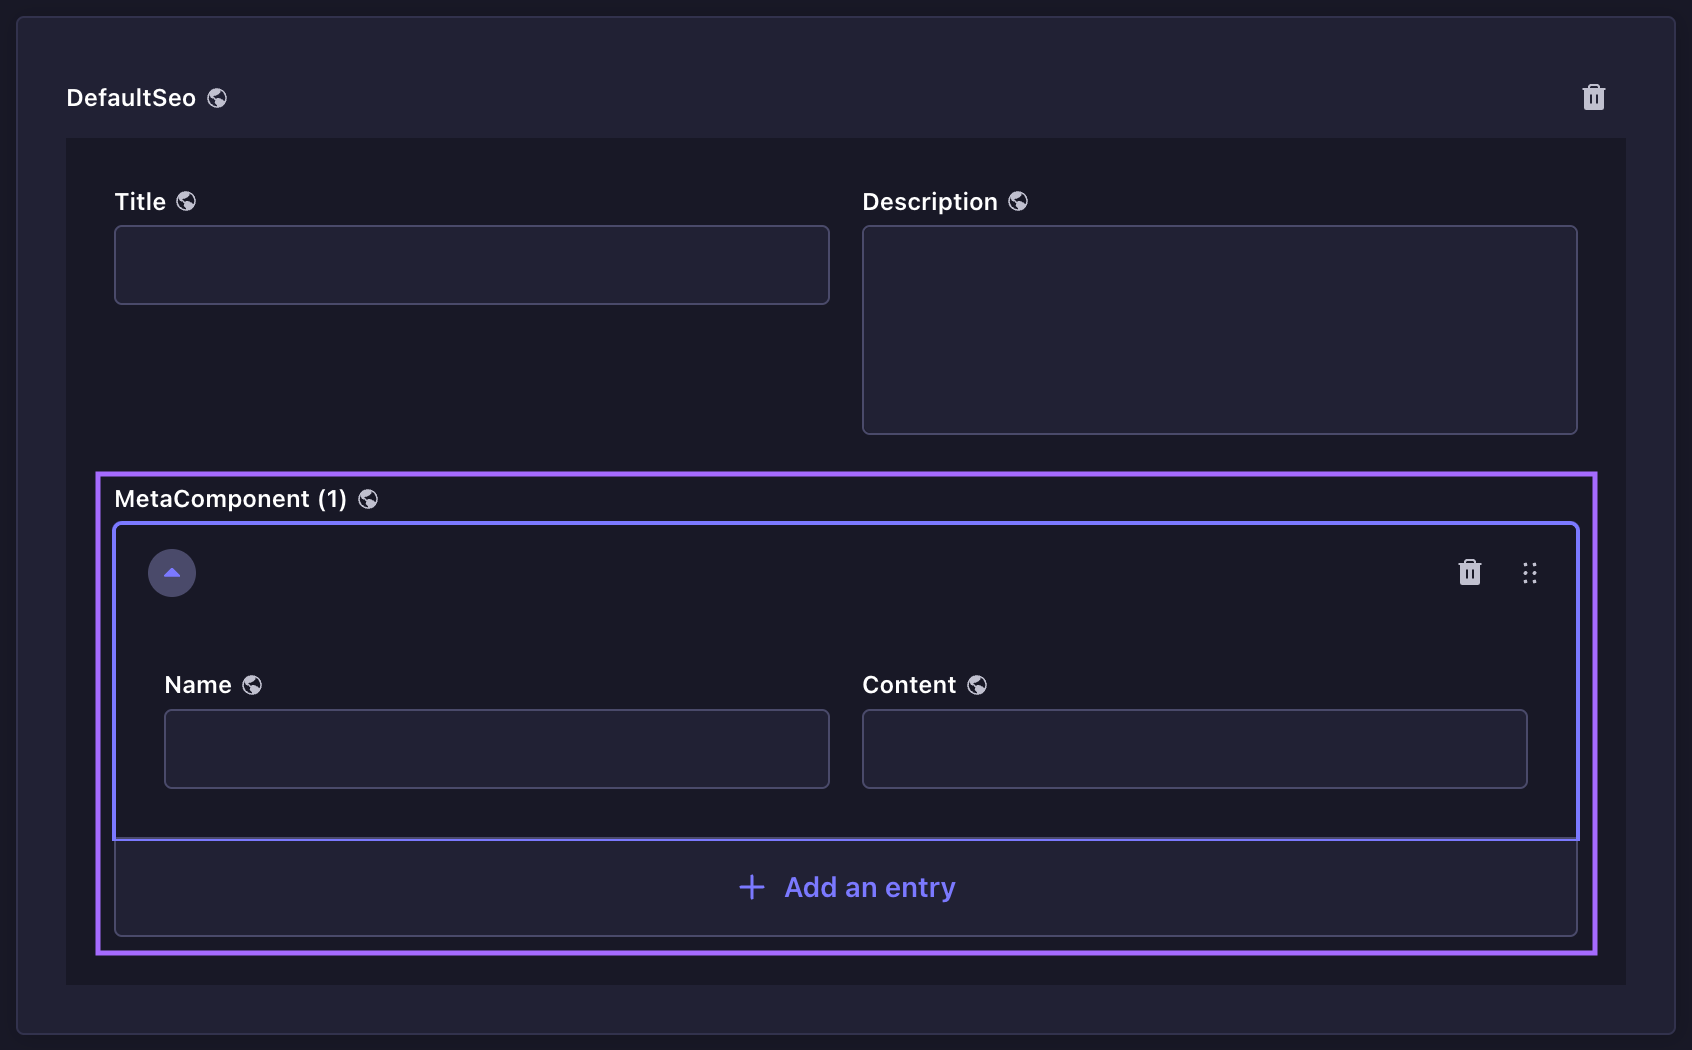
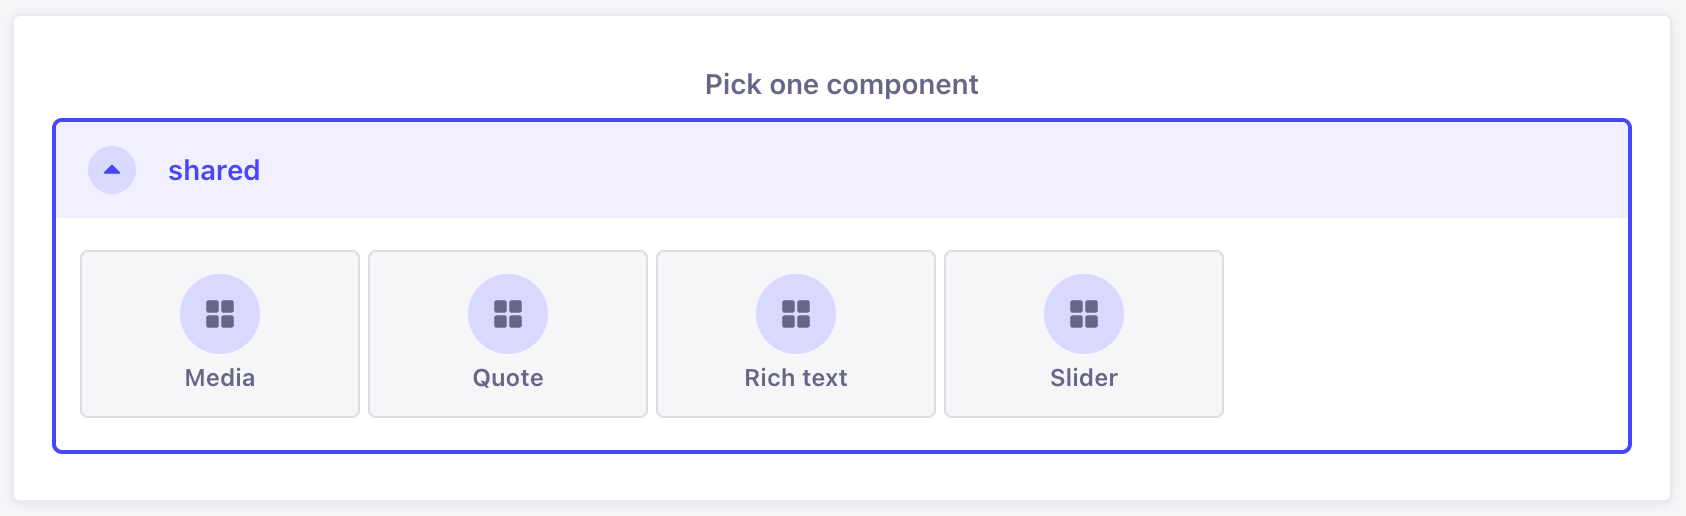
动态区域
🌐 Dynamic zones
动态区域是由组件组合而成的,而组件本身又由多个字段组成。编写动态区域的内容需要额外步骤以访问这些字段。
🌐 Dynamic zones are a combination of components, which themselves are composed of several fields. Writing the content of a dynamic zone requires additional steps in order to access the fields.


- 点击 向[动态区域名称]添加组件按钮。
- 选择动态区域可用的组件。
- 填写组件的字段。
动态区域的组件还可以使用组件区域右上角显示的按钮直接在编辑视图中重新排序或删除。
🌐 Dynamic zones' components can also be reordered or deleted directly in the edit view, using buttons displayed in the top right corner of the component area.
- 使用拖放按钮 重新排列动态区域中的组件。
- 使用删除按钮 从你的动态区域中删除组件。
你也可以使用键盘重新排列组件:使用 Tab 聚焦组件,按空格键在拖放按钮上 ,然后使用箭头键重新排序,再次按空格键放下该项目。
与常规字段不同,动态字段内部的字段和组件的顺序非常重要。它应完全对应终端用户阅读/查看内容的方式。
🌐 Unlike regular fields, the order of the fields and components inside a dynamic field is important. It should correspond exactly to how end users will read/see the content.
关联字段
🌐 Relational fields
向内容类型添加关系类型字段可以与另一个集合类型建立关系。这些字段称为“关系字段”。
🌐 Relation-type fields added to a content-type allow establishing a relation with another collection type. These fields are called "relational fields".
关系字段的内容是从它们所属内容类型的编辑视图中编写的。然而,关系字段可以指向其他集合类型的一个或多个条目,这就是为什么在内容管理器中可以管理内容类型的关系字段,以选择哪些条目是相关的。
🌐 The content of relational fields is written from the edit view of the content-type they belong to. However, relational fields can point to one or several entries of the other collection type, this is why in the Content Manager it is possible to manage a content-type's relational fields to choose which entries are relevant.
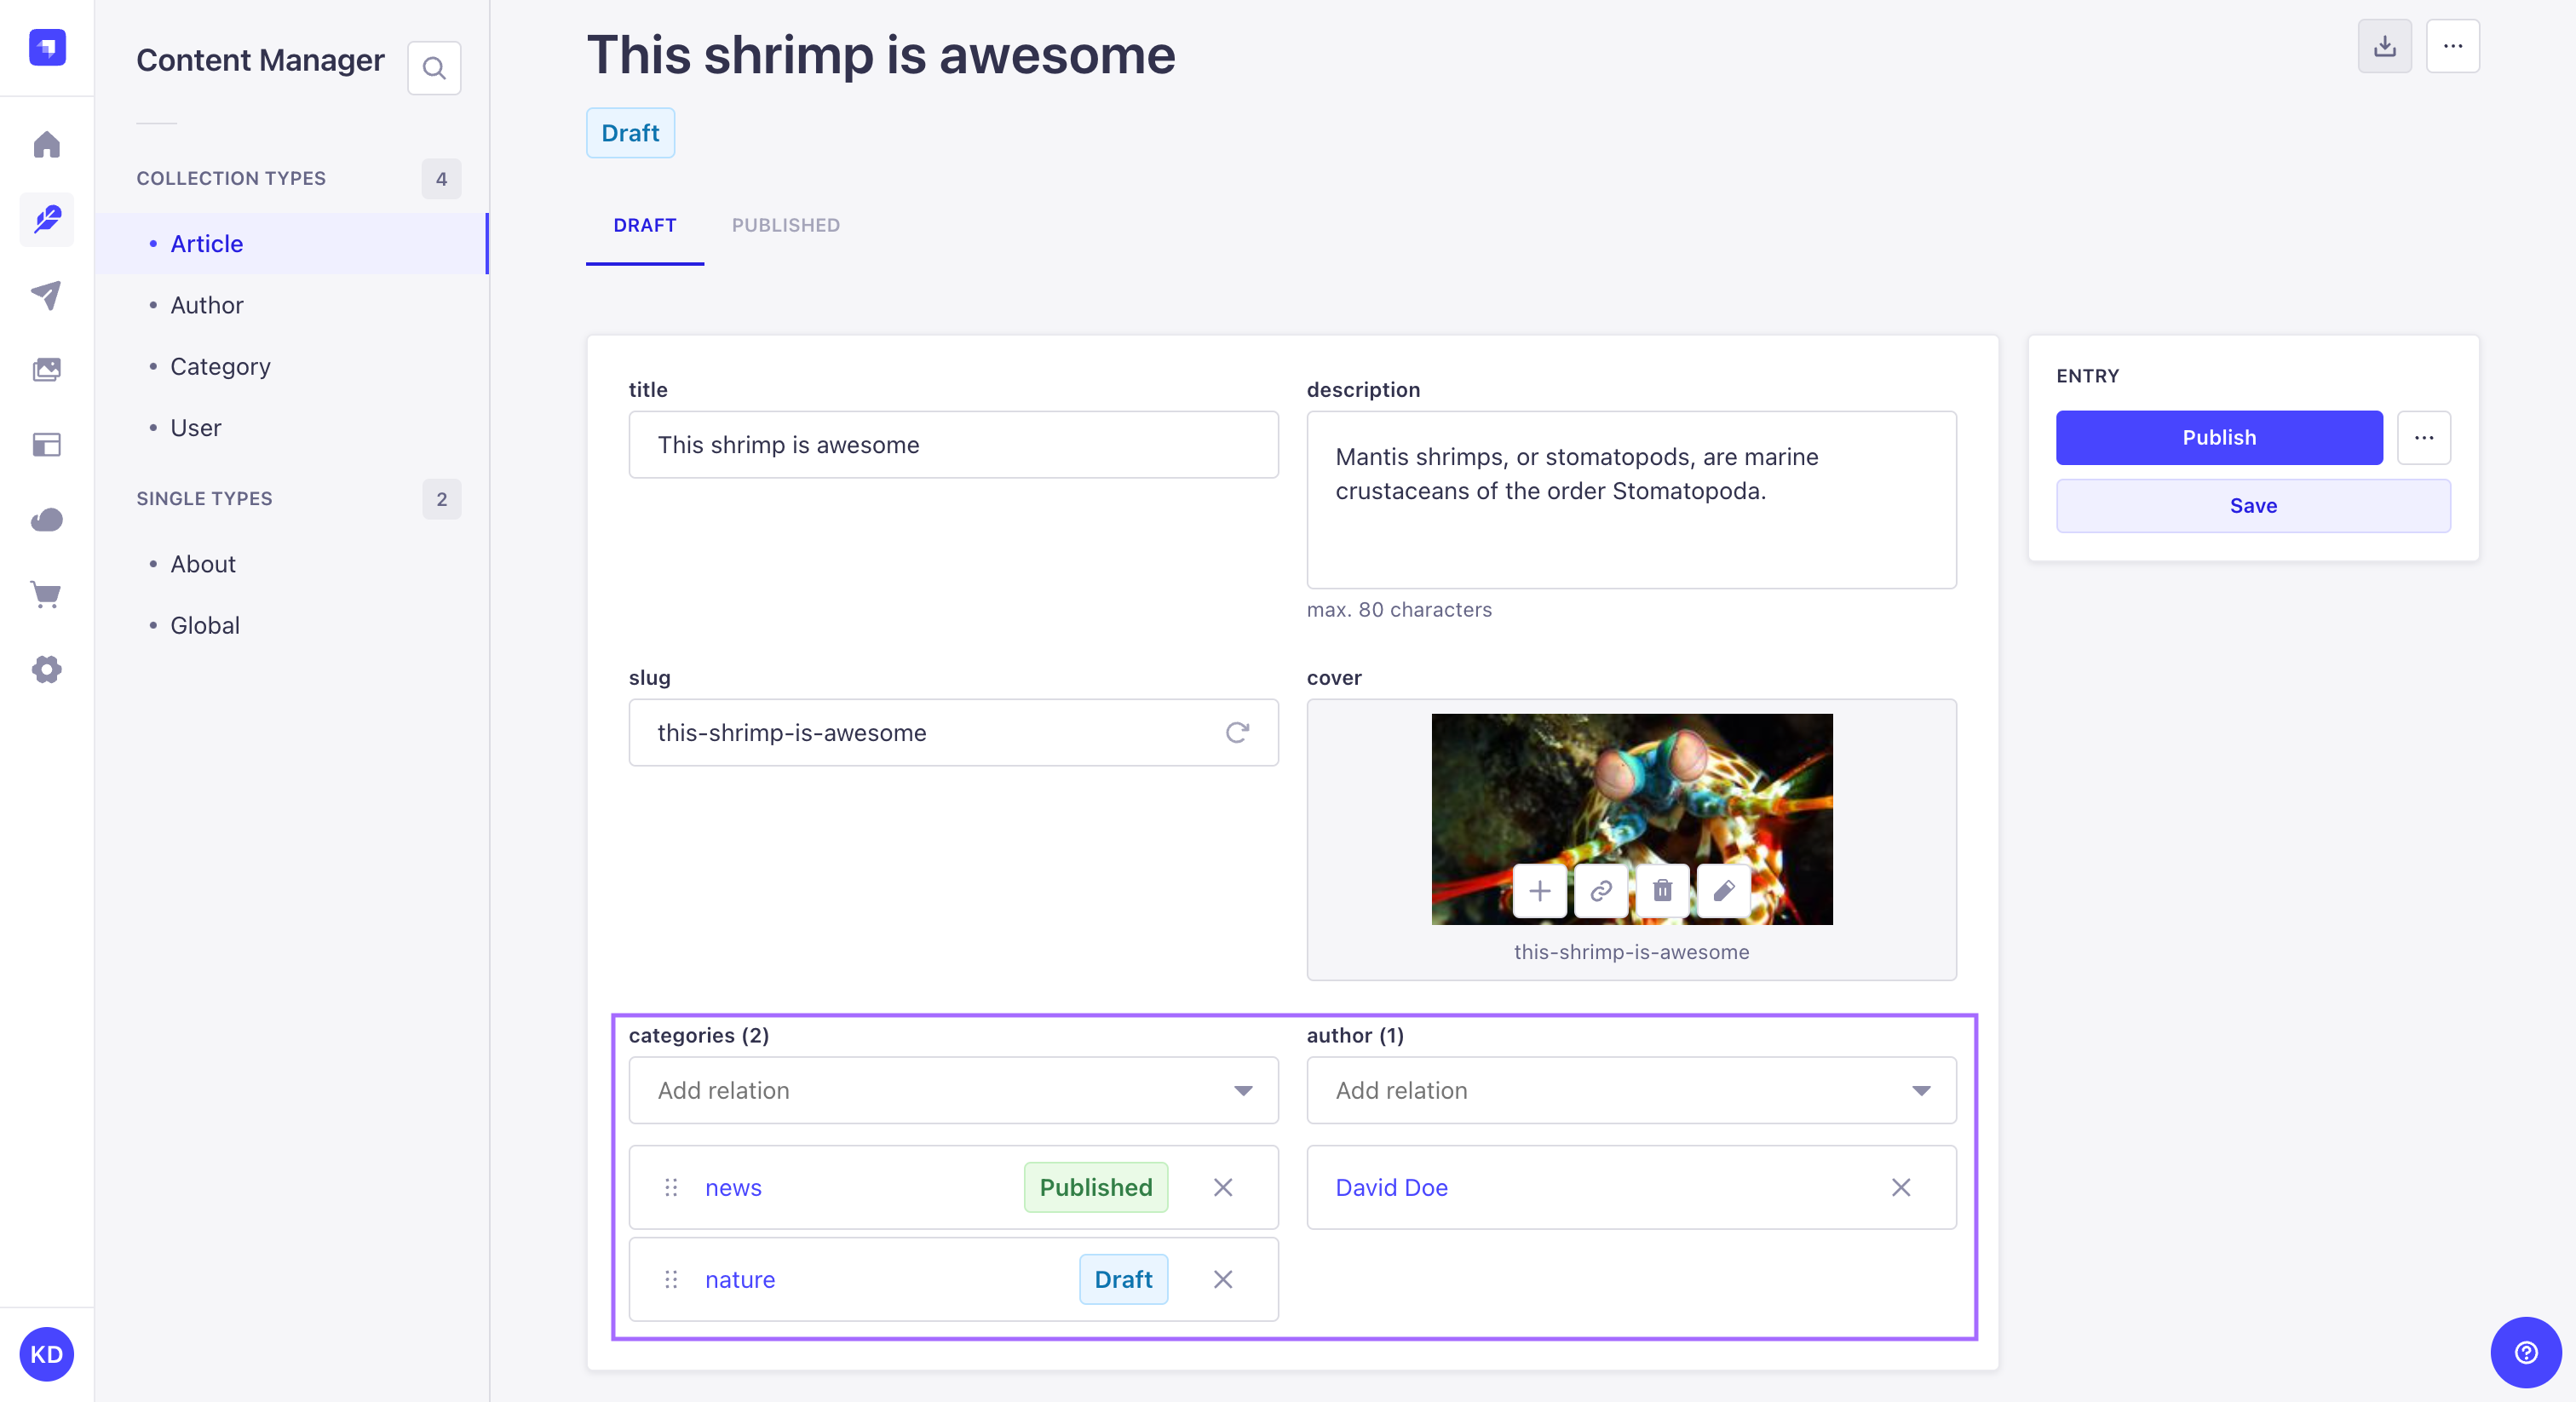
关系字段示例
在我的 Strapi 管理面板中,我创建了 2 种集合类型:
🌐 In my Strapi admin panel I have created 2 collection types:
- 餐厅,每个入口都是一家餐厅
- 类别,其中每个条目都是一种餐厅类型
我想为我的每家餐厅分配一个类别,因此我在我的两种集合类型之间建立了一个关系:餐厅可以有一个类别。
🌐 I want to assign a category to each of my restaurants, therefore I have established a relation between my 2 collection types: restaurants can have one category.
在内容管理器中,从我的餐厅条目的编辑视图中,我可以管理类别关联字段,并选择哪个类别条目与我的餐厅相关。
- One-choice relational fields
- Multiple-choice relational fields
多对一、一对一和单向关系类型仅允许为每个关系字段选择一个条目。
🌐 Many-to-one, one-to-one, and one-way types of relation only allow to choose one entry per relational field.
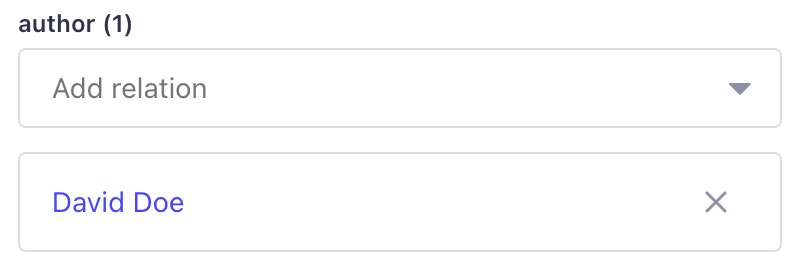
要选择唯一相关的关系字段条目:
🌐 To select the only relevant relational field's entry:
- 在内容类型的编辑视图中,单击关系字段的下拉列表。
- 在条目列表中,选择一项。
要删除下拉列表中选中的条目,请点击删除按钮 。
多对多、一对多和多方类型的关系允许为每个关系字段选择多个条目。
🌐 Many-to-many, one-to-many, and many-ways types of relation allow to choose several entries per relational field.
要选择相关关系字段的条目:
🌐 To select the relevant relational field's entries:
- 在内容类型的编辑视图中,单击关系字段的下拉列表。
- 在条目列表中,选择一项。
- 重复步骤 2,直到选择所有相关条目。
要删除条目,请点击所选条目列表中的叉号按钮 。
多选关系字段的条目可以重新排序,通过拖动按钮 表示。要移动条目,请点击并按住它,将其拖到所需位置,然后释放。
- 并非所有条目都默认列出:可以通过点击 加载更多 按钮显示更多条目。此外,与其通过滚动列表选择条目,不如点击任何关联字段下拉列表并输入以搜索特定条目。
- 点击条目的名称以打开它。行为取决于在编辑视图中配置的关联打开行为设置:条目可以在模态窗口中打开(默认)、导航到其完整编辑页面,或在新的浏览器标签中打开。请参阅配置编辑视图以更改此设置。
- 如果内容类型的关系字段启用了草稿 & 发布功能,你会在下拉列表中看到条目名称旁边出现蓝色或绿色的点。这些点分别表示条目的状态,即草稿或已发布内容。
- 如果内容类型启用了国际化 (i18n) 功能,条目列表可能会受到限制或因语言环境而异。仅会列出可能被选作关联字段的相关条目。
删除内容
🌐 Deleting content
你可以通过删除集合类型的任意条目或单一类型的默认条目来删除内容。
🌐 You can delete content by deleting any entry of a collection type, or the default entry of a single type.
- 在条目的编辑视图中,点击界面右上角的 ,然后点击删除文档按钮。
如果内容类型启用了国际化,你还可以选择仅删除当前所选的语言版本,方法是点击删除语言版本按钮。 - 在弹出的窗口中,点击 确认 按钮以确认删除。

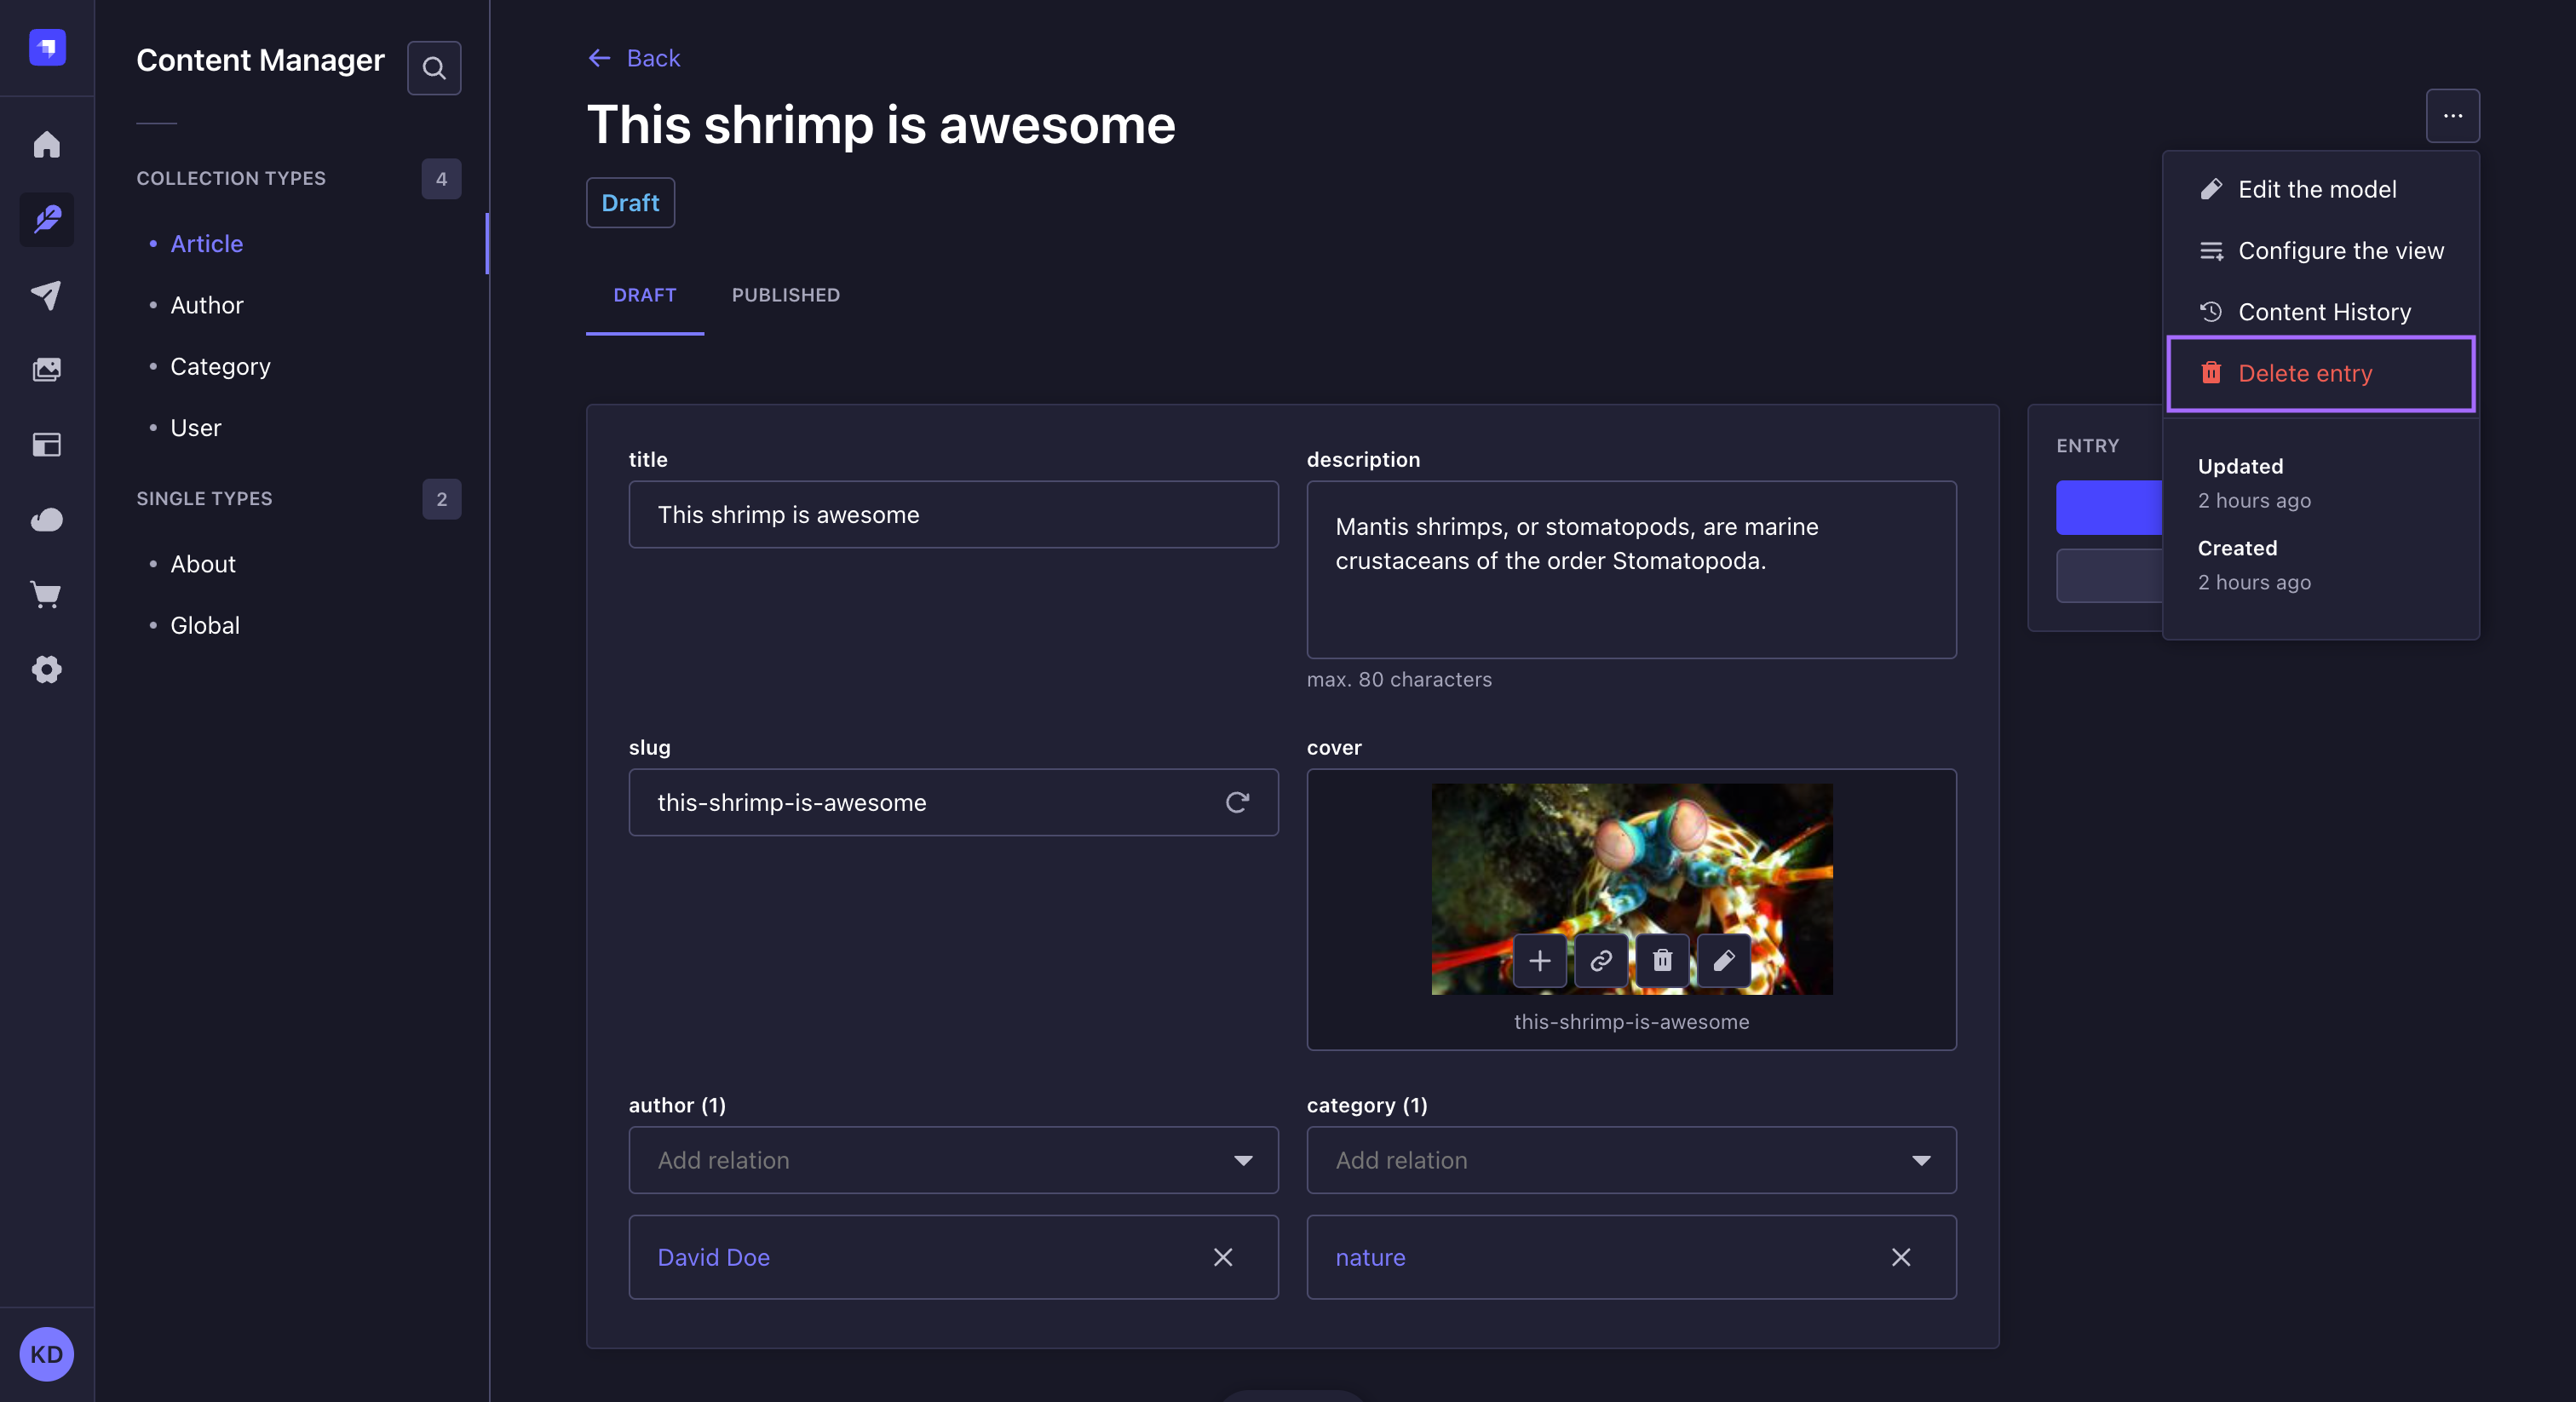
你可以通过在表格中条目记录的右侧点击 ,然后选择 删除文档按钮,从集合类型的列表视图中删除条目。
如果内容类型启用了国际化,删除文档会删除所有语言版本,而删除语言版本只会删除当前列出的语言版本。