数据管理
🌐 Data Management
Page summary:
数据管理处理基于 CLI 的内容导入、导出以及在 Strapi 实例之间的传输,同时在管理面板中进行部分配置。本文件中解释的逐步命令和前提设置可确保迁移安全。
数据管理功能可用于导入、导出或转移数据。数据管理仅基于命令行接口,但部分配置可以在管理面板中进行。
🌐 The Data Management feature can be used to import, export, or transfer data. Data Management is CLI-based only, but is partly configured in the admin panel.
配置
🌐 Configuration
数据管理功能的一些配置选项在管理面板中可用,一些通过你的 Strapi 项目的代码处理。
🌐 Some configuration options for the Data Management feature are available in the admin panel, and some are handled via your Strapi project's code.
管理面板设置
🌐 Admin panel settings
transfer.token.salt 应该在 config/admin 配置文件中定义(参见 基于代码的配置)。
🌐 A transfer.token.salt should be defined in the config/admin configuration file (see code-based configuration).
配置此功能的路径: 设置 > 全局设置 > 传输令牌
传输令牌允许用户授权 strapi transfer CLI 命令(参见 数据传输 文档)。
🌐 Transfer tokens allow users to authorize the strapi transfer CLI command (see Data transfer documentation).
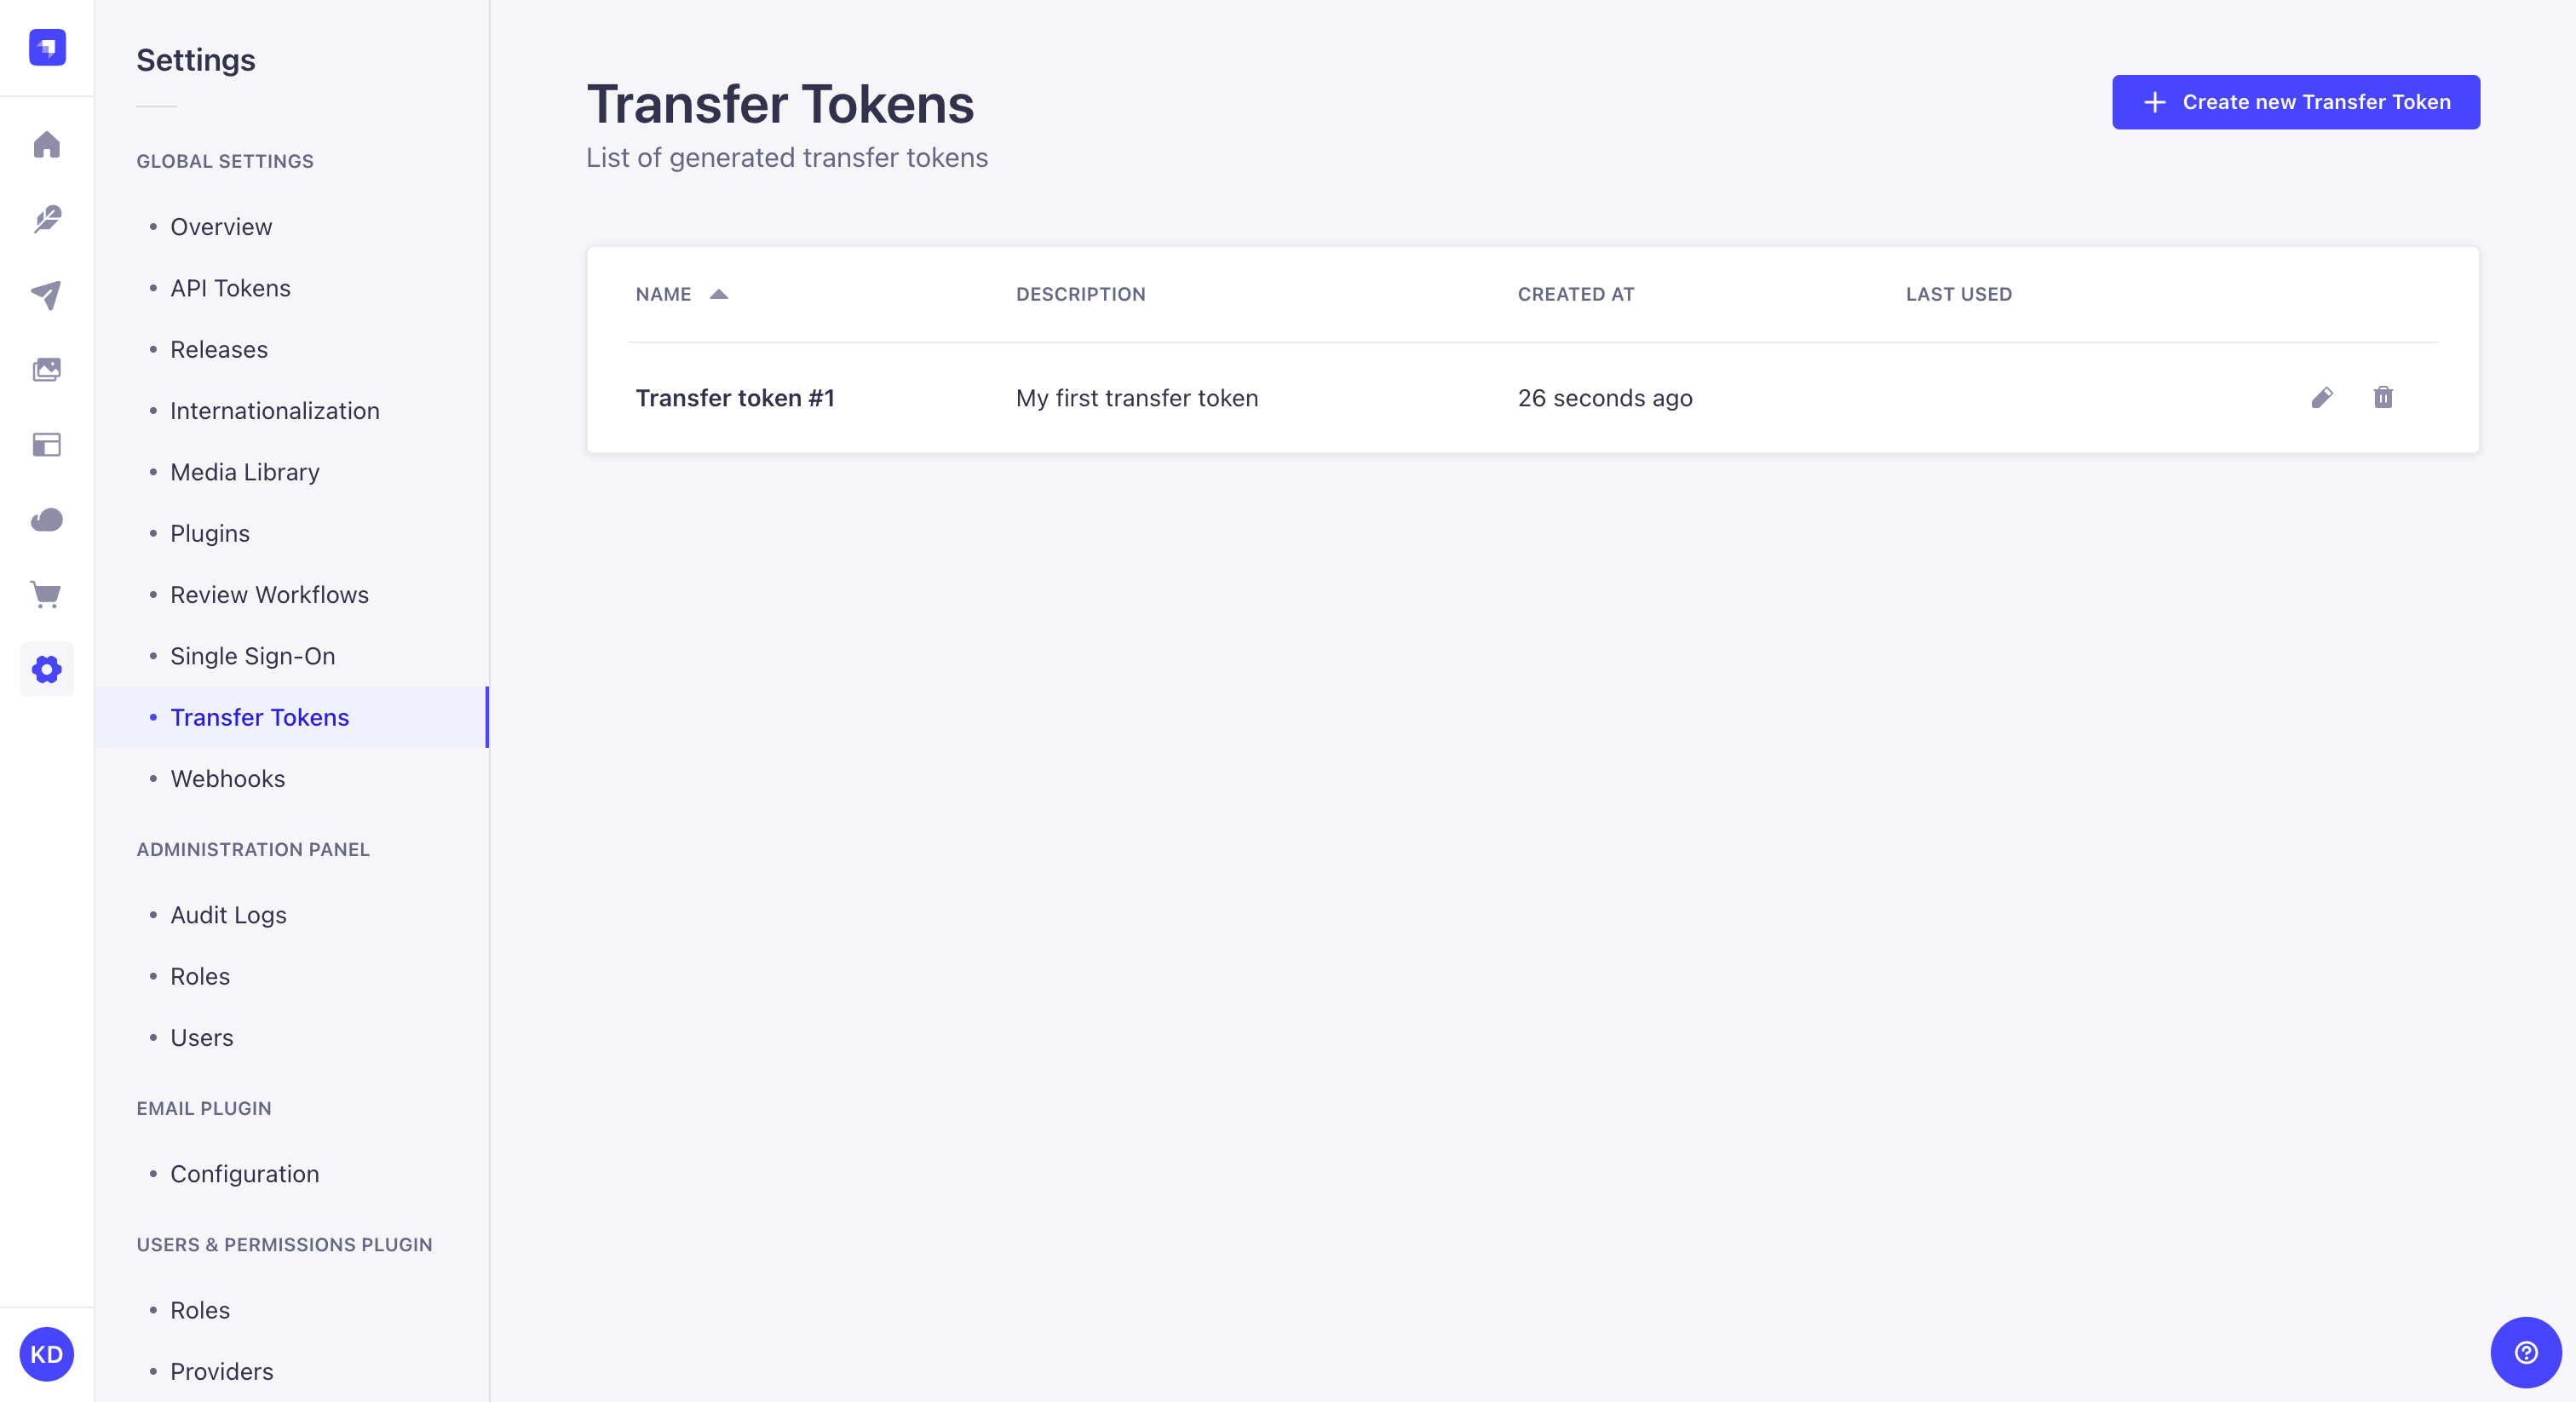
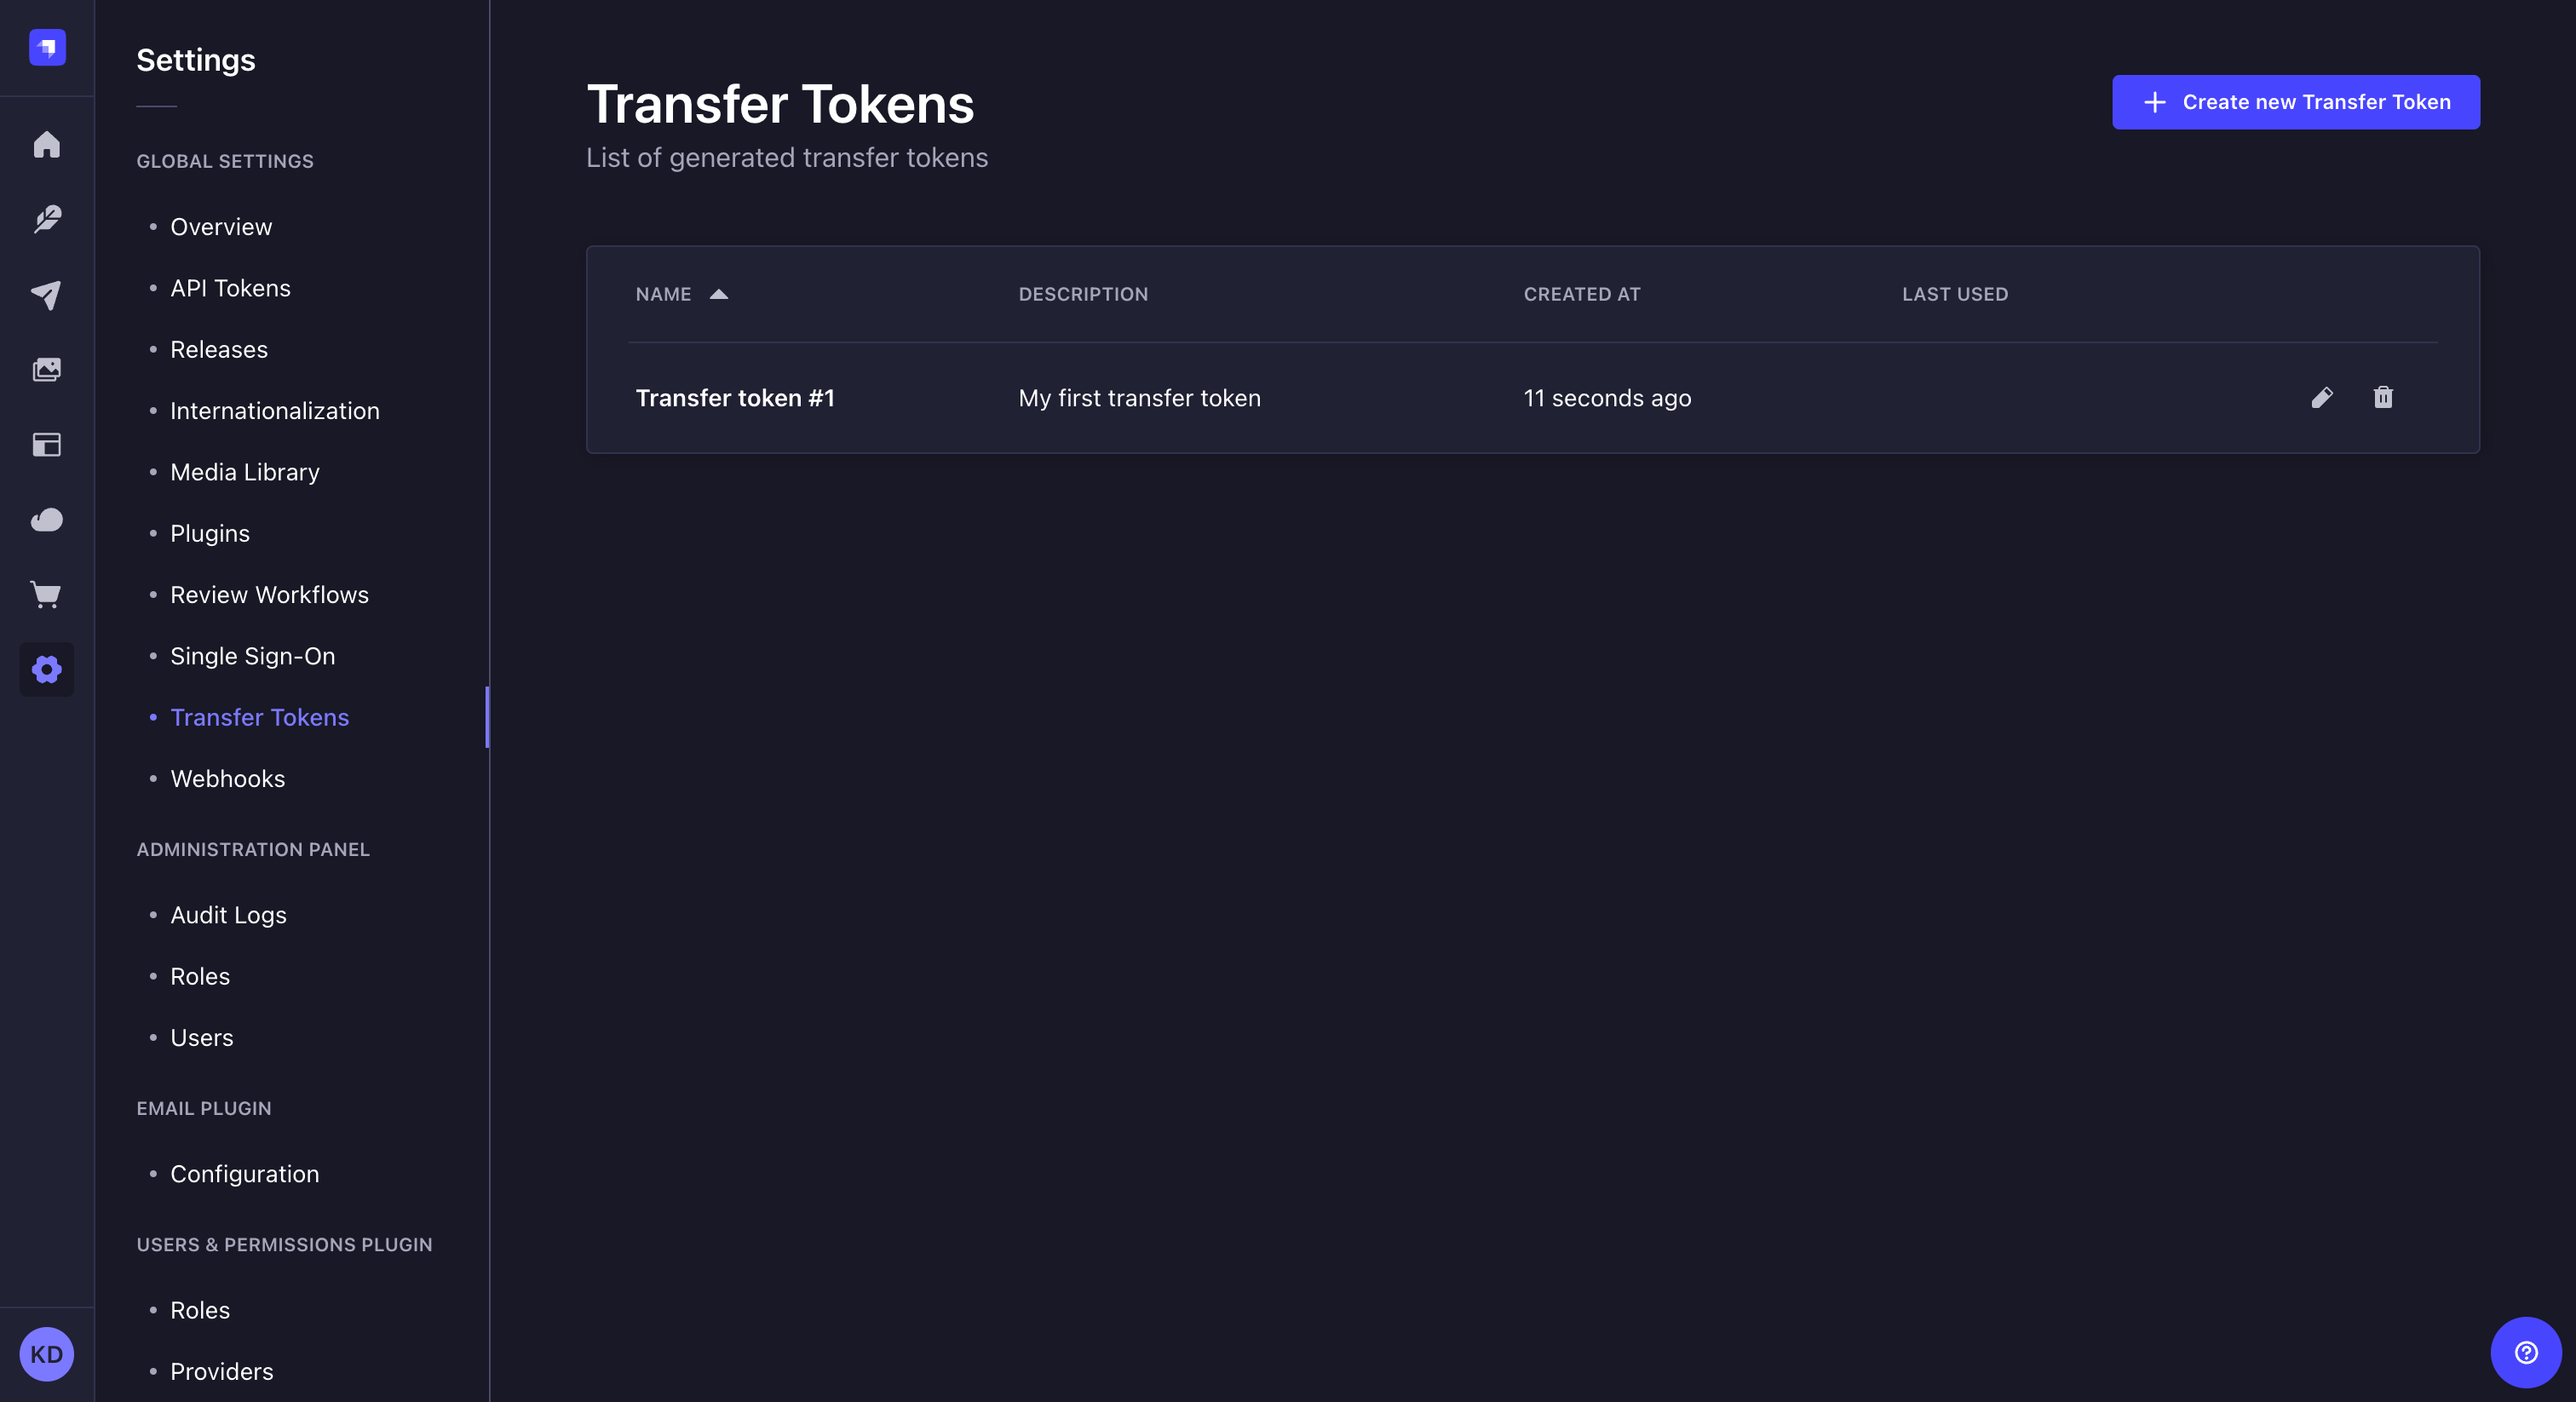
转移令牌界面显示一个表格,列出所有已创建的转移令牌。更具体地,它显示每个转移令牌的名称、描述、创建日期以及最后使用日期。
🌐 The Transfer Tokens interface displays a table listing all of the created Transfer tokens. More specifically, it displays each Transfer token's name, description, date of creation, and date of last use.
从那里,管理员还可以:
🌐 From there, administrators can also:
- 点击 以编辑传输令牌的名称、描述或类型,或重新生成令牌。
- 点击 以删除传输令牌。
创建新的传输令牌
🌐 Creating a new transfer token
- 点击 创建新的传输令牌 按钮。
- 在传输令牌发行界面,配置新的传输令牌:
| 设置名称 | 说明 || -------------- | --------------------------------------------------------------------------- || 名称 | 输入传输令牌的名称。 || 描述 | (可选)为传输令牌写一个描述。 || 令牌有效期 | 选择令牌有效期:7天、30天、90天或无限。 || 令牌类型 | 选择令牌类型:
- 推送 仅允许从本地实例到远程实例的传输,
- 拉取 仅允许从远程实例到本地实例的传输,
- 或 完全访问 允许两种类型的传输。
- 点击 保存 按钮。新的传输令牌将显示在界面顶部,并带有一个复制按钮 。
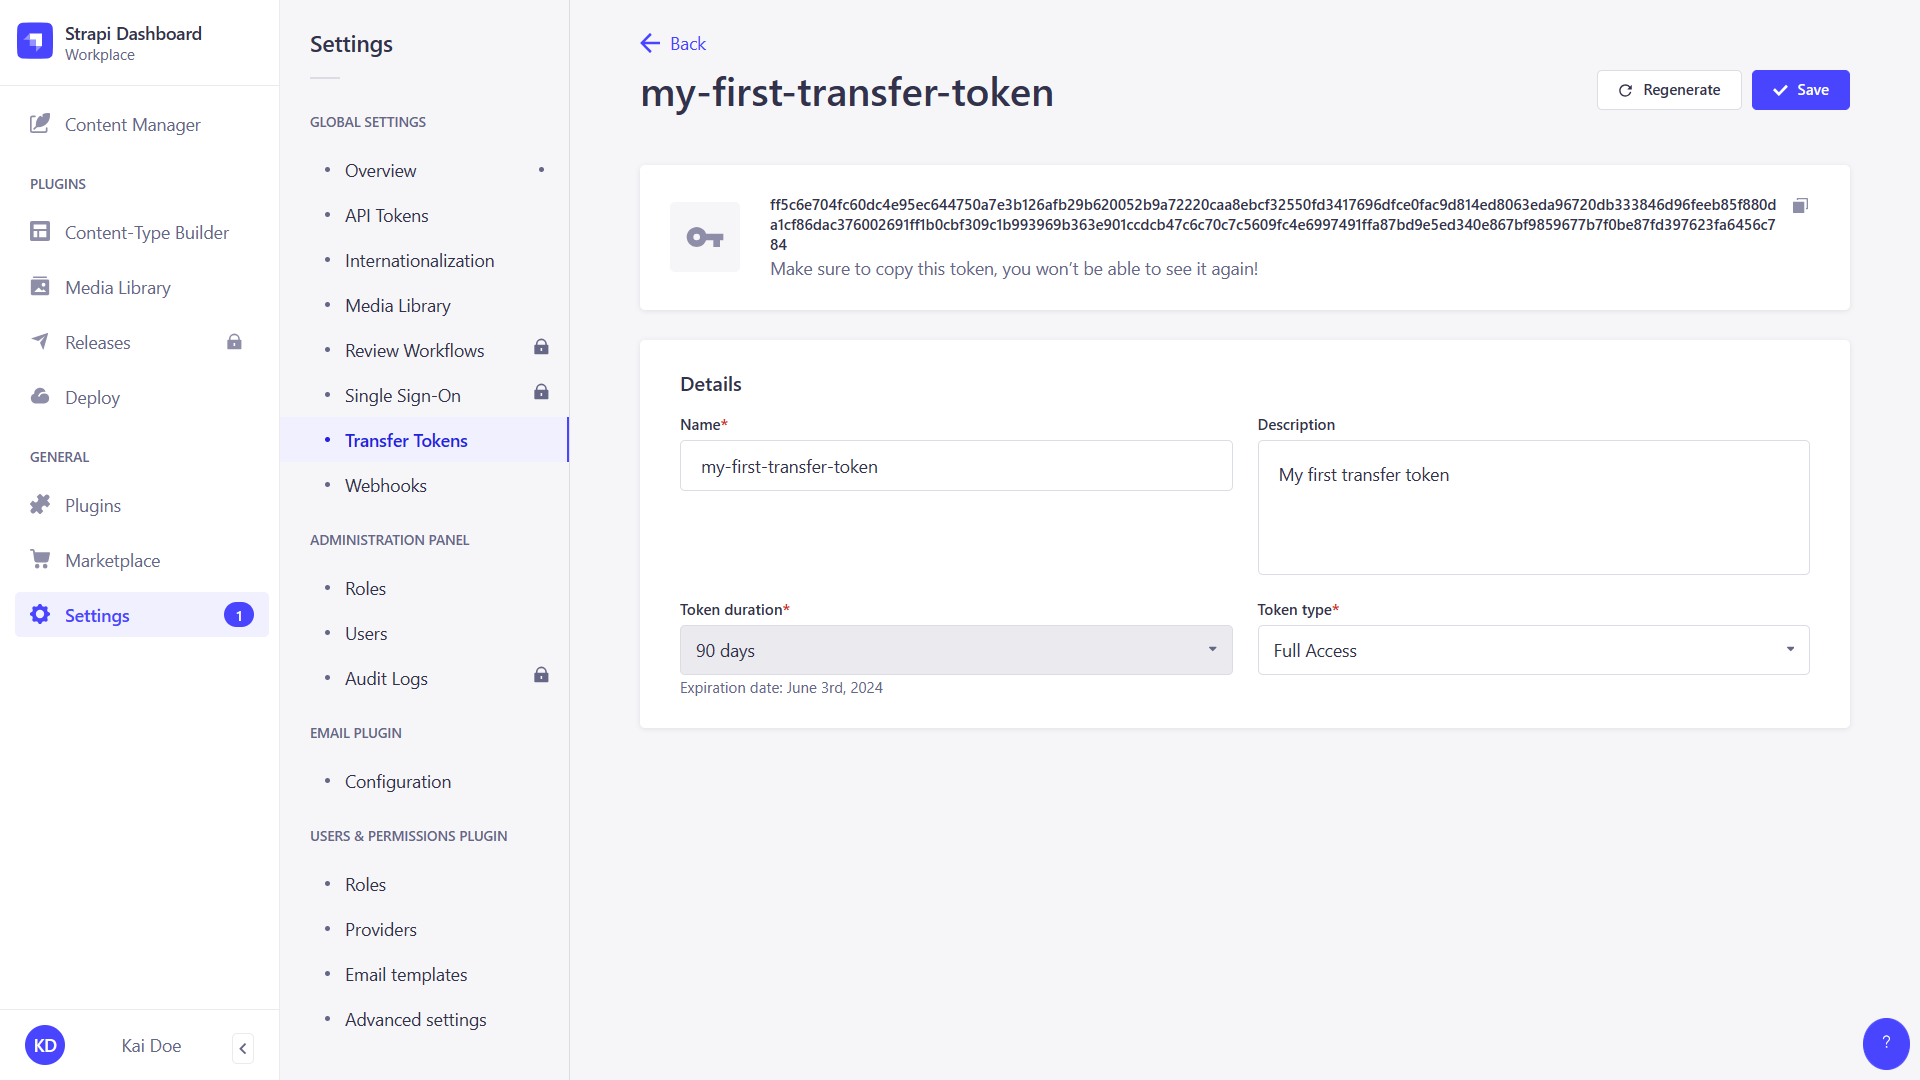
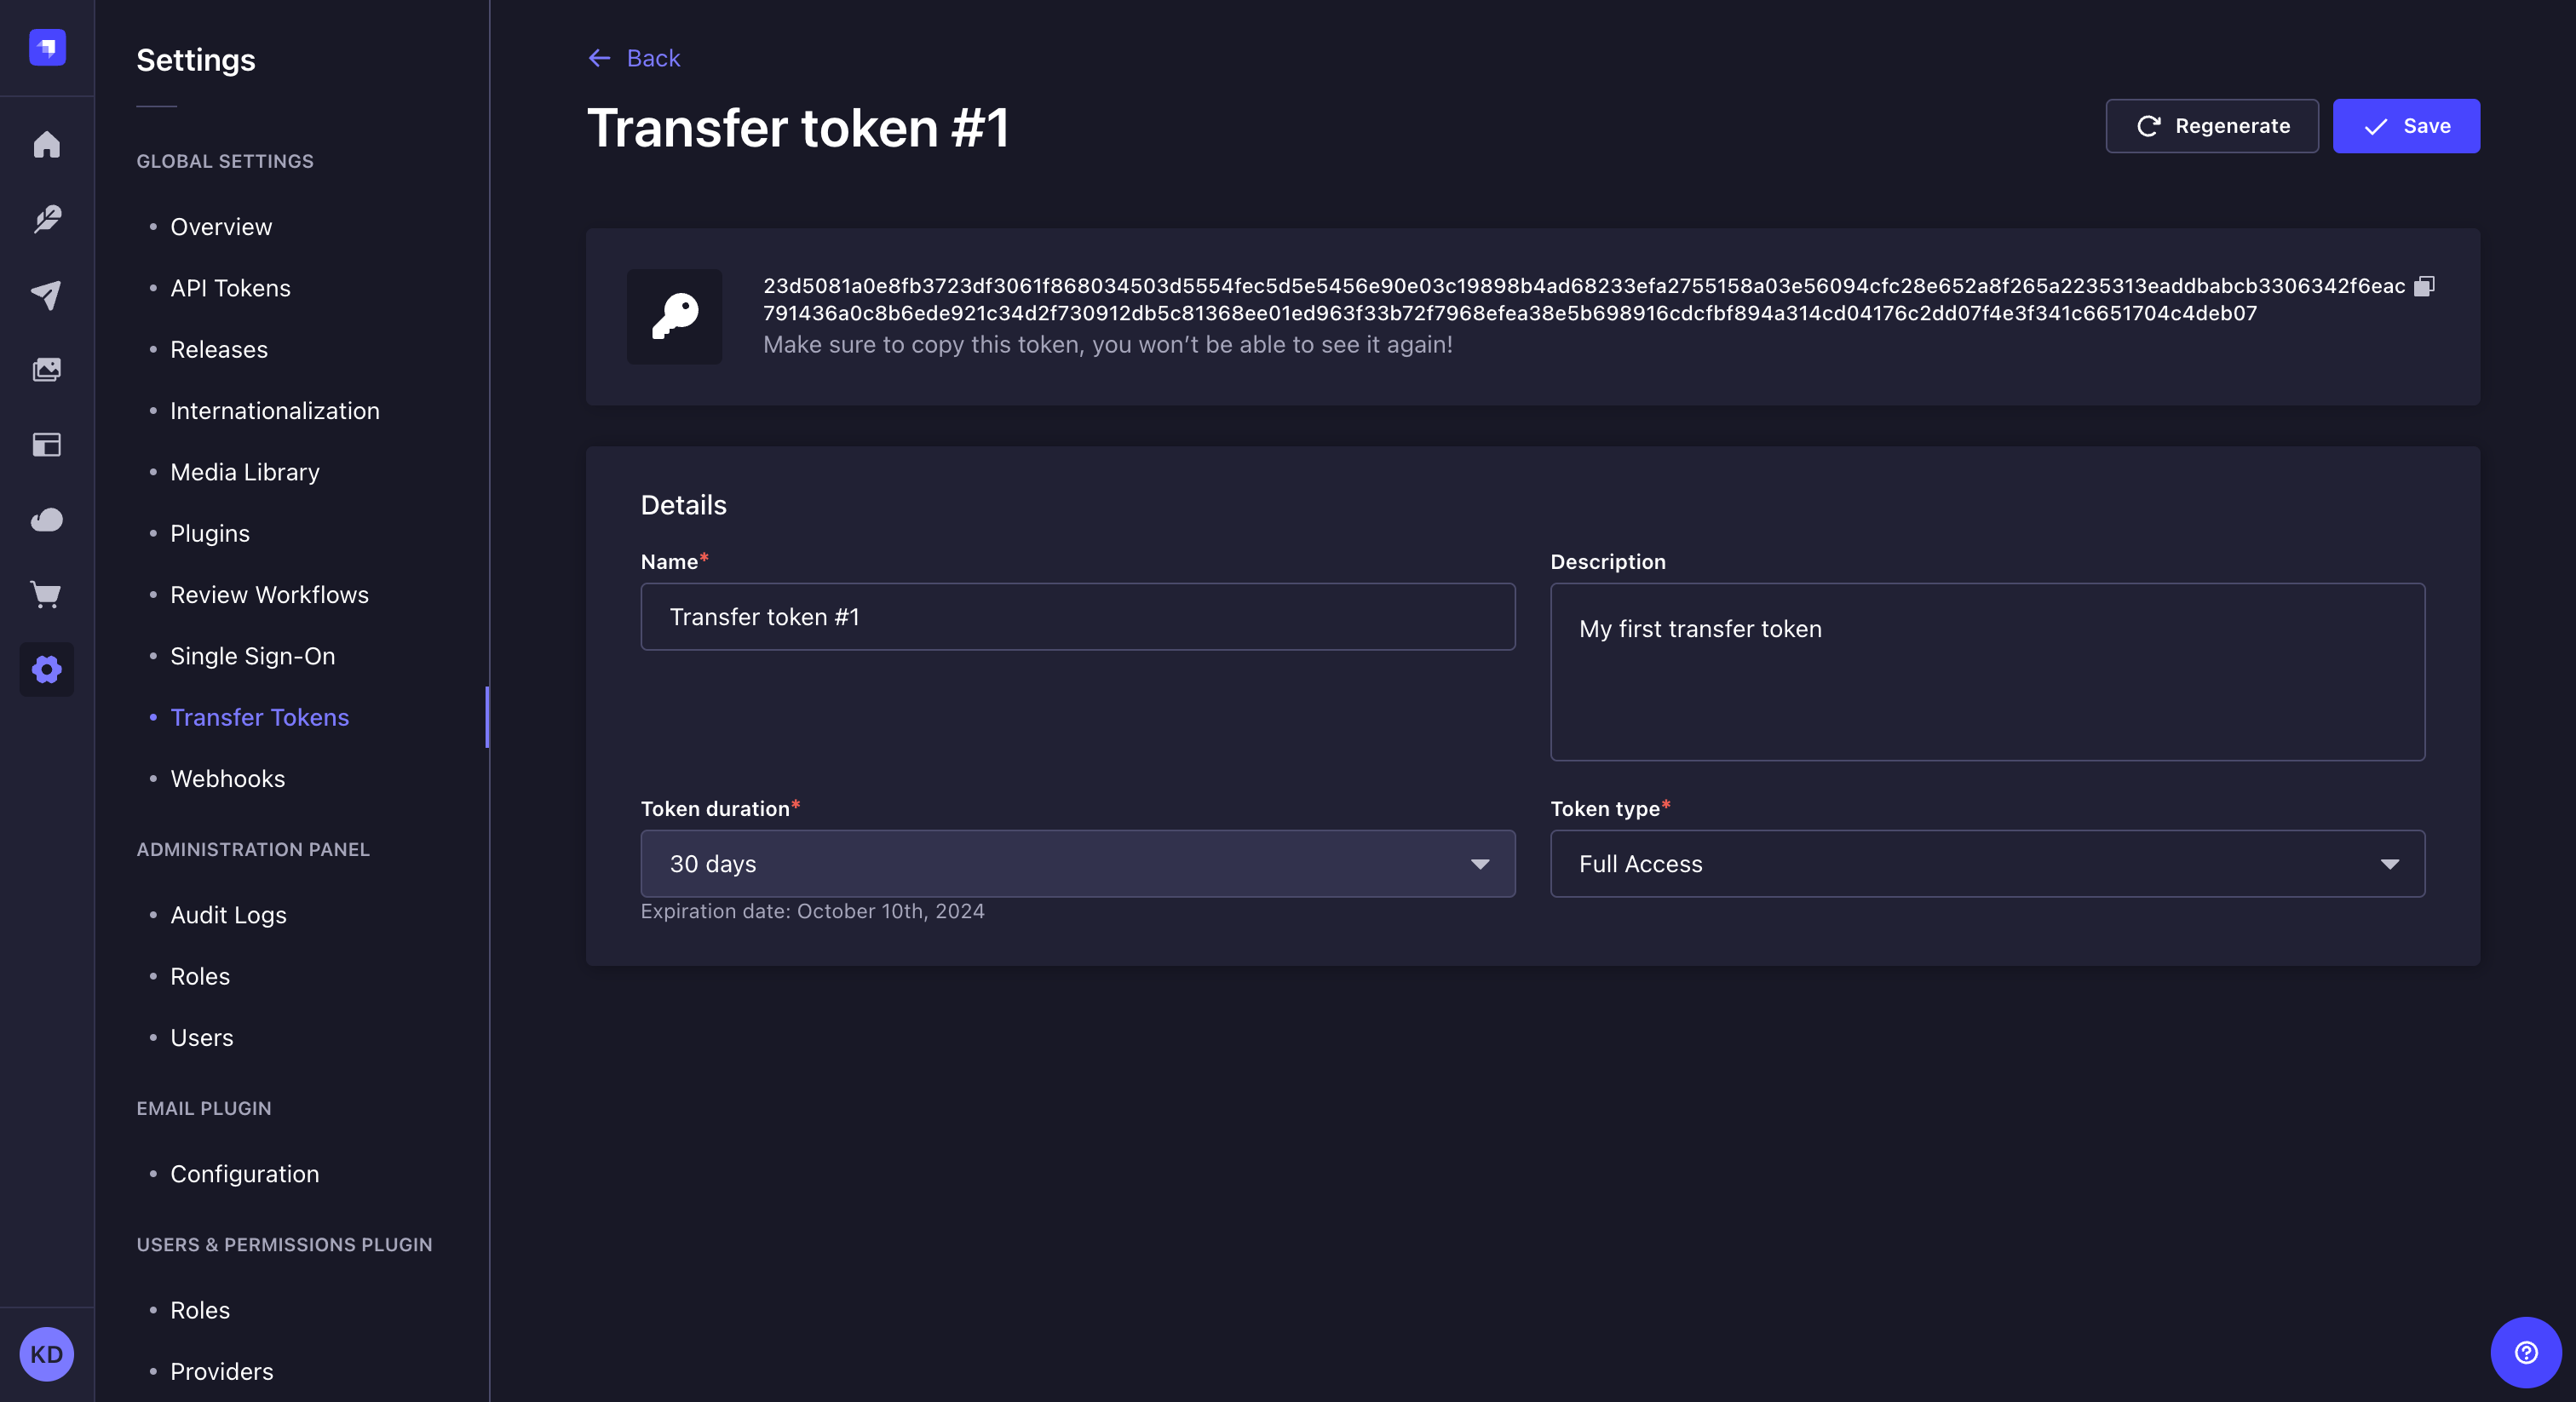
出于安全原因,转账令牌仅在创建后立即显示。刷新页面或在管理面板中导航到其他位置时,新创建的转账令牌将被隐藏,并且不会再次显示。
🌐 For security reasons, Transfer tokens are only shown right after they have been created. When refreshing the page or navigating elsewhere in the admin panel, the newly created Transfer token will be hidden and will not be displayed again.
重新生成传输令牌
🌐 Regenerating a Transfer token
- 单击转移令牌的编辑按钮。
- 点击 重新生成 按钮。
- 点击 重新生成 按钮,在对话框中确认。
- 复制界面顶部显示的新转移令牌。
基于代码的配置
🌐 Code-based configuration
transfer.token.salt 值必须在 config/admin 文件 中定义,以便能够正确生成转移令牌。如果未定义该值,该功能将被禁用。salt 可以是任意长字符串,并且为了提高安全性,最好将其添加到 环境变量 中,并使用 env() 工具导入,如以下示例所示:
🌐 A transfer.token.salt value must be defined in the config/admin file so that transfer tokens can be properly generated. If no value is defined, the feature will be disabled. The salt can be any long string, and for increased security, it's best to add it to the environment variables and import it using the env() utility as in the following example:
- JavaScript
- TypeScript
module.exports = ({ env }) => ({
  // …
  transfer: {
    token: {
      salt: env('TRANSFER_TOKEN_SALT', 'anotherRandomLongString'),
    }
  },
});
export default ({ env }) => ({
  // …
  transfer: {
    token: {
      salt: env('TRANSFER_TOKEN_SALT', 'anotherRandomLongString'),
    }
  },
});
使用
🌐 Usage
数据管理系统仅基于命令行接口(CLI),这意味着任何导入、导出或传输命令都必须从终端执行。每个命令的详尽文档可以从以下页面获得:
🌐 The Data Management system is CLI-based only, meaning any import, export, or transfer command must be executed from the terminal. Exhaustive documentation for each command is accessible from the following pages: