如何从 Strapi 插件存储和访问数据
🌐 How to store and access data from a Strapi plugin
要使用 Strapi 插件 存储数据,请使用插件内容类型。插件内容类型的工作方式与其他 内容类型 完全相同。一旦 创建 内容类型,你就可以开始 与数据交互 了。
🌐 To store data with a Strapi plugin, use a plugin content-type. Plugin content-types work exactly like other content-types. Once the content-type is created, you can start interacting with the data.
为你的插件创建一个内容类型
🌐 Create a content-type for your plugin
要使用 CLI 生成器创建内容类型,请在插件的 server/src/ 目录中的终端运行以下命令:
🌐 To create a content-type with the CLI generator, run the following command in a terminal within the server/src/ directory of your plugin:
- Yarn
- NPM
yarn strapi generate content-type
npm run strapi generate content-type
生成器 CLI 是交互式的,会询问一些关于内容类型及其包含的属性的问题。先回答第一个问题,然后在 Where do you want to add this model? 问题中,选择 Add model to existing plugin 选项,并在提示时输入相关插件的名称。
🌐 The generator CLI is interactive and asks a few questions about the content-type and the attributes it will contain. Answer the first questions, then for the Where do you want to add this model? question, choose the Add model to existing plugin option and type the name of the related plugin when asked.
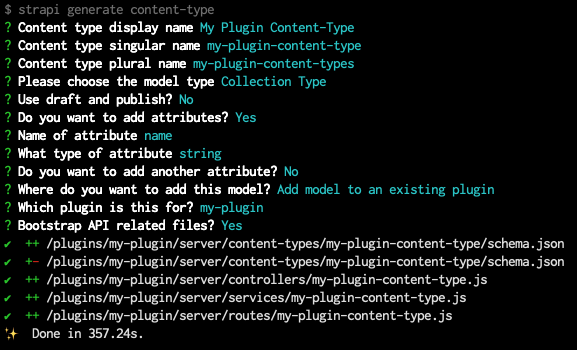
strapi generate content-type CLI 生成器用于为插件创建一个基础内容类型。CLI 将生成一些使用你的插件所需的代码,其中包括以下内容:
🌐 The CLI will generate some code required to use your plugin, which includes the following:
- 内容�类型模式(content-type schema)
- 以及一个基本的 controller、service 和 route 用于内容类型
你可能希望完全通过 CLI 生成器创建你的内容类型的整个结构,或者直接创建和编辑 schema.json 文件。我们建议你先使用 CLI 生成器创建一个简单的内容类型,然后利用管理面板中的 内容类型构建器 编辑你的内容类型。
🌐 You may want to create the whole structure of your content-types either entirely with the CLI generator or by directly creating and editing schema.json files. We recommend you first create a simple content-type with the CLI generator and then leverage the Content-Type Builder in the admin panel to edit your content-type.
如果你的内容类型在管理面板中不可见,你可能需要在内容类型模式的 pluginOptions 对象中将 content-manager.visible 和 content-type-builder.visible 参数设置为 true:
🌐 If your content-type is not visible in the admin panel, you might need to set the content-manager.visible and content-type-builder.visible parameters to true in the pluginOptions object of the content-type schema:
在管理面板中使插件内容类型可见:
示例 schema.json �文件中以下高亮显示的行展示了如何使插件内容类型在内容类型构建器和内容管理器中可见:
🌐 The following highlighted lines in an example schema.json file show how to make a plugin content-type visible to the Content-Type Builder and Content-Manager:
{
  "kind": "collectionType",
  "collectionName": "my_plugin_content_types",
  "info": {
    "singularName": "my-plugin-content-type",
    "pluralName": "my-plugin-content-types",
    "displayName": "My Plugin Content-Type"
  },
  "options": {
    "draftAndPublish": false,
    "comment": ""
  },
  "pluginOptions": {
    "content-manager": {
      "visible": true
    },
    "content-type-builder": {
      "visible": true
    }
  },
  "attributes": {
    "name": {
      "type": "string"
    }
  }
}
确保导入插件内容类型
🌐 Ensure plugin content-types are imported
CLI 生成器可能没有导入你插件的所有相关内容类型文件,因此在 strapi generate content-type CLI 命令运行完成后,你可能需要进行以下调整:
🌐 The CLI generator might not have imported all the related content-type files for your plugin, so you might have to make the following adjustments after the strapi generate content-type CLI command has finished running:
- 在
/server/index.js文件中,导入内容类型:
'use strict';

const register = require('./register');
const bootstrap = require('./bootstrap');
const destroy = require('./destroy');
const config = require('./config');
const contentTypes = require('./content-types');
const controllers = require('./controllers');
const routes = require('./routes');
const middlewares = require('./middlewares');
const policies = require('./policies');
const services = require('./services');

module.exports = {
  register,
  bootstrap,
  destroy,
  config,
  controllers,
  routes,
  services,
  contentTypes,
  policies,
  middlewares,
};
- 在
/server/content-types/index.js文件中,导入 content-type 文件夹:
'use strict';

module.exports = {
  // In the line below, replace my-plugin-content-type
  // with the actual name and folder path of your content type
  "my-plugin-content-type": require('./my-plugin-content-type'),
};
- 确保
/server/content-types/[your-content-type-name]文件夹不仅包含由 CLI 生成的schema.json文件,还包含一个index.js文件,该文件使用以下代码导出内容类型:
'use strict';

const schema = require('./schema');

module.exports = {
  schema,
};
与插件中的数据进行交互
🌐 Interact with data from the plugin
为插件创建内容类型后,你可以创建、读取、更新和删除数据。
🌐 Once you have created a content-type for your plugin, you can create, read, update, and delete data.
插件只能与 /server 文件夹中的数据交互。如果你需要从管理面板更新数据,请参考 传递数据指南。
🌐 A plugin can only interact with data from the /server folder. If you need to update data from the admin panel, please refer to the passing data guide.
要创建、读取、更新和删除数据,你可以使用 Document Service API 或 Query Engine API。虽然建议使用 Document Service API,特别是当你需要访问组件或动态区域时,但如果你需要不受限制地访问底层数据库,Query Engine API 也非常有用。
🌐 To create, read, update, and delete data, you can use either the Document Service API or the Query Engine API. While it's recommended to use the Document Service API, especially if you need access to components or dynamic zones, the Query Engine API is useful if you need unrestricted access to the underlying database.
在文档服务和查询引擎 API 查询中使用 plugin::your-plugin-slug.the-plugin-content-type-name 语法来标识内容类型。
🌐 Use the plugin::your-plugin-slug.the-plugin-content-type-name syntax for content-type identifiers in Document Service and Query Engine API queries.
示例:
以下是如何查找为名为 my-plugin 的插件创建的 my-plugin-content-type 集合类型的所有条目:
🌐 Here is how to find all the entries for the my-plugin-content-type collection type created for a plugin called my-plugin:
// Using the Document Service API
let data = await strapi.documents('plugin::my-plugin.my-plugin-content-type').findMany();

// Using the Query Engine API
let data = await strapi.db.query('plugin::my-plugin.my-plugin-content-type').findMany();
你可以通过 strapi 对象访问数据库,该对象可以在 middlewares、policies、controllers、services 中找到,也可以从 register、boostrap、destroy 生命周期函数中获取。
🌐 You can access the database via the strapi object which can be found in middlewares, policies, controllers, services, as well as from the register, boostrap, destroy lifecycle functions.