配置内容类型的视图
¥Configuring the views of a content-type
根据其类型,内容类型可以分为 2 个接口:列表视图和编辑视图。两个接口都可以配置。
¥Depending on their type, content-types can be divided into 2 interfaces: the list view and the edit view. Both interfaces can be configured.
配置列表视图
¥Configuring the list view
在列表视图界面的右侧,表格正上方,显示一个设置按钮 。它允许访问可为集合类型的列表视图设置的配置,并选择要在表中显示的字段。
¥On the right side of the list view interface, right above the table, a settings button is displayed. It allows to access the configurations that can be set for the list view of your collection type, and to choose which fields to display in the table.
这些配置仅适用于从中访问设置的集合类型的��列表视图(即禁用集合类型的过滤器或搜索选项不会自动也禁用所有其他集合类型的相同选项)。
¥The configurations only apply to the list view of the collection type from which the settings are accessed (i.e. disabling the filters or search options for a collection type will not automatically also disable these same options for all other collection types).
另请注意,下面的说明解释了如何永久配置在集合类型的列表视图的表格中显示哪些字段。也可以临时配置显示的字段(参见 内容管理器简介)。
¥Note also that the explanations below explain how to permanently configure which fields are displayed in the table of the list view of your collection type. It is also possible to configure the displayed fields temporarily (see Introduction to Content Manager).


列表视图设置
¥List view settings
-
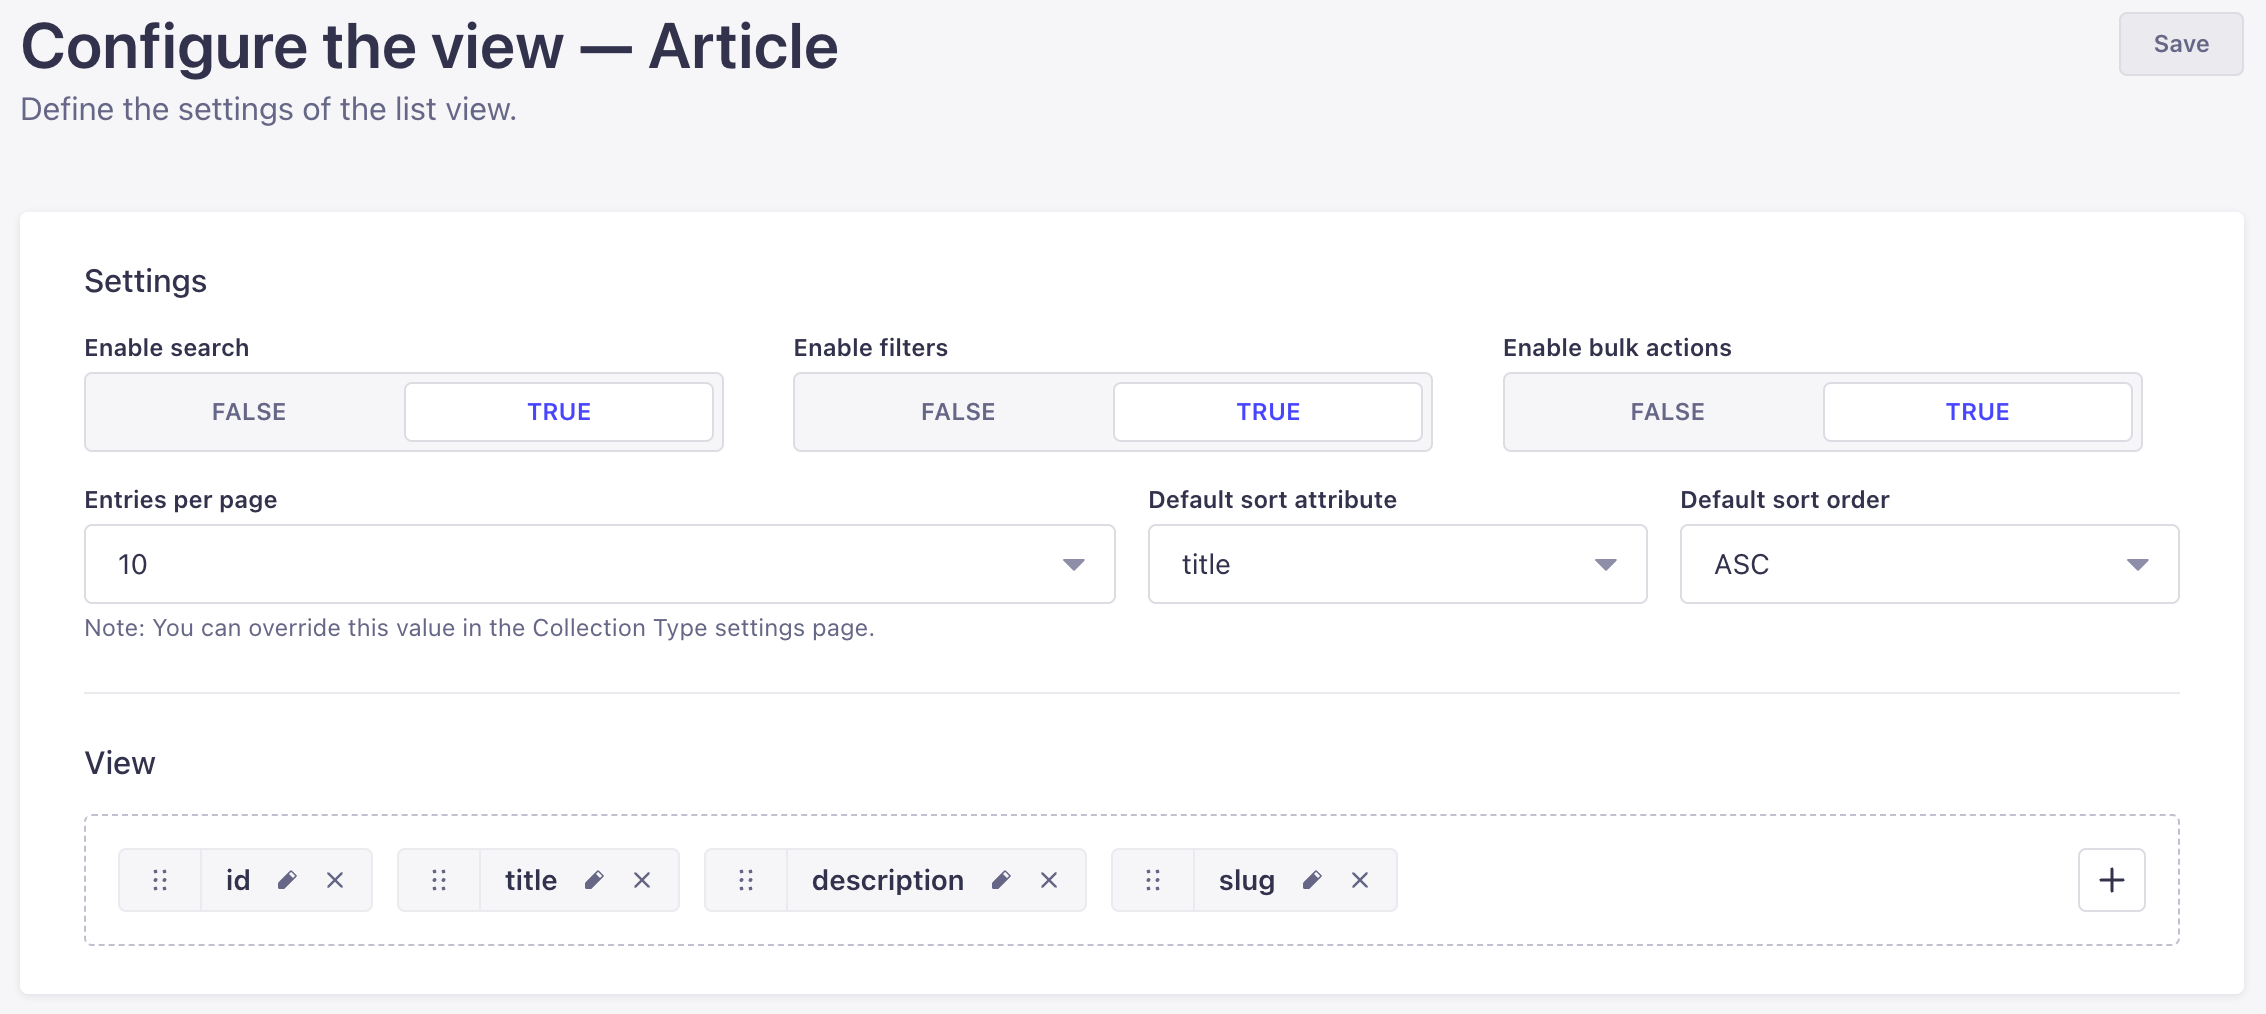
在你的集合类型的列表视图中,单击设置按钮 ,然后单击 ,配置要重定向到列表视图配置界面的视图。
¥In the list view of your collection type, click on the settings button then Configure the view to be redirected to the list view configuration interface.
-
在“设置”区域中,定义你选择的新设置:
¥In the Settings area, define your chosen new settings:
| 设置名称 | 指示 |
|---|---|
| 启用搜索 | 单击 TRUE 或 FALSE 可启用或禁用搜索。 |
| 启用过滤器 | 单击 TRUE 或 FALSE 可启用或禁用过滤器。 |
| 启用批量操作 | 单击 TRUE 或 FALSE 可启用或禁用列表视图表格中的多个选择框。 |
| 每页条目数 | 从下拉列表中选择每页的条目数。 |
| 默认排序属性 | 选择默认使用的排序字段。 |
| 默认排序顺序 | 选择默认情况下应用的排序类型。 |
-
单击“保存”按钮。
¥Click on the Save button.
列表视图显示
¥List view display
-
在你的集合类型的列表视图中,单击设置按钮 ,然后单击 ,配置要重定向到列表视图配置界面的视图。
¥In the list view of your collection type, click on the settings button then Configure the view to be redirected to the list view configuration interface.
-
在“视图”区域中,定义要在列表视图表中显示的字段以及显示顺序:
¥In the View area, define what fields to display in the list view table, and in what order:
-
单击添加按钮 添加新字段。
¥Click the add button to add a new field.
-
单击删除按钮 删除字段。
¥Click the delete button to remove a field.
-
单击重新排序按钮 并将其拖放到你希望它显示在其他字段中的位置。
¥Click the reorder button and drag and drop it to the place you want it to be displayed among the other fields.
-
-
单击编辑按钮 访问其可用的自身设置:
¥Click the edit button to access its available own settings:
| 设置名称 | 指示 |
|---|---|
| 标签 | 写入要用于列表视图表中的字段的标签。 |
| 在此字段上启用排序 | 单击 TRUE 或 FALSE 可启用或禁用字段排序。 |
-
单击“保存”按钮。
¥Click on the Save button.
关系字段也可以显示在列表视图中。然而,有一些特殊性需要记住:
¥Relational fields can also be displayed in the list view. There are however some specificities to keep in mind:
-
每个关系字段只能显示一个字段。
¥Only one field can be displayed per relational field.
-
只能显示第一级字段(即无法显示关系的关系中的字段)。
¥Only first-level fields can be displayed (i.e. fields from the relation of a relation can't be displayed).
-
如果显示的字段包含多个值,则不会显示其所有值,而是显示一个指示值数量的计数器。你可以悬停此计数器以查看指示关系字段的前 10 个值的工具提示。
¥If the displayed field contains more than one value, not all its values will be displayed, but a counter indicating the number of values. You can hover this counter to see a tooltip indicating the first 10 values of the relational field.
另请注意,关系字段不能设置为默认排序。
¥Note also that relational fields cannot be set as default sort.
配置编辑视图
¥Configuring the edit view
在内容类型的编辑视图中,会显示按钮,该按钮指向配置视图按钮。它允许访问可为内容类型的编辑视图设置的配置,例如条目标题和内容类型字段的显示(包括关系字段)。
¥In the edit view of a content-type, a button is displayed, which leads to the Configure the view button. It allows to access the configurations that can be set for the edit view of the content-type, such as the entry title, and the display of the fields of the content-type, including the relational ones.


编辑视图设置
¥Edit view settings
-
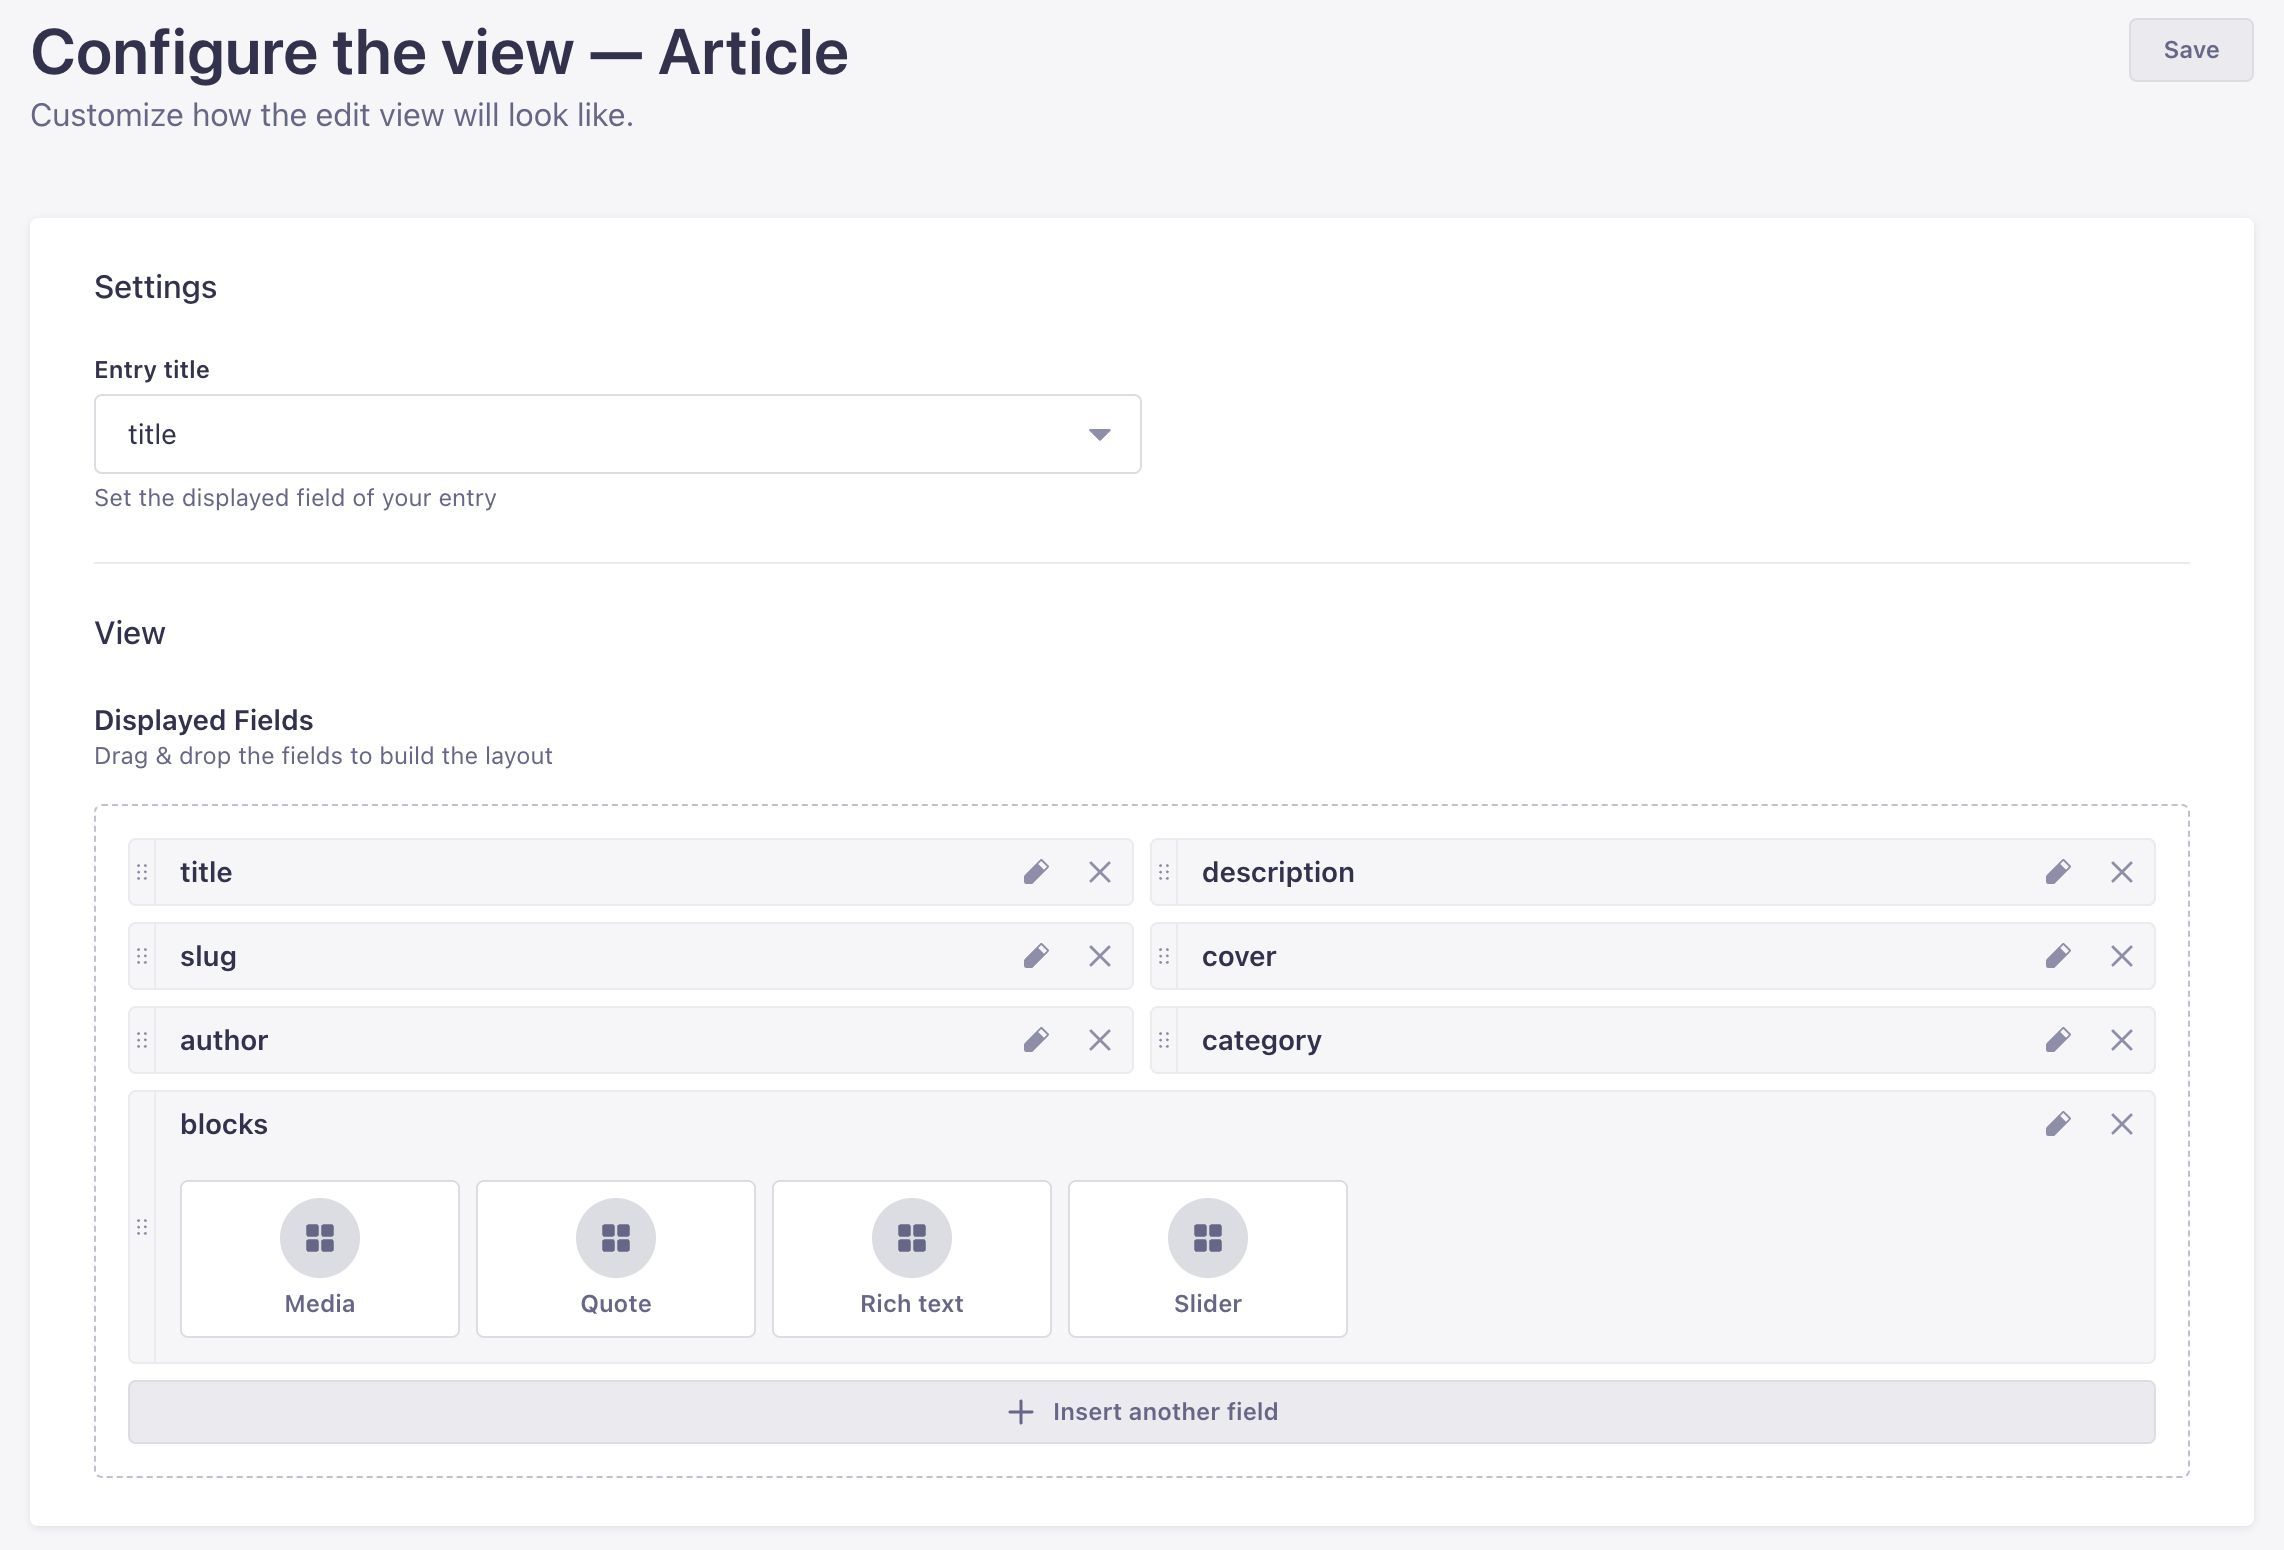
在你的内容类型的编辑视图中,点击按钮,然后点击配置视图。
¥In the edit view of your content-type, click on the button then Configure the view.
-
在“设置”区域中,定义你选择的新设置:
¥In the Settings area, define your chosen new settings:
| 设置名称 | 指示 |
|---|---|
| 入口标题 | 从下拉列表中选择应用作条目标题的字段。 |
-
单击“保存”按钮。
¥Click on the Save button.
编辑视图显示
¥Edit view display
-
在你的内容类型的编辑视图中,点击按钮,然后点击配置视图。
¥In the edit view of your content-type, click on the button then Configure the view.
-
在“视图”区域中,定义要在列表视图表中显示的字段(包括关系字段)、显示顺序和大小:
¥In the View area, define what fields (including relational fields) to display in the list view table, in what order and what size:
-
点击 插入另一个字段按钮添加新字段。
¥Click the Insert another field button to add a new field.
-
单击删除按钮 删除字段。
¥Click the delete button to remove a field.
-
单击重新排序按钮 并将其拖放到你希望它显示在其他字段中的位置。
¥Click the reorder button and drag and drop it to the place you want it to be displayed among the other fields.
-
-
单击字段的编辑按钮 访问其可用设置:
¥Click the edit button of a field to access its available settings:
| 设置名称 | 指示 |
|---|---|
| 标签 | 写下该字段应该使用的标签。 |
| 描述 | 为该字段编写描述,以帮助其他管理员正确填写。 |
| 占位符 | 在字段中写入默认显示的占位符。 |
| 可编辑字段 | 单击 TRUE 或 FALSE 可启用或禁用管理员对该字段的编辑。 |
| 尺寸 | 选择字段在内容管理器中显示的大小。请注意,此设置既不适用于 JSON 和富文本字段,也不适用于动态区域和组件。 |
| 入口标题 | (仅限关系字段)编写应用于关系字段的条目标题。建议选择好关系字段的条目标题,越全面,管理员越容易在编辑视图中管理关系字段的内容。 |
-
单击“保存”按钮。
¥Click on the Save button.
组件字段的设置和显示无法通过条目的编辑视图配置页面进行管理和重新排序。单击组件的“设置组件布局”按钮,可以访问组件自身的配置页面。你会发现与条目完全相同的设置和显示选项,但这将专门应用于你的组件。
¥The settings and display of a component's fields cannot be managed and reordered through the entry's edit view configuration page. Click on the Set the component's layout button of a component to access the component's own configuration page. You will find the exact same settings and display options as for the entry, but that will specifically apply to your component.
另请注意,这些设置是为组件本身定义的,这意味着这些设置将自动应用于使用该组件的每个其他内容��类型。
¥Note also that the settings are defined for the component itself, which means that the settings will automatically be applied for every other content-type where the component is used.