项目设置
🌐 Project settings
Page summary:
设置区域涵盖项目级别的控制(通用、账单、计划、发票)以及每个环境的配置。
在所选项目的仪表板中,位于页眉的 设置按钮使你能够管理你的 Strapi Cloud 项目及其环境的配置和设置。
界面左侧的设置菜单分为两类�:整个项目的设置以及针对项目中配置的任何环境的特定设置。
🌐 The settings' menu on the left side of the interface is separated into 2 categories: the settings for the entire project and the settings specific to any configured environment for the project.
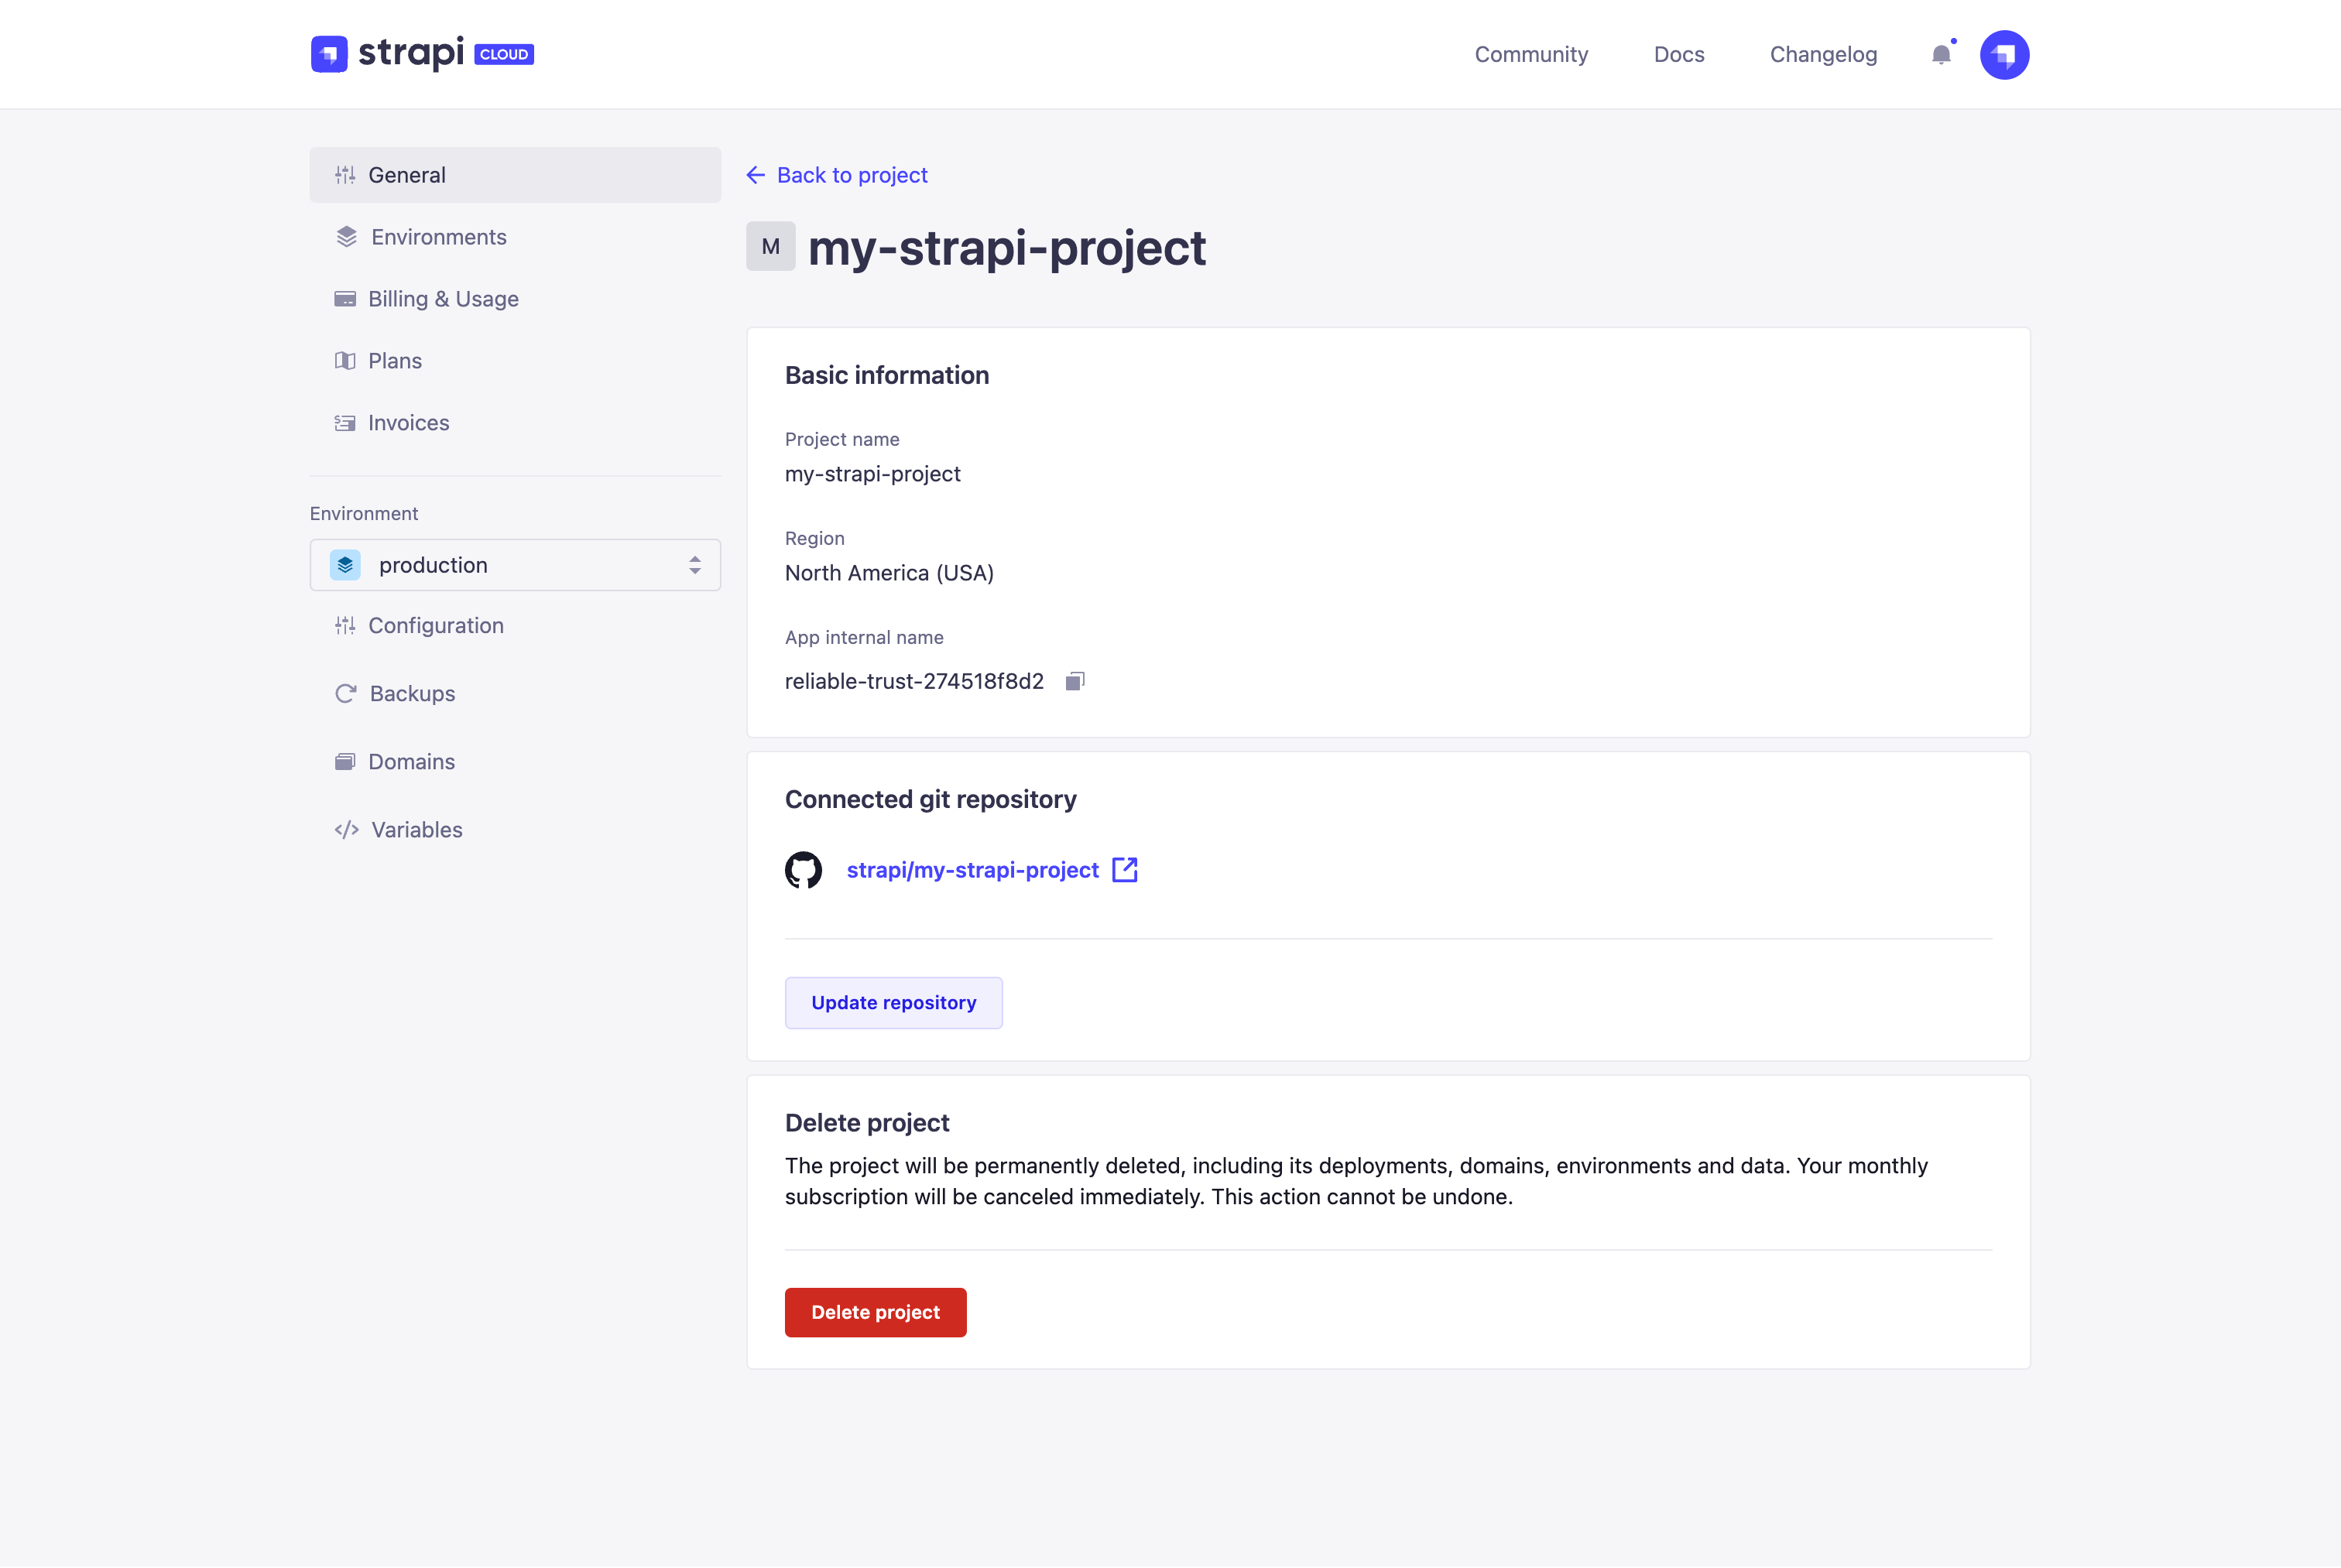
项目级设置
🌐 Project-level settings
项目设置有5个可用的标签页:
🌐 There are 5 tabs available for the project settings:
一般
🌐 General
项目级设置的 常规选项卡使你能够检查和更新项目的以下选项:
- 基本信息,请参见:
- Strapi CMS 许可证密钥:用于在你的云项目上直接启用和使用某些 CMS 功能(请参阅定价页面购买许可证)。
- 已连接的 Git 仓库:用于更改项目使用的仓库和分支(请参见 修改 git 仓库与分支)。还可以启用/禁用“推送时部署”选项。
- 危险区域,与:
- 转移所有权:项目所有者将云项目的所有权转移给已存在的维护者(参见转移项目所有权)。
- 删除项目:永久删除你的 Strapi Cloud 项目(参见 删除 Strapi Cloud 项目)。
重命名项目
🌐 Renaming project
项目名称在项目创建时设置(参见 项目创建),之后可以通过项目设置进行修改。
🌐 The project name is set at project creation (see Project creation) and can be modified afterwards via the project settings.
- 在 常规选项卡的基本信息部分,点击 编辑按钮。
- 在对话框中,在项目名称文本框中写上你选择的新项目名称。
- 点击 重命名 按钮以确认项目名称的修改。
添加 CMS 许可证密钥
🌐 Adding a CMS license key
可以将 CMS 许可证密钥添加并连接到 Strapi Cloud 项目,以解锁整个项目环境中的额外 Strapi CMS 功能。通过许可证密钥可访问的 CMS 功能取决于所购买的许可证类型。有关更多信息和/或购买许可证,请参阅 Strapi Pricing page 。
如果你没有看到 Strapi CMS 许可密钥 部分,这可能意味着你的订阅是旧版订阅,并且不支持自定义 CMS 许可。这意味着你已经拥有一个会自动包含在你的项目中的许可。
🌐 If you don't see the Strapi CMS license key section, it probably means that your subscription is a legacy one and does not support custom CMS licenses. It means that you already have one that is automatically included on your project.
- 在 Strapi CMS 许可密钥 部分,点击 添加许可 按钮。
- 在对话�框中,将你的许可密钥粘贴到字段中。
- 点击 保存并部署 按钮以使更改生效。
要从你的 Strapi Cloud 项目中移除 Strapi CMS 许可证,你可以点击 取消关联许可证 按钮。这也将移除对之前添加的许可证中包含的 CMS 功能的访问和使用权限。
🌐 To remove the Strapi CMS license from your Strapi Cloud project, you can click on the Unlink license button. This will also remove access and usage to the CMS features included in the previously added license.
许可证密钥已应用于项目中的所有环境。
🌐 The license key is applied to all the environments in the project.
修改 git 仓库和分支
🌐 Modifying git repository & branch
Strapi Cloud 项目的 GitHub 或 GitLab 仓库、分支和基础目录默认在创建项目时选择(参见 创建项目)。在项目创建后,可以通过项目设置更新项目仓库或切换到其他 Git 提供商。
🌐 The GitHub or GitLab repository, branch and base directory for a Strapi Cloud project are by default chosen at the creation of the project (see Creating a project). After the project's creation, via the project settings, it is possible to update the project repository or switch to another git provider.
更新 git 仓库可能导致项目及其数据的丢失,例如如果选择了错误的仓库或旧仓库与新仓库之间的数据结构不匹配。
🌐 Updating the git repository could result in the loss of the project and its data, for instance if the wrong repository is selected or if the data schema between the old and new repository doesn't match.
-
在 常规选项卡的已连接的 Git 仓库部分,点击更新仓库按钮。你将被重定向到另一个界面。
-
(可选)如果你希望不仅更新仓库,还想切换到另一个 git 提供商,请点击界面右上角的 切换 Git 提供商 按钮。在返回 更新仓库 界面之前,你将被重定向到所选 git 提供商的授权设置。
-
在更新仓库部分,填写两个可用的设置:
| 设置名称 | 使用说明 || --------------- | ------------------------------------------------------------------------ || 账户 | 从下拉列表中选择一个账户。 || 仓库 | 从下拉列表中选择一个仓库。 |
-
在 选择 Git 分支 部分,为你的任何环境填写可用设置。请注意,每个环境的分支可以通过其自身的设置进行编辑,参见 常规(环境)。
| 设置名称 | 说明 || --------------- | ------------------------------------------------------------------------ || 分支 | 从下拉列表中选择一个分支。 || 基本目录 | 在文本框中填写基本目录的路径。 || 自动部署 | 勾选该框以在向所选分支推送新提交时自动触发新部署。取消勾选以禁用此选项。 |
-
点击 保存并部署 按钮以使更改生效。
转移项目所有权
🌐 Transferring project ownership
Strapi Cloud 项目的所有权可以转让给其他用户,只要他们是该项目的维护者。这可以由当前项目所有者主动发起,也可以由项目维护者提出请求。一旦所有权转让完成,该转让将是永久的,直到新所有者决定再次将所有权转让给另一位维护者。
🌐 The ownership of the Strapi Cloud project can be transferred to another user, as long as they're a maintainer of the project. It can either be at the initiative of the current project owner, or can be requested by a project maintainer. Once the ownership is transferred, it is permanent until the new owner decides to transfer the ownership again to another maintainer.
要转让项目的所有权,必须满足以下要求:
🌐 For the ownership of a project to be transferred, the following requirements must be met:
- 该项目必须使用付费计划,且当前无已过期的卡或未支付的账单。
- 维护者必须已经填写了他们的账单信息。
- 该项目不得有任何现有的所有权转让在进行中。
请注意,当在订阅续订的同一天(即每月的1日)进行所有权转让时,转让可能会失败。如果当天转让失败,但所有先决条件已满足,你应等待几小时后再尝试。
🌐 Note that ownership transfers might fail when done the same day of subscription renewal (i.e. 1st of every month). If the transfer fails that day, but all prerequisites are met, you should wait a few hours and try again.
- 在 常规选项卡的危险区域部分,点击转移所有权按钮。
- 在对话中:
- 如果你是项目拥有者:通过点击其名字旁的 ... > 转让所有权 来选择应被转让所有权的维护者。
- 如果你是维护者:在列表中找到自己,然后点击与你的名字相关的 ... > 转让所有权。
- 在新对话框中点击 转移所有权 按钮以确认转移/请求。
一封电子邮件将发送给两位用户。需要转让所有权或继承的人员必须点击电子邮件中的 确认转让 按钮。完成后,前所有者将收到一封确认电子邮件,确认转让已成功完成。
🌐 An email will be sent to both users. The person who needs to transfer the ownership or inherit it will have to click on the Confirm transfer button in the email. Once done, the previous owner will receive a confirmation email that the transfer has successfully been done.
只要所有权转移或请求尚未确认,就可以在选择维护者的同一对话框中选择取消。
🌐 As long as the ownership transfer or request hasn't been confirmed, there is the option to cancel in the same dialog that the maintainer was chosen.
一旦所有权转移完成,项目将与 Strapi Cloud 断开连接。作为新所有者,请确保前往项目设置的 常规选项卡以重新连接项目。
删除 Strapi Cloud 项目
🌐 Deleting a Strapi Cloud project
你可以删除任何 Strapi Cloud 项目,但这是永久且不可逆的。相关的域名、部署和数据将被删除,项目的订阅将自动取消。
🌐 You can delete any Strapi Cloud project, but it will be permanent and irreversible. Associated domains, deployments and data will be deleted and the subscription for the project will automatically be canceled.
- 在 常规选项卡的危险区域部分,点击删除项目按钮。
- 在对话框中,选择删除项目的原因。
- 通过点击 删除项目 按钮来确认删除你的项目。
环境
🌐 Environments
ProThis feature is available with a Strapi Cloud Pro plan. ScaleThis feature is available with a Strapi Cloud Scale plan.“环境”选项卡允许查看 Strapi Cloud 项目中配置的所有环境,以及创建新的环境。生产环境是默认环境,无法删除。可以根据项目的订阅计划创建其他环境,以便在 Strapi Cloud 项目的独立实例上更安全地工作(例如,一个暂存环境,用于在上线到生产环境前进行测试)。
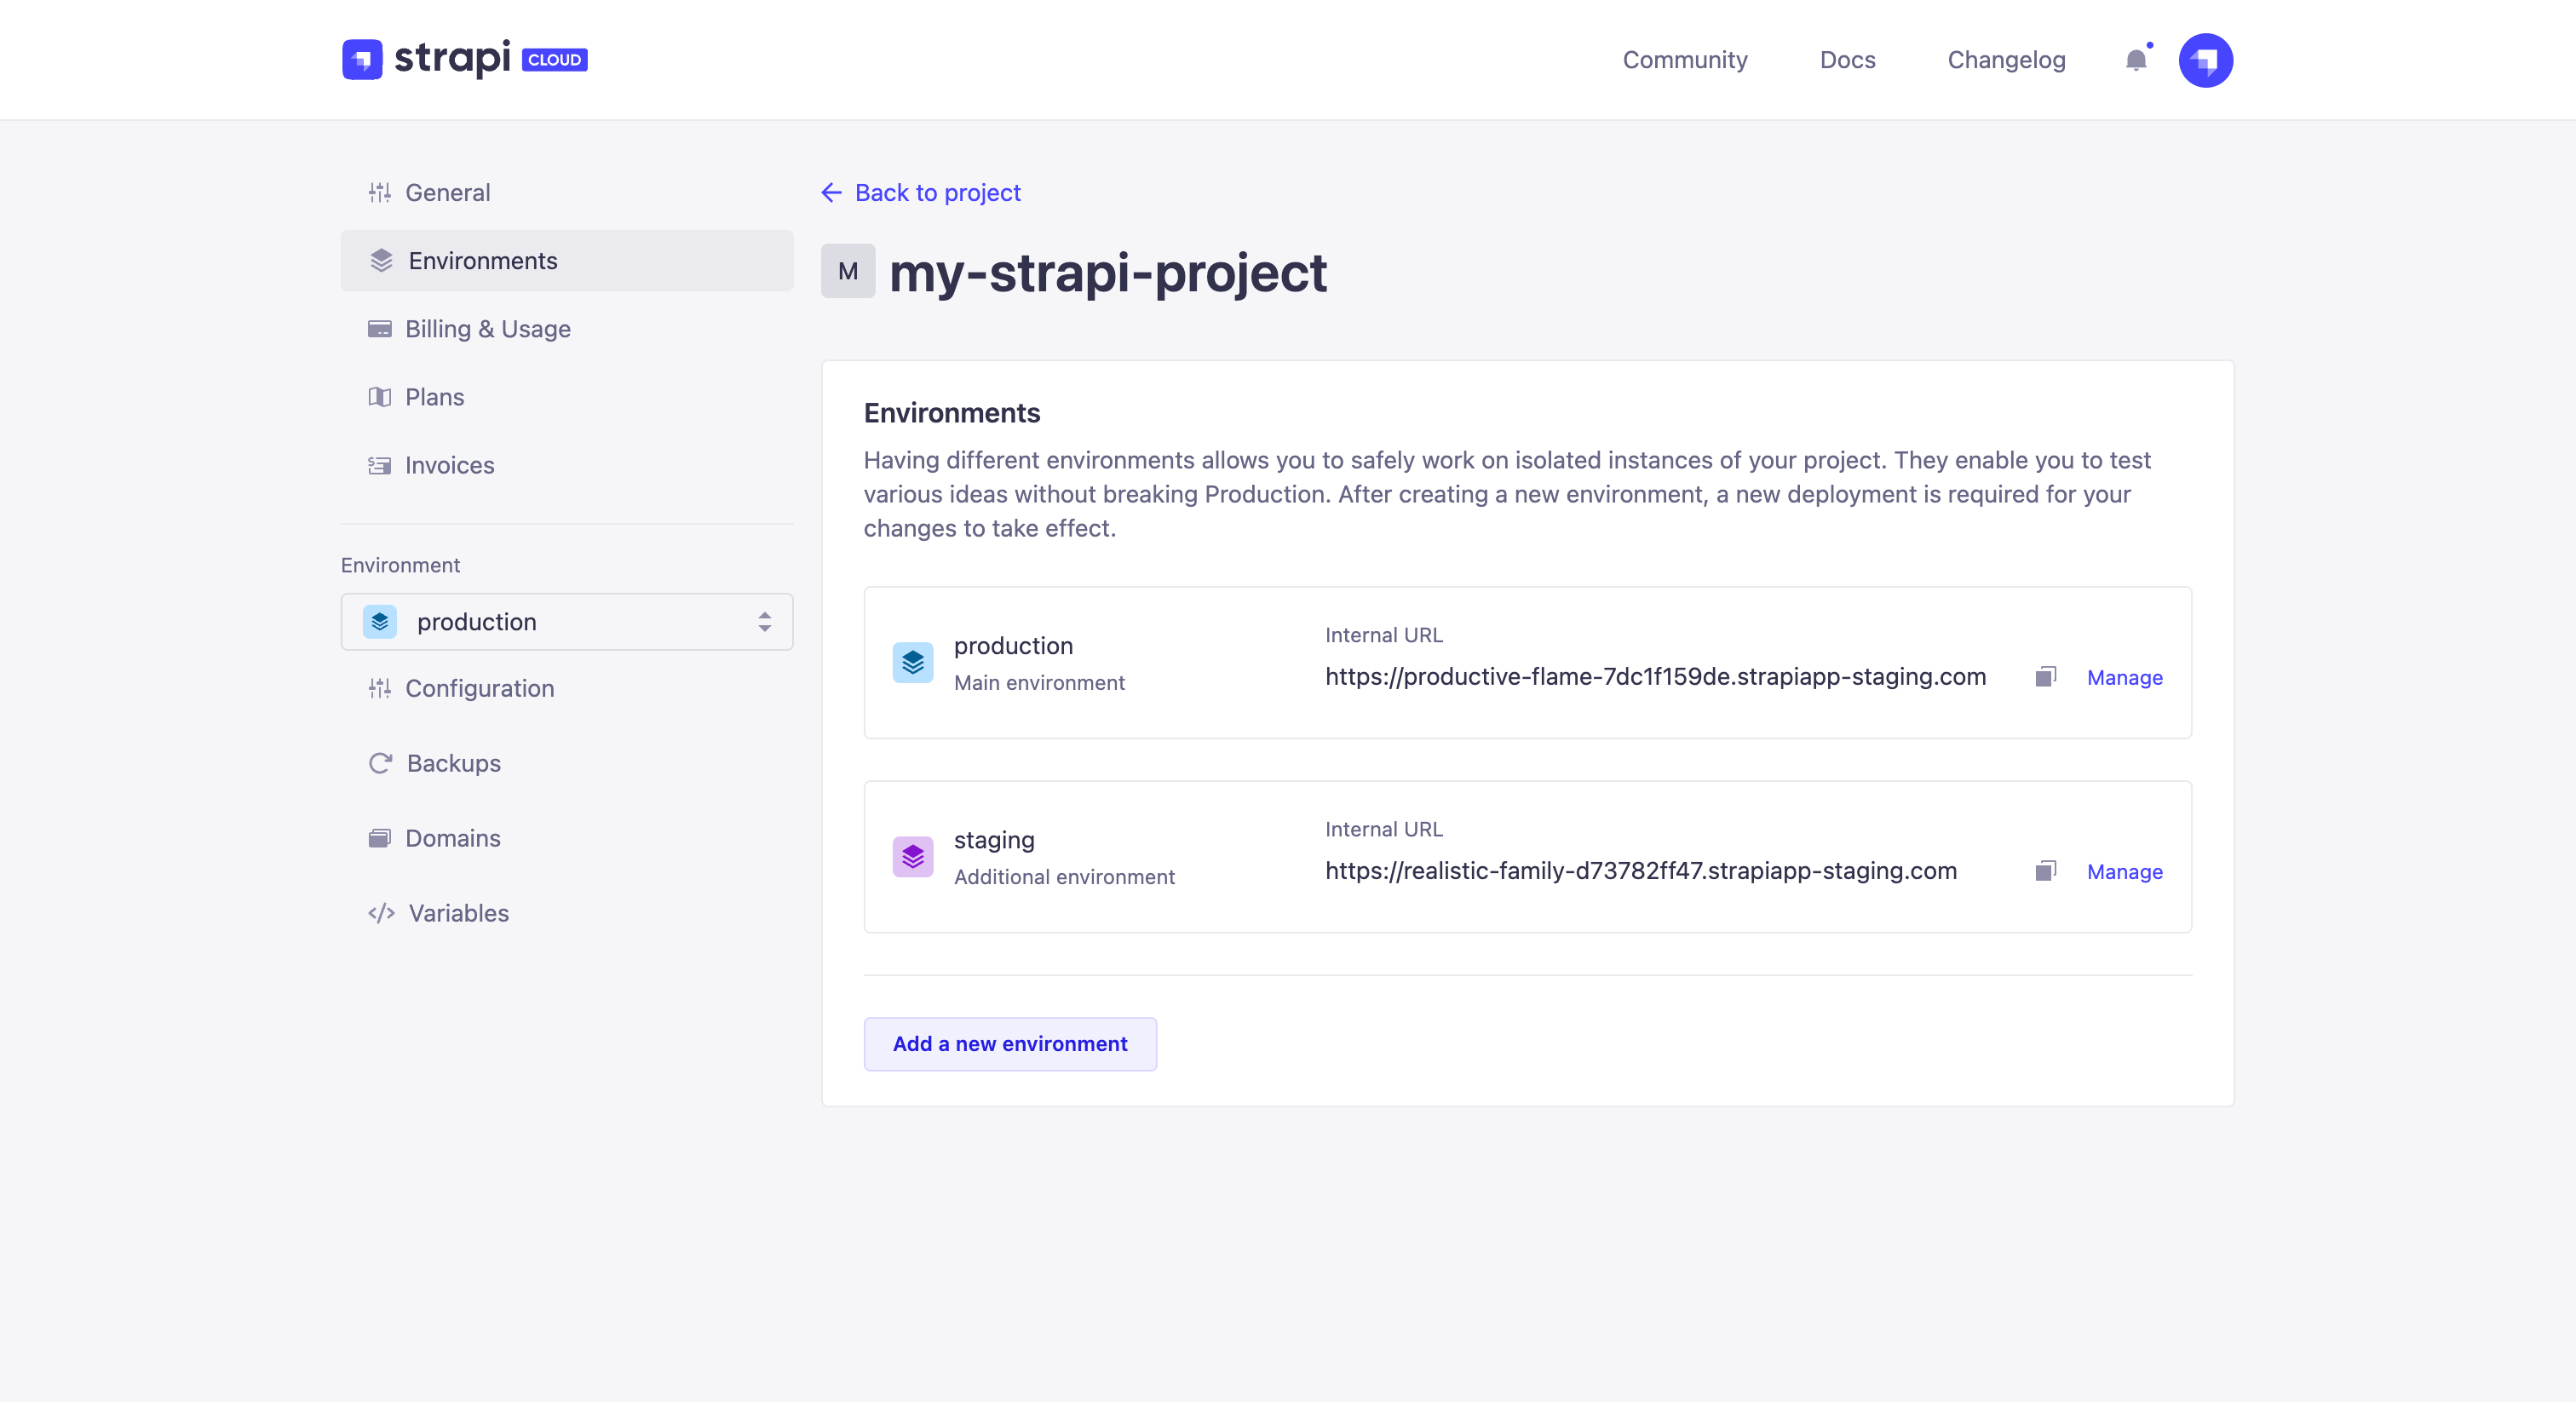
你购买的附加环境的计费周期将与你的计划计费周期相匹配。
🌐 The billing cycle of additional environments you purchase will match the billing cycle of your plan.
要创建一个新环境:
🌐 To create a new environment:
-
点击 添加新环境 按钮。
-
在设置步骤中,填写可用的设置:
| 设置名称 | 说明 || ---------------- | ------------------------------------------------------------------------ || 环境名称 | (必填)为你的项目新环境写一个名称。 || Git 分支 | (必填)为你的新环境选择正确的分支。 || 基础目录 | 写入你的新环境的基础目录名称。 || 推送时部署 | 勾选此框以在向所选分支推送更改时自动触发部署。若未启用,则需要手动部署最新更改。 || 导入变量 | 勾选此框从现有环境导入变量名称。值不会被导入,所有变量将保持为空。 |
-
点击 确认 以继续到结账步骤。
-
查看环境价格、适用税费和按比例调整。
-
点击 添加环境 按钮以创建项目的新环境。然后,你将被重定向到你的 项目仪表板,在那里你可以跟踪新环境的创建和首次部署。
如果在环境创建过程中发生错误,进度指示器将停止并显示错误消息。你将在失败步骤旁看到一个重试按钮,允许你重新启动创建过程。
🌐 If an error occurs during the environment creation, the progress indicator will stop and display an error message. You will see a Retry button next to the failed step, allowing you to restart the creation process.
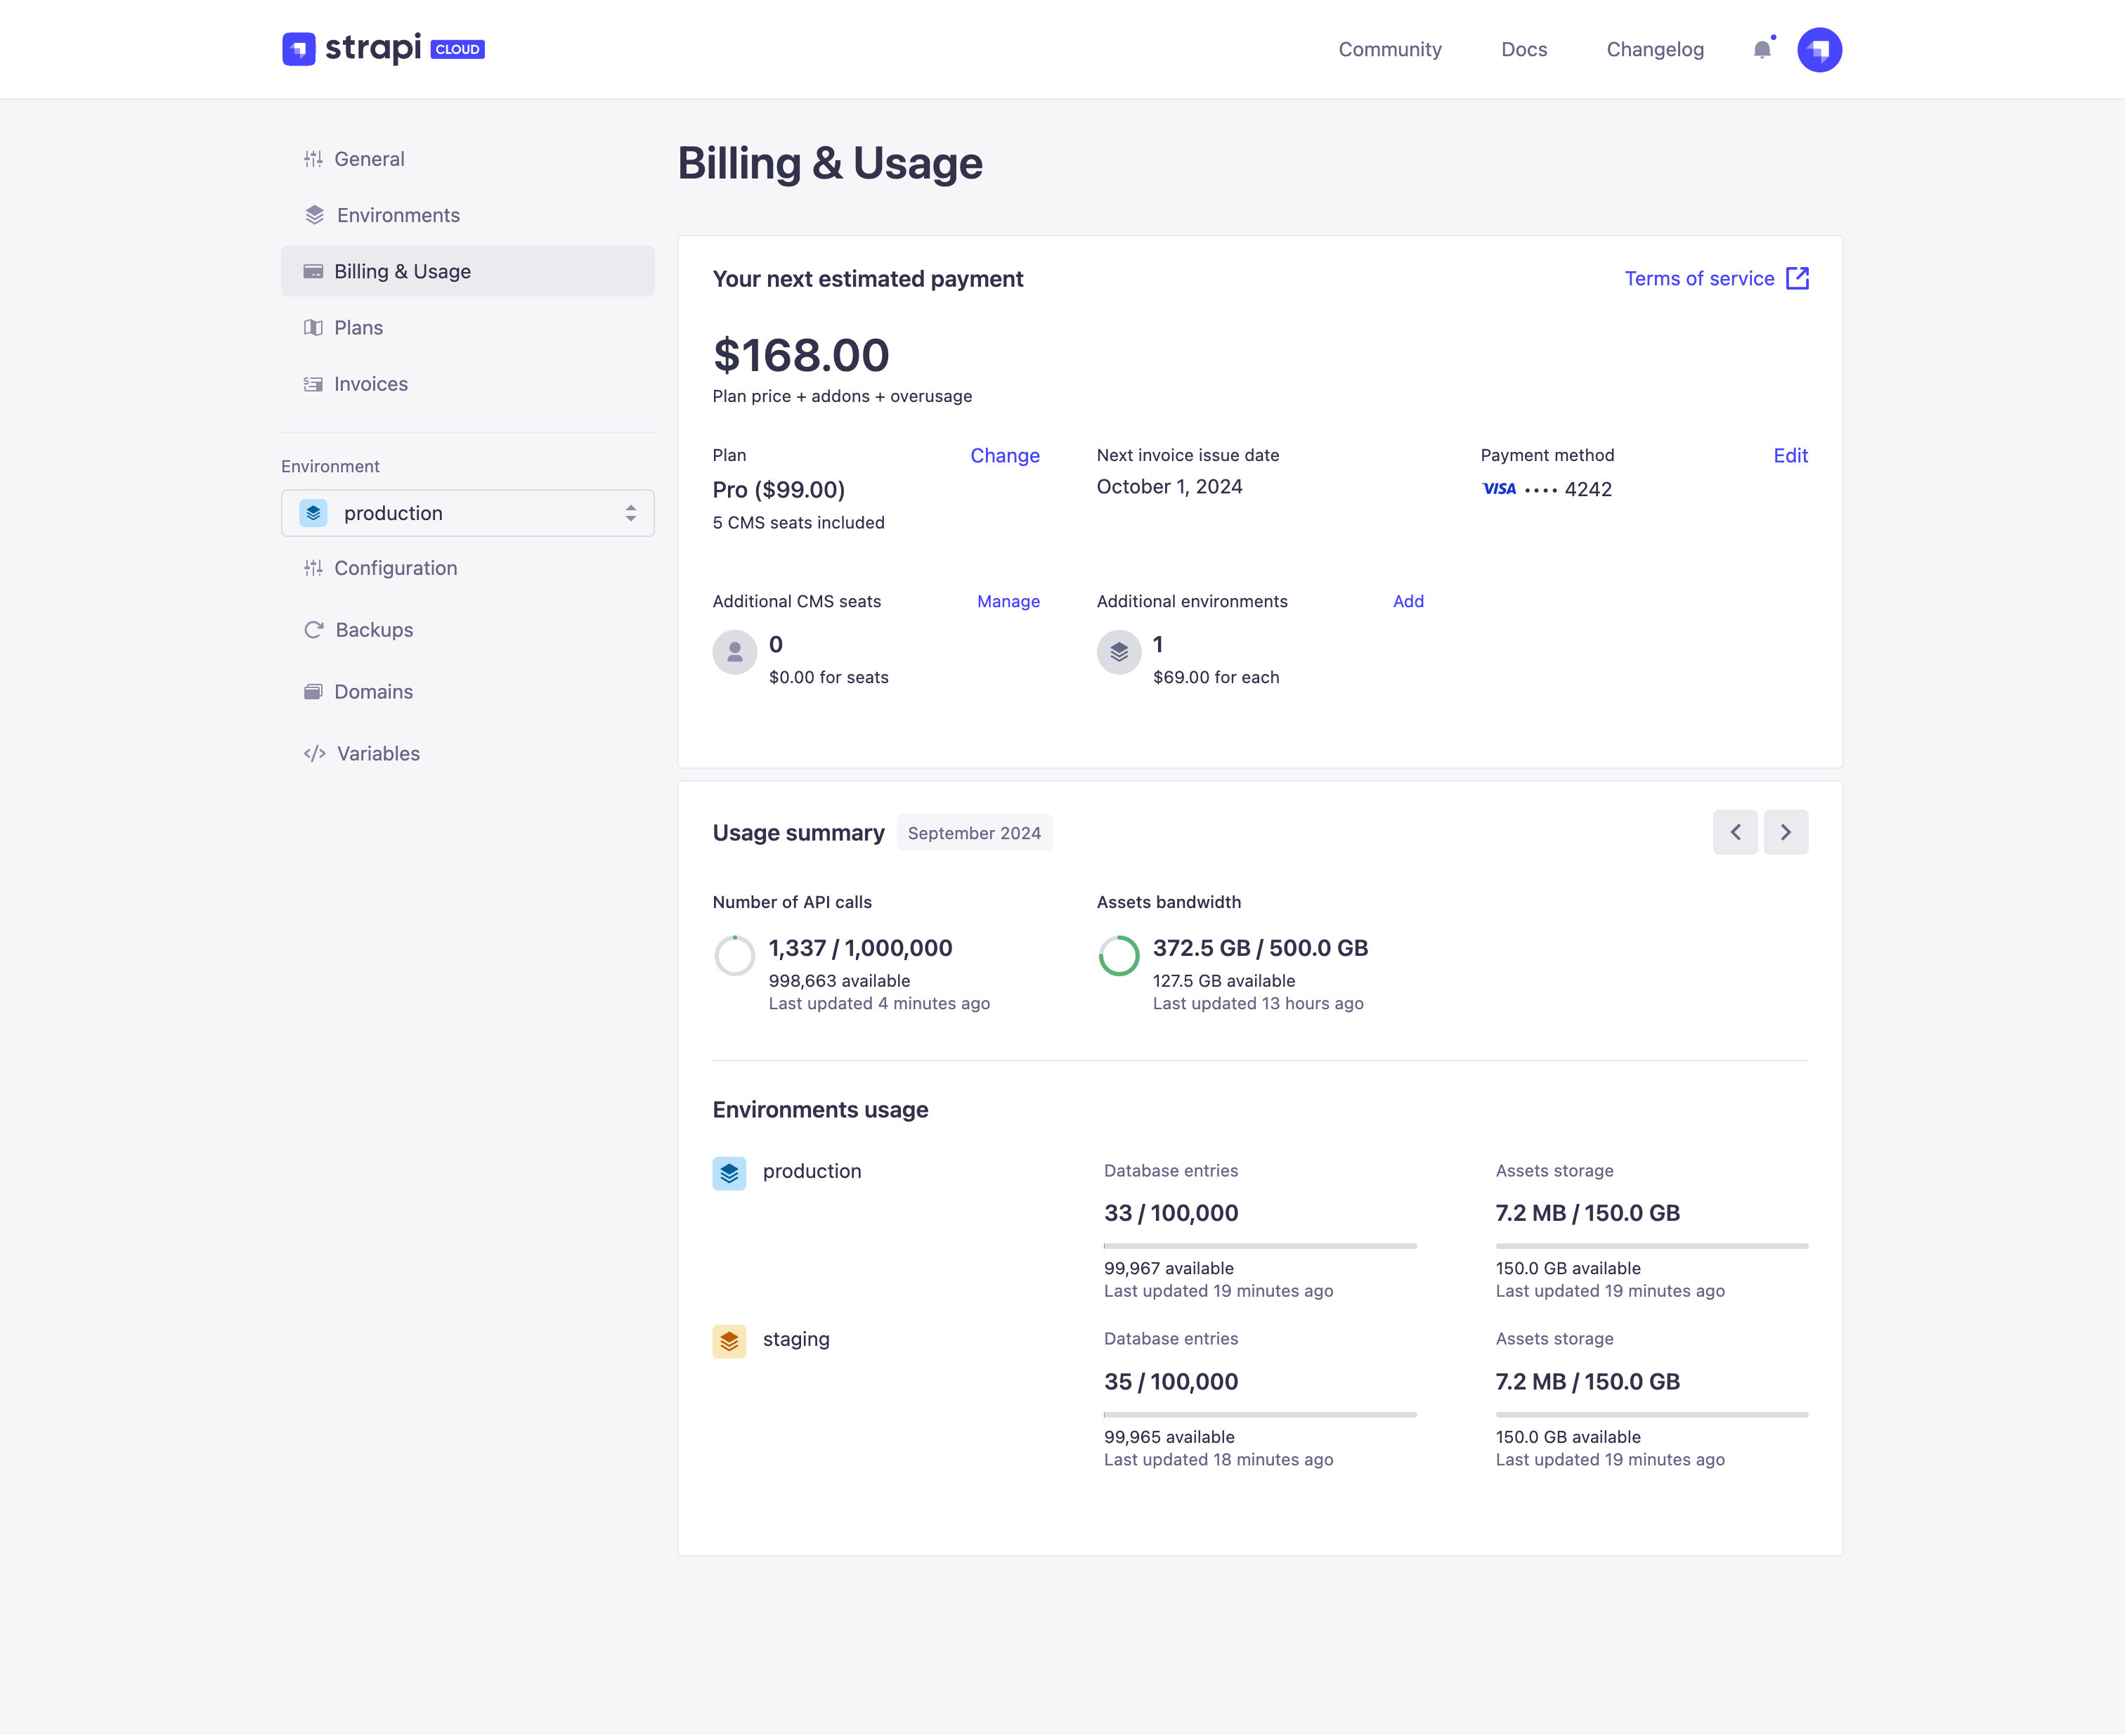
账单与使用情况
🌐 Billing & Usage
“ 账单与使用情况”标签显示你下次预计付款、当前订阅计划的所有信息以及项目使用情况的详细摘要。它还允许你为项目添加新环境(请 参考环境部分的文档)。
通过此标签,你还可以:
🌐 Through this tab, you also have the possibility to:
你可以通过直接从此页面选择付款方式,将专用卡附加到你的项目。这样,你可以使用不同的卡管理你的订阅。
🌐 You can attach a dedicated card to your project by choosing the payment method directly from this page. In that way, you can manage your subscriptions with different cards.
在 计费与使用选项卡的使用情况部分,你可以看到项目当前的每月使用量与项目订阅允许的最大使用量的对比。使用右上角的箭头可以查看项目在任意选定月份的使用情况。
还请注意,如果你的使用情况显示另一种订阅计划更适合你的项目,系统将在 计费与使用标签中显示一条消息,建议你可以切换到哪个计划。
计划
🌐 Plans
“Plans” 标签显示可用的 Strapi Cloud 计划概览,并允许你更改当前计划或账单周期。
如果你当前的计划被标记为旧版,你将能够切换到新的计划(请参阅降级部分)。一旦你切换,你将无法再访问之前的计划。
🌐 If your current plan is labeled as legacy, you will be able to sidegrade to a new plan (see downgrade section). Once you sidegrade, you will no longer have access to your previous plan.
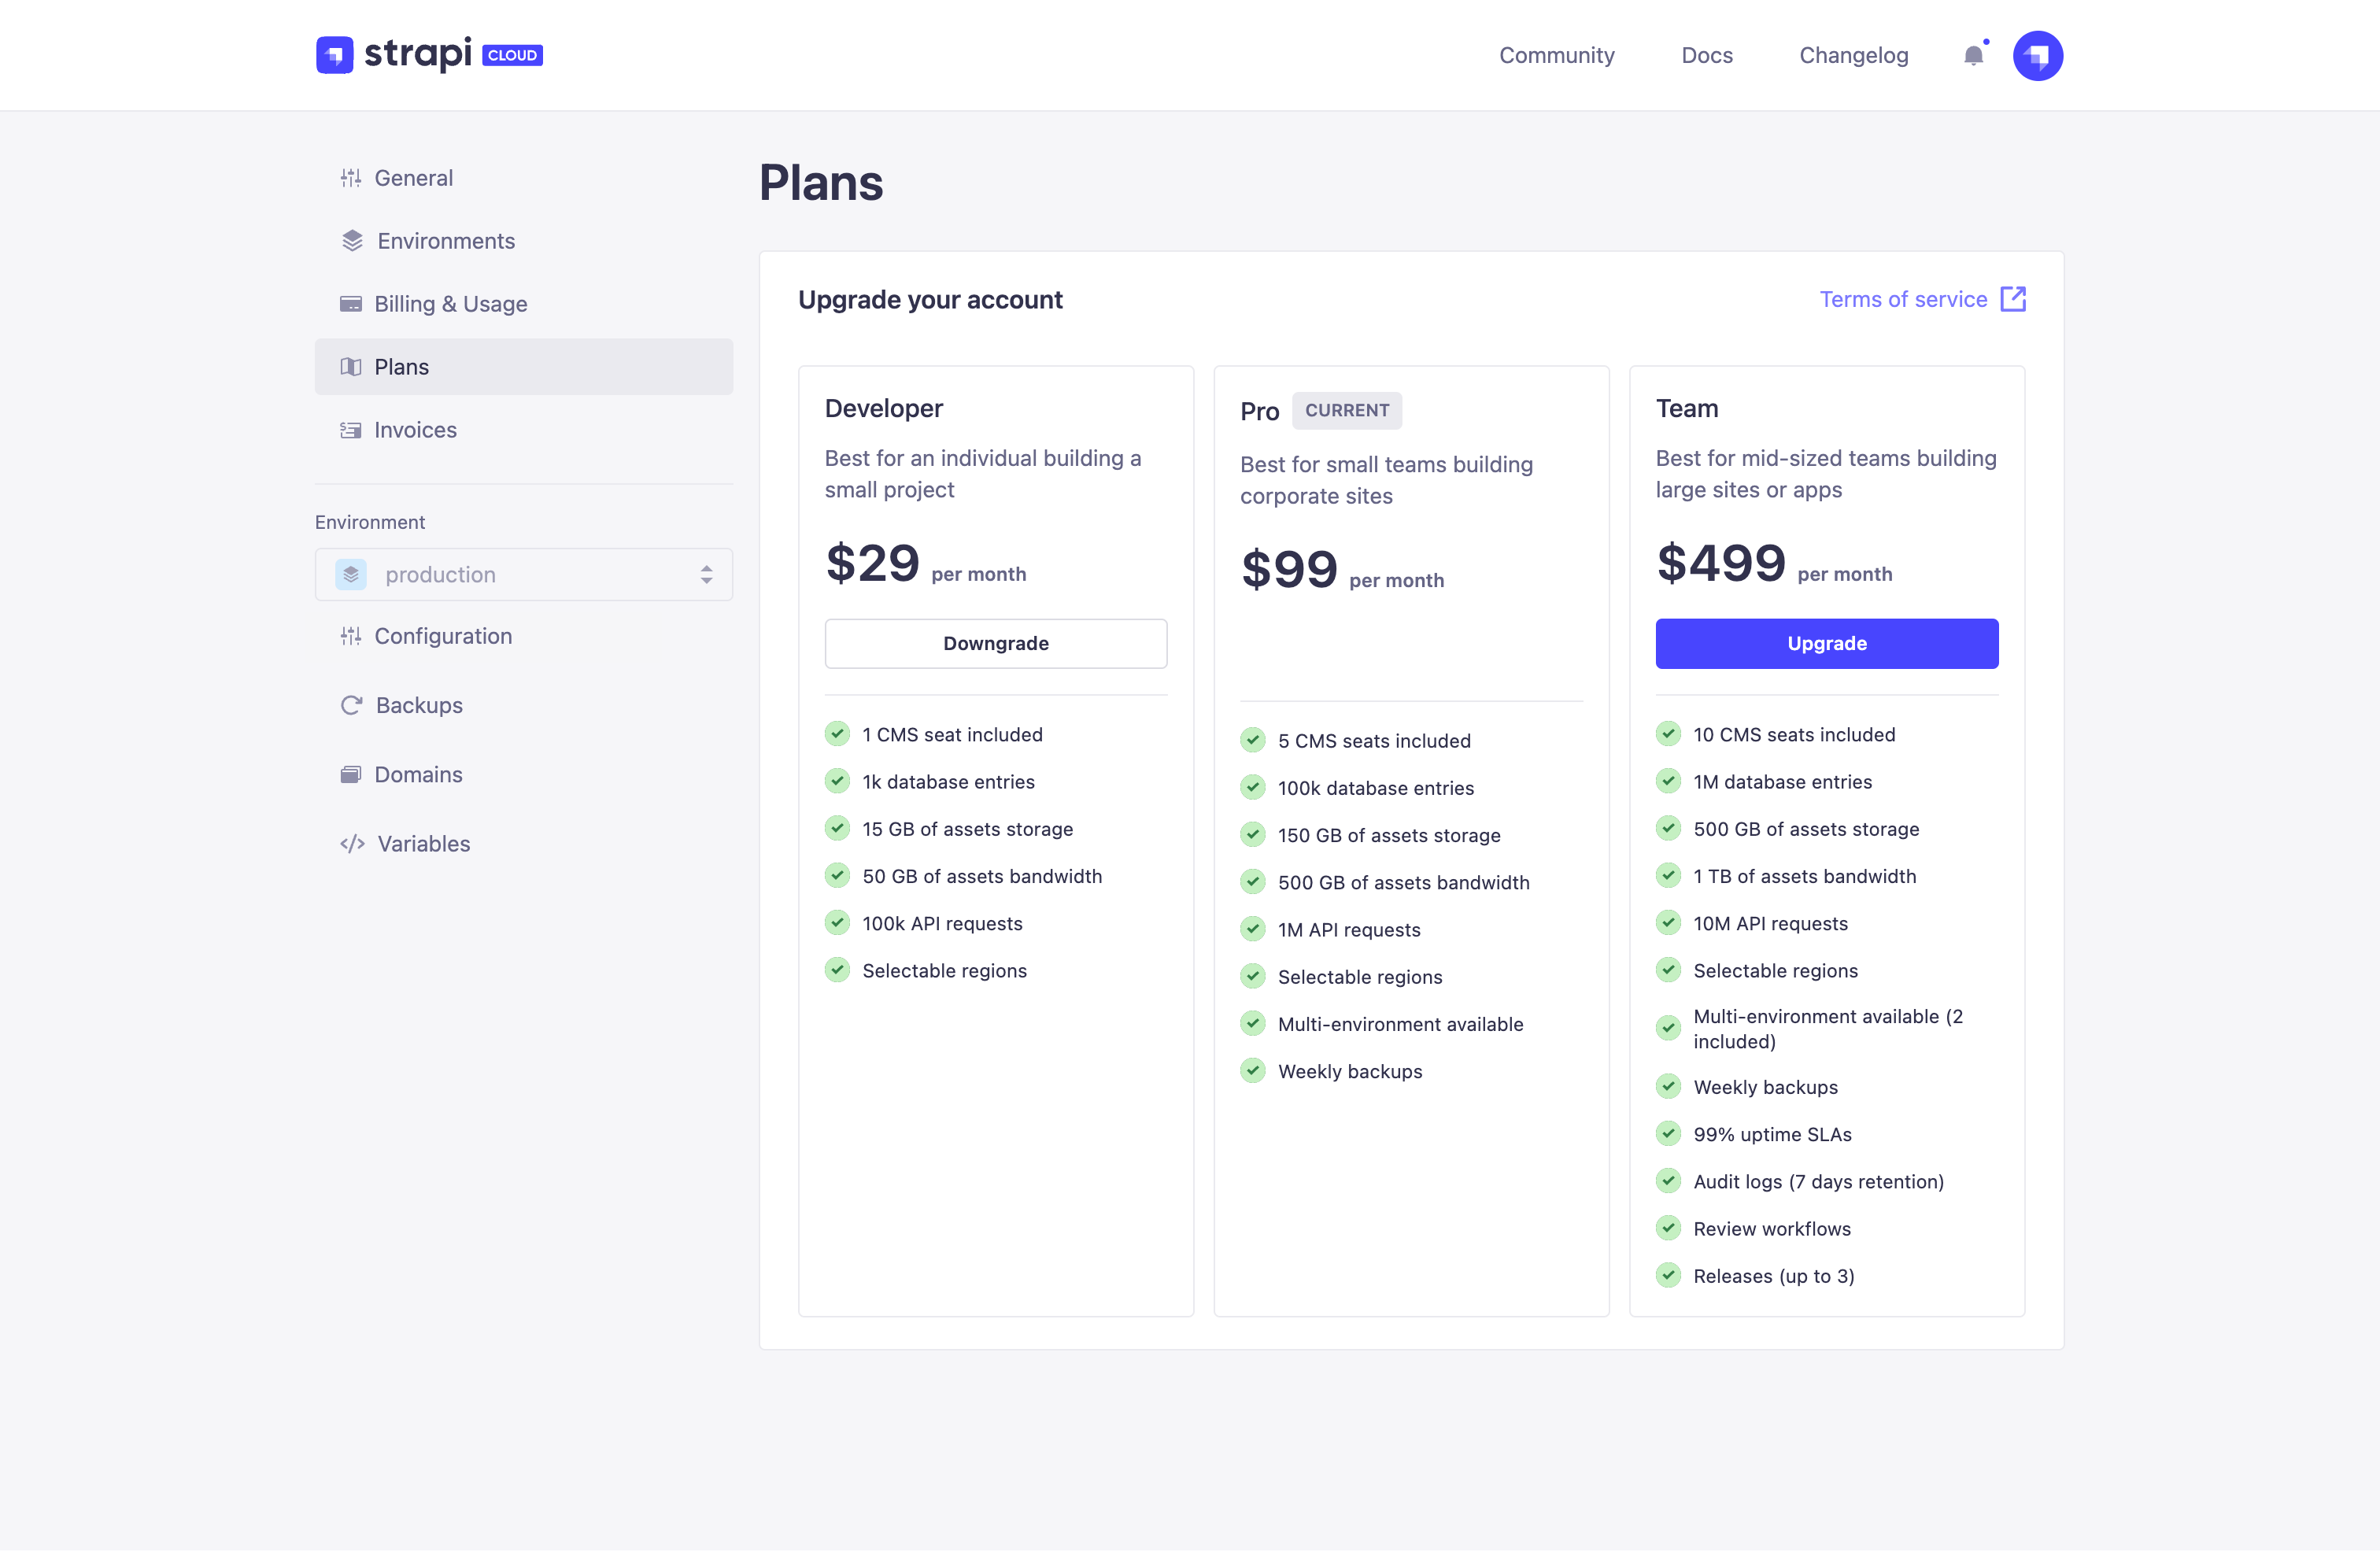
升级到其他方案
🌐 Upgrading to another plan
计划升级是即时的,并且可以通过每个项目的项目设置进行管理。
🌐 Plan upgrades are immediate and can be managed, for each project, via the project settings.
要将你当前的计划升级到更高级别,请:
🌐 To upgrade your current plan to a higher one:
-
在项目设置的 计划选项卡中,选择按月或按年计费的频率,然后点击你想升级的计划的升级按钮。
-
在打开的窗口中,查看升级的付款详情和条款。
a.(可选)点击 编辑 按钮以选择其他付款方式。
b.(可选)点击 我有折扣码,在字段中输入你的折扣码,然后点击 应用 按钮。
-
点击 升级到 [plan name] 按钮以确认升级。项目将自动重新部署。
降级到另一个计划
🌐 Downgrading to another plan
每个项目的计划降级可以通过项目设置进行管理。然而,降级不会立即生效:当前计划将继续有效,直到当前计费周期结束。
🌐 Plan downgrades can be managed, for each project, via the project settings. Downgrades are, however, not immediately effective: the current plan will remain active until the end of the current billing period.
在降级之前,请确保检查你的 Strapi Cloud 项目的使用情况:如果你当前的使用量超出了较低套餐的限制,你将面临超额收费的风险。你还可能会失去某些功能的访问权限:例如,降级到 Essential 计划将导致你项目的所有备份丢失。有关更多信息,请参阅 计费与使用信息。
🌐 Make sure to check the usage of your Strapi Cloud project before downgrading: if your current usage exceeds the limits of the lower plan, you are taking the risk of getting charged for overages. You may also lose access to some features: for example, downgrading to the Essential plan would result in the loss of all your project's backups. Please refer to Information on billing & usage for more information.
请注意,如果你有额外的付费环境,则无法降级。你需要先删除计划基础价格中未包含的所有额外环境(请参见 重置与删除环境),然后才能安排降级。当从Scale降级到Pro时,额外包含的环境将在降级生效时自动删除。
🌐 Note also that you cannot downgrade if you have additional paid environments. You will first need to delete all additional environments that were not included in the base price of you plan (see Resetting & Deleting environment) before you can schedule a downgrade. When downgrading from Scale to Pro, the additional included environment will automatically be deleted when the downgrade takes effect.
如果项目连接了 GitHub 组织仓库,则无法降级到免费计划。要降级,请先在 已连接的 Git 仓库 设置中切换到个人仓库。
🌐 You cannot downgrade to the Free plan if a GitHub organization repository is connected to the project. To downgrade, first switch to a personal repository in the Connected Git repository settings.
要将你当前的计划降级到较低的计划:
🌐 To downgrade your current plan to a lower one:
- 在项目设置的 计划选项卡中,选择按月或按年计费频率,然后点击你想降级到的计划的降级按钮。
- 在打开的窗口中,查看降级条款。
- 点击 降级 按钮以确认降级。项目将自动重新部署。
降级将在当前计费周期结束时生效。在更改待处理期间,你可以取消已安排的降级并继续使用当前计划。
🌐 Downgrades are effective at the end of the current billing period. Whilst the change is pending, you can cancel the scheduled downgrade and stay on your current plan.
更改账单周期
🌐 Changing billing cycle
你可以随时在每月和每年计费之间切换项目的计费周期。虽然项目计划和附加组件可以根据你的计费周期按月或按年计费,但超额部分始终按月计费。
🌐 You can switch your project's billing cycle between monthly and yearly billing at any time. While project plans and addons can either be billed monthly or yearly depending on your billing cycle, overages are always billed monthly.
要更改你的计费周期:
🌐 To change your billing cycle:
- 在项目设置的 计划选项卡中,使用计划部分顶部的切换按钮在按月和按年计费之间切换。
- 点击你当前计划的 切换到[每月/每年]计费 按钮。
- 在打开的窗口中,查看计费周期更改的条款。
- 点击确认切换以确认更改。
当从年度计费切换到每月计费时,你的计划将在下一个续订日期之前保持年度周期。在更改待处理期间,你可以取消计划中的更改并继续使用当前的��计费周期。然而,当从每月计费切换到年度计费时,更改会立即生效。
🌐 When switching from yearly to monthly billing, your plan will remain on its yearly cycle until your next renewal date. Whilst the change is pending, you can cancel the scheduled change and stay on your current billing cycle. When switching from monthly to yearly, however, the change is immediate.
发票
🌐 Invoices
“ 发票”标签显示你的 Strapi Cloud 项目的全部发票列表及其状态。免费计划不提供发票。
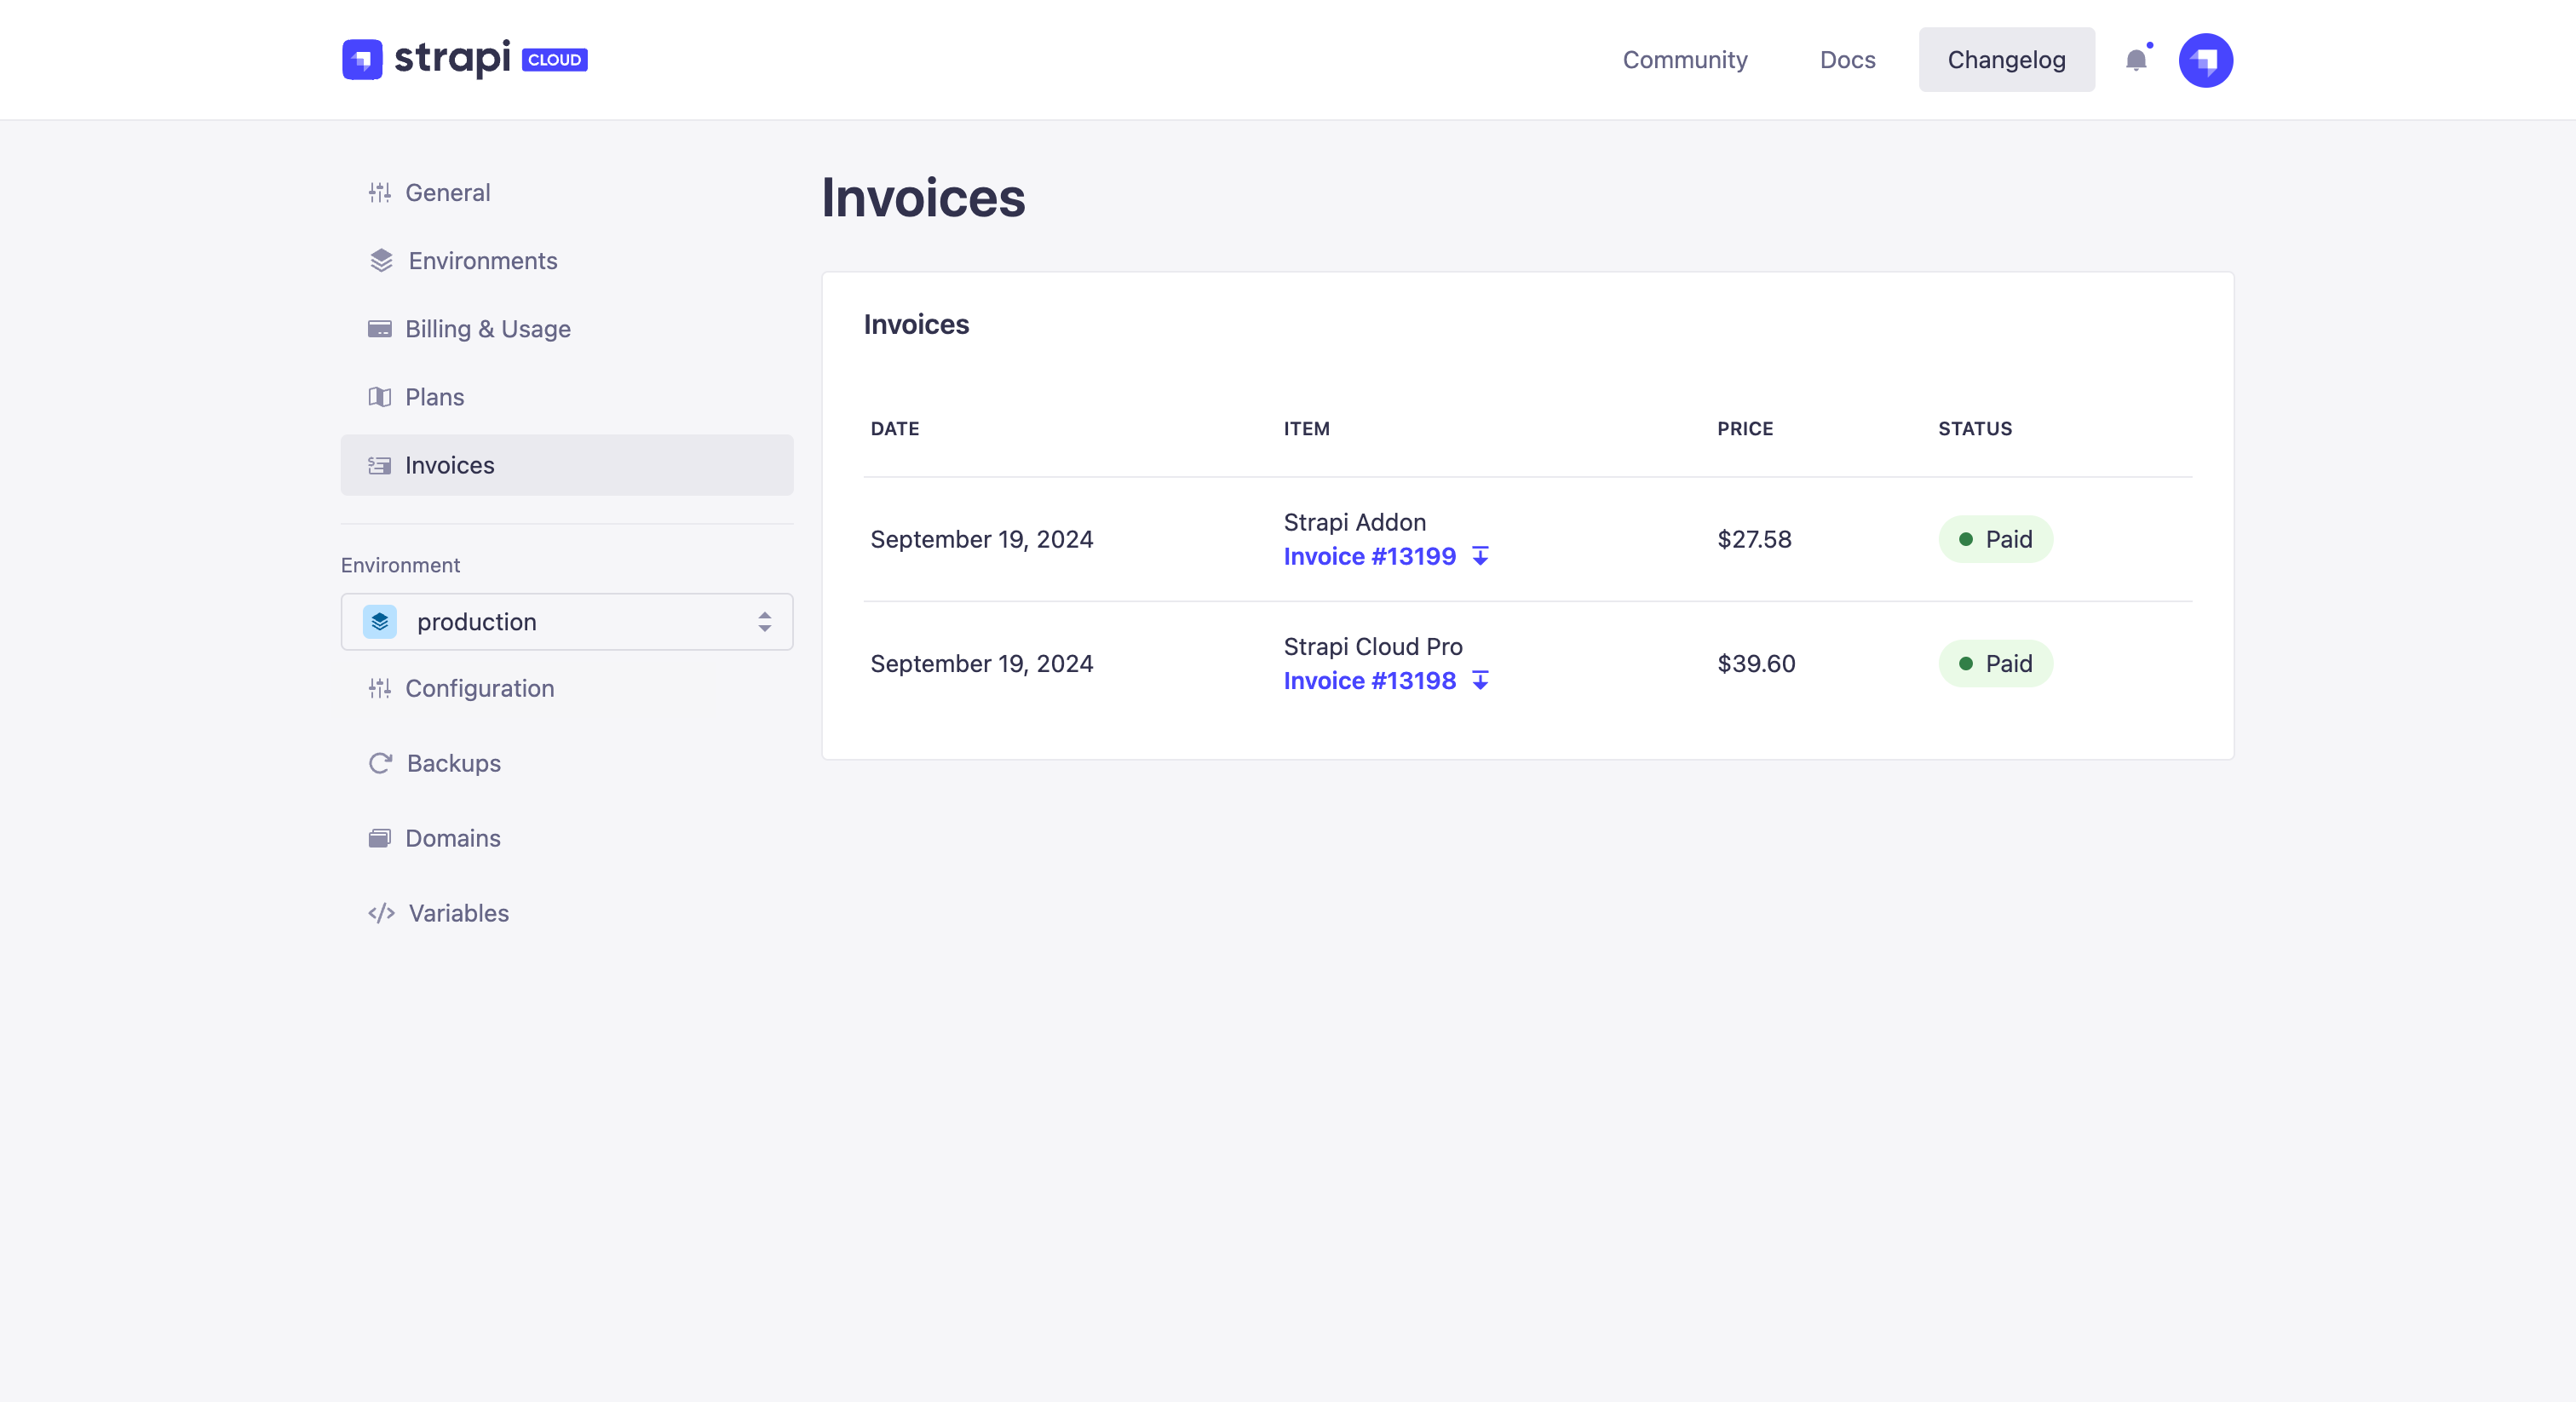
发票可以具有以下任何状态:
🌐 Invoices can have any of the following statuses:
- 已付款:付款已完成,发票已可用,无需其他操作。
- 待付款:发票尚未完成或验证
- 付款到期:付款未成功,需要修复
- 未支付:付款失败,且不会自动重试
- 作废:发票已被取消。
点击 ![]() 图标下载发票。
图标下载发票。
🌐 Click the ![]() icon to download an invoice.
icon to download an invoice.
在 个人资料 > 发票 选项卡中,你将找到所有项目的完整发票列表。欢迎查看专用文档。
🌐 In the Profile > Invoices tab, you will find the complete list of invoices for all your projects. Feel free to check the dedicated documentation.
环境级设置
🌐 Environment-level settings
在项目的环境设置中,你首先需要使用下拉菜单选择要配置其设置的环境。根据所选的环境,通常有3到4个可用的选项卡:
🌐 In the project's environments' settings, you first need to select the environment whose settings you would like to configure, using the dropdown. Depending on the chosen environment, there are 3 to 4 tabs available:
配置
🌐 Configuration
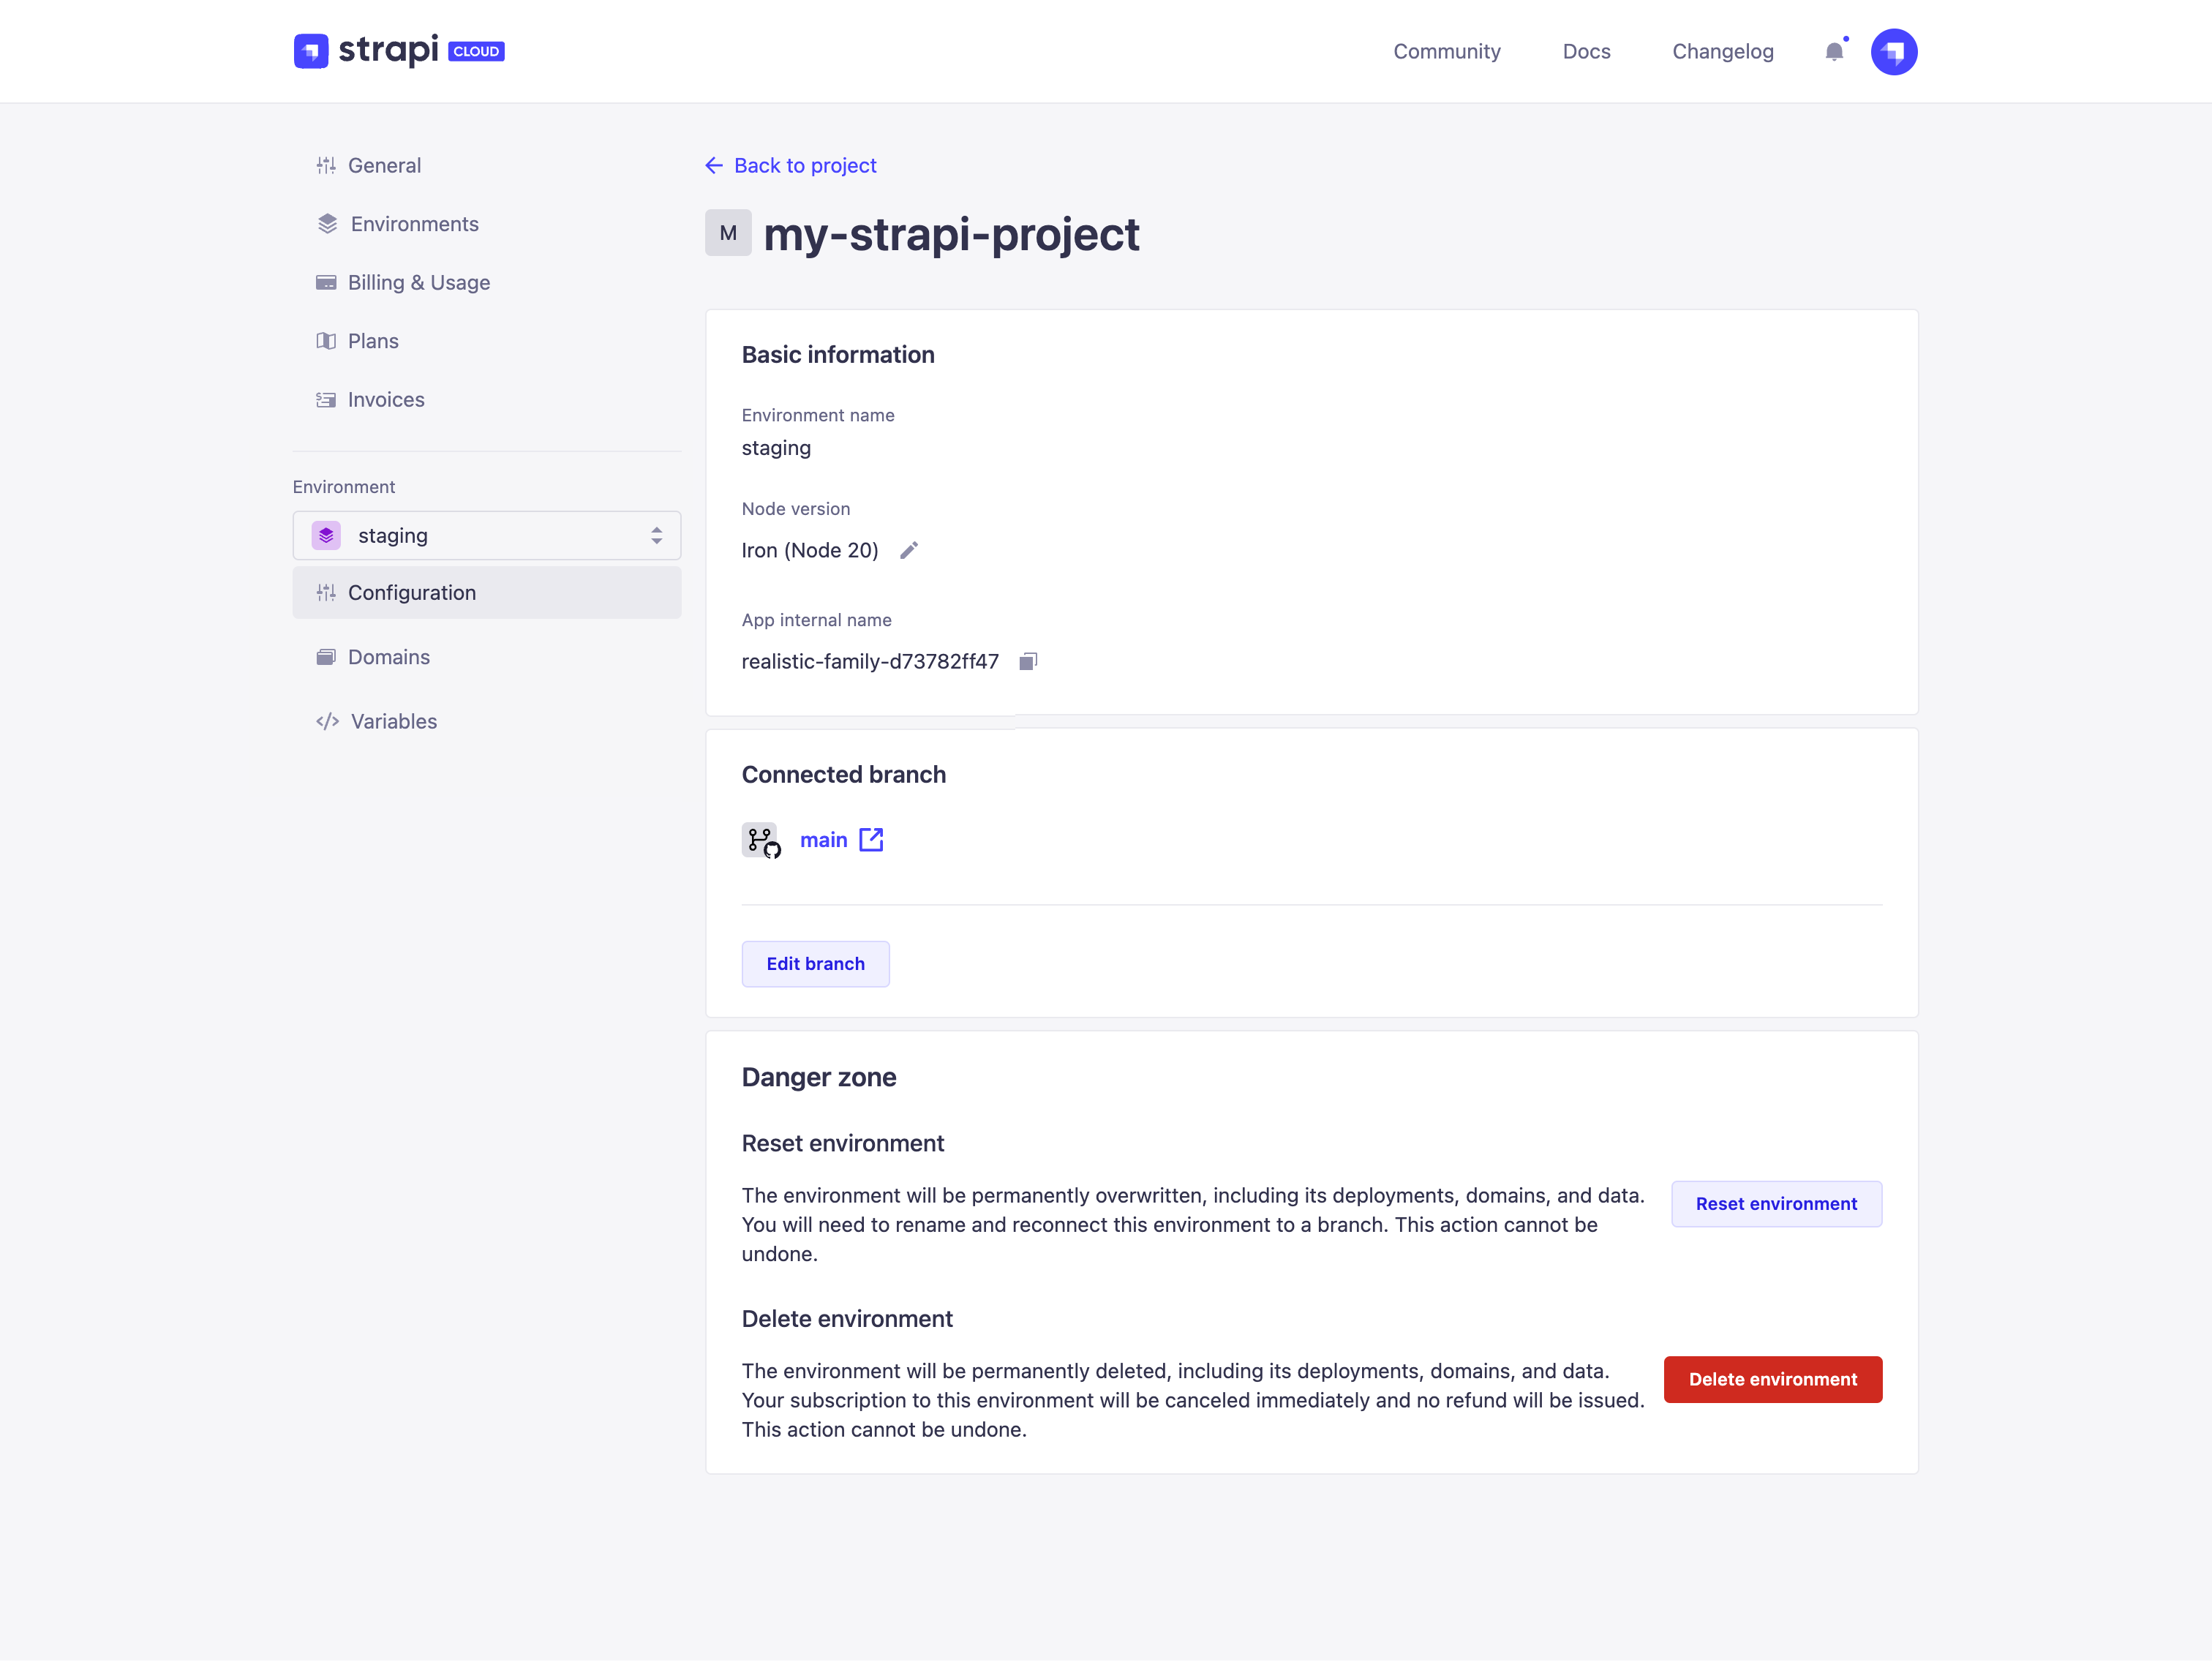
环境级设置的 配置选项卡使你能够检查和更新项目的以下选项:
- 基本信息,请参见:
- 你的 Strapi Cloud 项目的环境名称。环境名称在创建时设置,之后无法修改。
- 环境的 Node 版本:要更改项目的 Node 版本(参见 修改 Node 版本)。
- 应用用于环境的内部名称,这对于调试和支持目的可能非常有用。
- 已连接的分支: 用于更改环境所使用的 GitHub 仓库分支(请参阅 编辑 Git 分支)。还可以启用/禁用“推送时部署”选项。
- 环境数据:从同一项目内的另一个环境传输数据(参见在环境之间传输数据)。
- 危险区域:重置或永久删除你的 Strapi Cloud 项目的环境(参见 重置和删除环境)。

修改 Node 版本
🌐 Modifying Node version
环境的 Node 版本基于创建项目时选择的版本(参见创建项目),通过高级设置。之后可以为任何环境切换��到其他 Node 版本。
🌐 The environment's Node version is based on the one chosen at the creation of the project (see Creating a project), through the advanced settings. It is possible to switch to another Node version afterwards, for any environment.
- 在 配置选项卡的基本信息部分,点击节点版本的编辑 按钮。
- 在对话框中使用 Node 版本 下拉菜单,点击你选择的版本。
- 点击 保存,或者如果你希望更改立即生效,就点击 保存并部署。
在部署之前,确保你在 Strapi 项目中配置的 Node 版本与项目仪表板中显示的 Node 版本匹配。
🌐 Ensure the Node version configured in your Strapi project matches the Node version shown in your project’s dashboard before deploying.
编辑 Git 分支
🌐 Editing Git branch
-
在 编辑分支 对话框中,编辑可用的设置。请注意,可以通过项目设置同时编辑所有环境的分支,详见 常规。
| 设置名称 | 说明 || --------------- | ------------------------------------------------------------------------ || 选择的分支 | (必填)从下拉列表中选择一个分支。 || 基础目录 | 在文本框中填写基础目录的路径。 || 在每次向此分支推送提交时部署项目 | 选中此框可在向所选分支推送新提交时自动触发新部署。取消选中以禁用该选项。 |
-
点击 保存并部署 按钮以使更改生效。
在环境之间传输数据 Beta
🌐 Transferring data between environments Beta
ProThis feature is available with a Strapi Cloud Pro plan. ScaleThis feature is available with a Strapi Cloud Scale plan.数据传输功能允许你将整个 CMS 内容(数据库和资源)从一个环境传输到同一 Strapi Cloud 项目中的另一个环境。这对于在次要环境中使用最新的生产数据测试更改,或在将内容投入生产之前在次要环境中准备和排练内容非常有用。
🌐 The data transfer feature allows you to transfer the entire CMS content (database and assets) from one environment to another within the same Strapi Cloud project. This is useful for testing changes in a secondary environment with up-to-date production data, or for preparing and staging content in a secondary environment before taking it to production.
在环境之间传输数据目前存在以下限制:
🌐 Transferring data between environments currently comes with the following limitations:
- 你只能转移到辅助环境(不能转移到生产环境)。
- 只有项目所有者才能发起和管理正在进行的转移。
- 暂停的项目无法发起转账。
将数据传输到某个环境将永久覆盖目标环境中的所有现有数据和资源。源环境的数据不受影响,并且在传输期间可以访问其 CMS。环境设置(例如变量和域)不会受到传输的影响。
🌐 Transferring data to an environment will permanently overwrite all existing data and assets in the target environment. The source environment's data remains unaffected, and its CMS can be accessed during the transfer. Environment settings (such as variables and domains) are not affected by the transfer.
将数据传输到次要环境:
🌐 To transfer data to a secondary environment:
- 创建并部署源和目标环境。
- 在 配置选项卡的环境数据部分,点击导入数据按钮。
- 在打开的模态窗口中,从下拉列表中选择源环境。只有完全创建并部署的环境可用作源。
- 点击 导入数据 以继续,然后按照步骤确认传输。
- 一旦启动,你将被重定向到环境的仪表板,在那里你可以监控传输的进度。传输完成后,仪表板将刷新,显示正在进行的和历史的部署。
在传输进行时,目标环境的 CMS 将无法访问。你可以取消正在进行的传输,但这将使目标环境为空。如果在传输过程中发生错误,你将有选项重新尝试或取消。
🌐 The CMS of the target environment will be inaccessible whilst the transfer is ongoing. You can cancel an ongoing transfer, but this will leave the target environment empty. If an error occurs during the transfer, you will have the option to retry or cancel.
重置和删除环境
🌐 Resetting & Deleting environment
你可以重置或删除 Strapi Cloud 项目的任何附加环境,但这是永久且不可逆的。然而,默认的生产环境既不能重置也不能删除。
🌐 You can reset or delete any additional environment of your Strapi Cloud project, but it will be permanent and irreversible. The default, production environment, can however neither be reset nor deleted.
重置环境
🌐 Resetting an environment
重置环境会删除所有环境数据,并将变量重置为默认值。操作步骤如下:
🌐 Resetting an environment deletes all environments data and resets the variables to their default. To do so:
-
在 配置选项卡的危险区域部分,点击重置环境按钮。
-
在打开的对话框中,点击 继续 按钮以确认环境重置。
-
填写可用字段以重置环境:
| 设置名称 | 说明 || --------------- | ------------------------------------------------------------------------ || 环境名称 | (必填)为项目的新环境写一个名称。 || Git 分支 | (必填)从下拉列表中选择一个分支。 || 基目录 | 在文本框中写入基目录的路径。 || 导入变量 | 勾选此框以从现有环境导入变量名。值不会被导入,所有变量将保持为空。 || 自动部署 | 在每次提交到该分支时部署项目。勾选此框以在新提交推送到所选分支时自动触发新的部署。取消勾选以禁用此选项。 |
-
点击 重置 按钮。
删除环境
🌐 Deleting an environment
- 在 配置选项卡的危险区域部分,点击删除环境按钮。
- 在文本框中输入你的环境名称。
- 点击 删除环境 按钮以确认删除。
备份
🌐 Backups
ProThis feature is available with a Strapi Cloud Pro plan. ScaleThis feature is available with a Strapi Cloud Scale plan.“ 备份”标签会通知你 Strapi Cloud 项目的最新备份状态和日期。所有现有 Strapi Cloud 项目关联的数据库确实会自动备份(专业版计划为每周一次,Scale 计划为每日一次)。备份会保留 28 天。此外,你还可以创建单次手动备份。
- 备份功能在免费或基础计划的 Strapi Cloud 项目中不可用。你需要升级到专业版或扩展版计划,以启用自动备份并访问手动备份选项。
- 备份仅包括你默认生产环境的数据库。上传到你的项目的资源和任何辅助环境的数据库不包括在内。
- 项目首次成功部署后不久,手动备份选项就会可用。
对于在2023年10月备份功能发布之前创建的项目,首次备份将在下次项目部署时自动触发。
🌐 For projects created before the release of the Backup feature in October 2023, the first backup will automatically be triggered with the next deployment of the project.
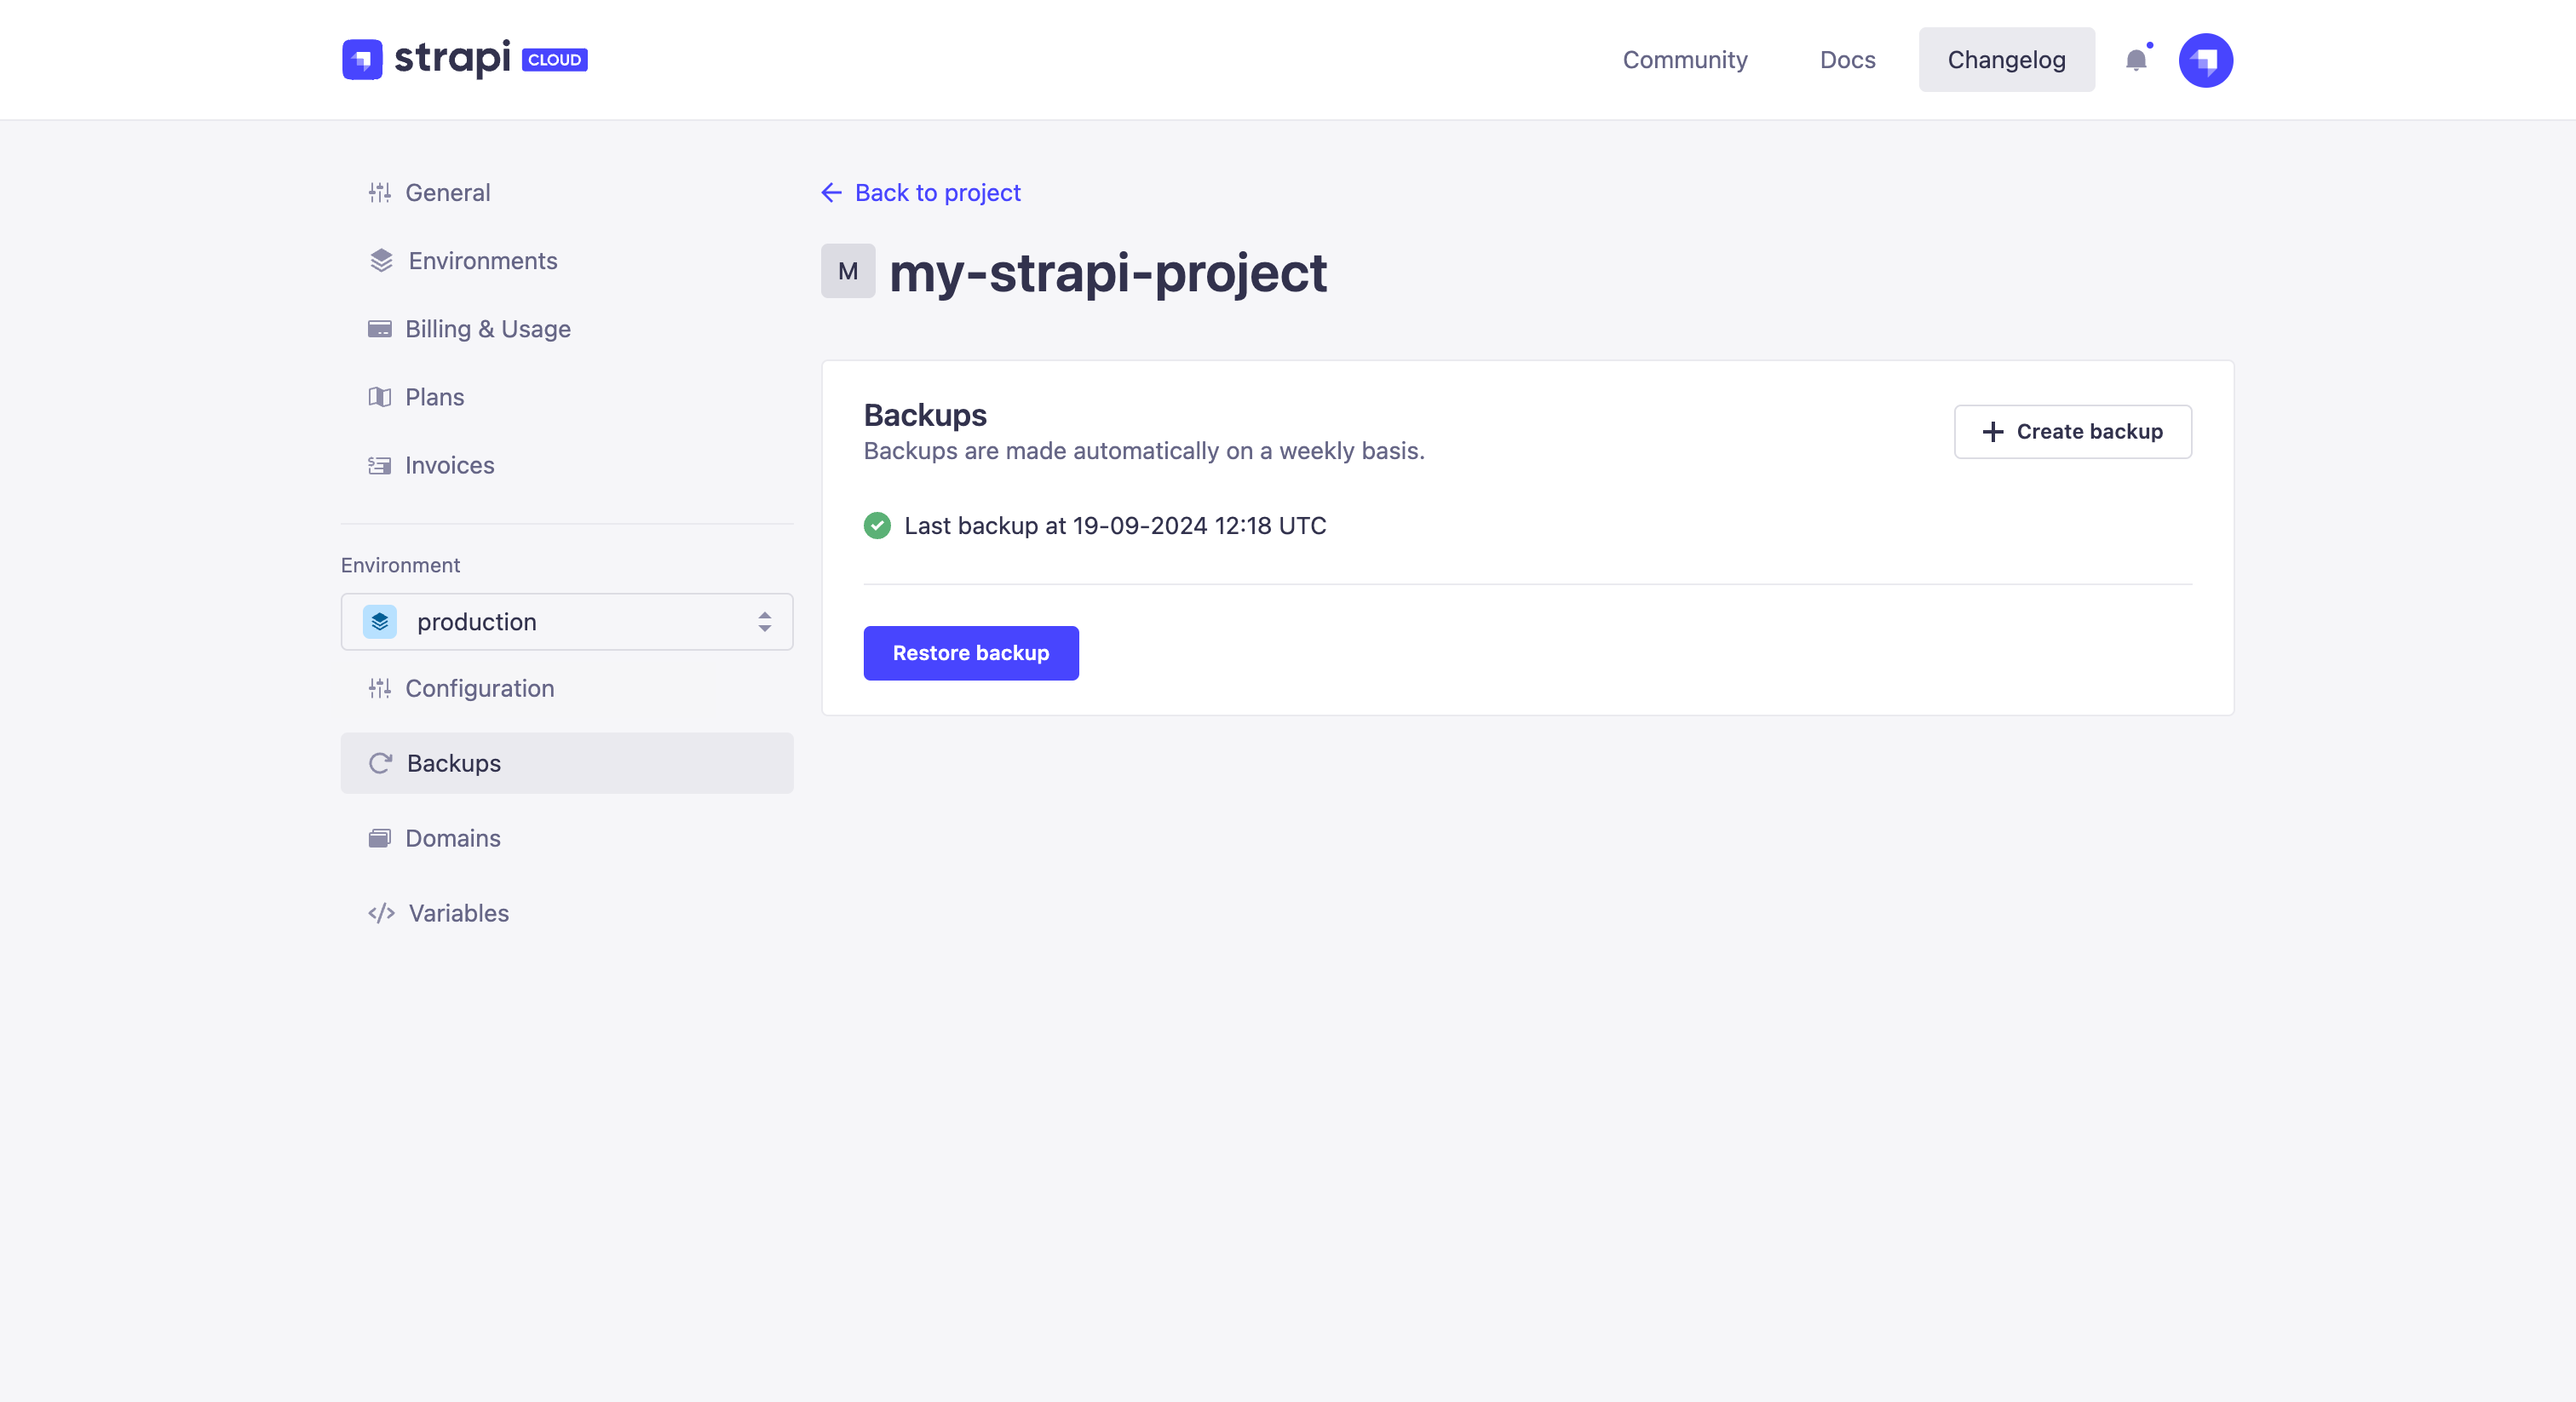
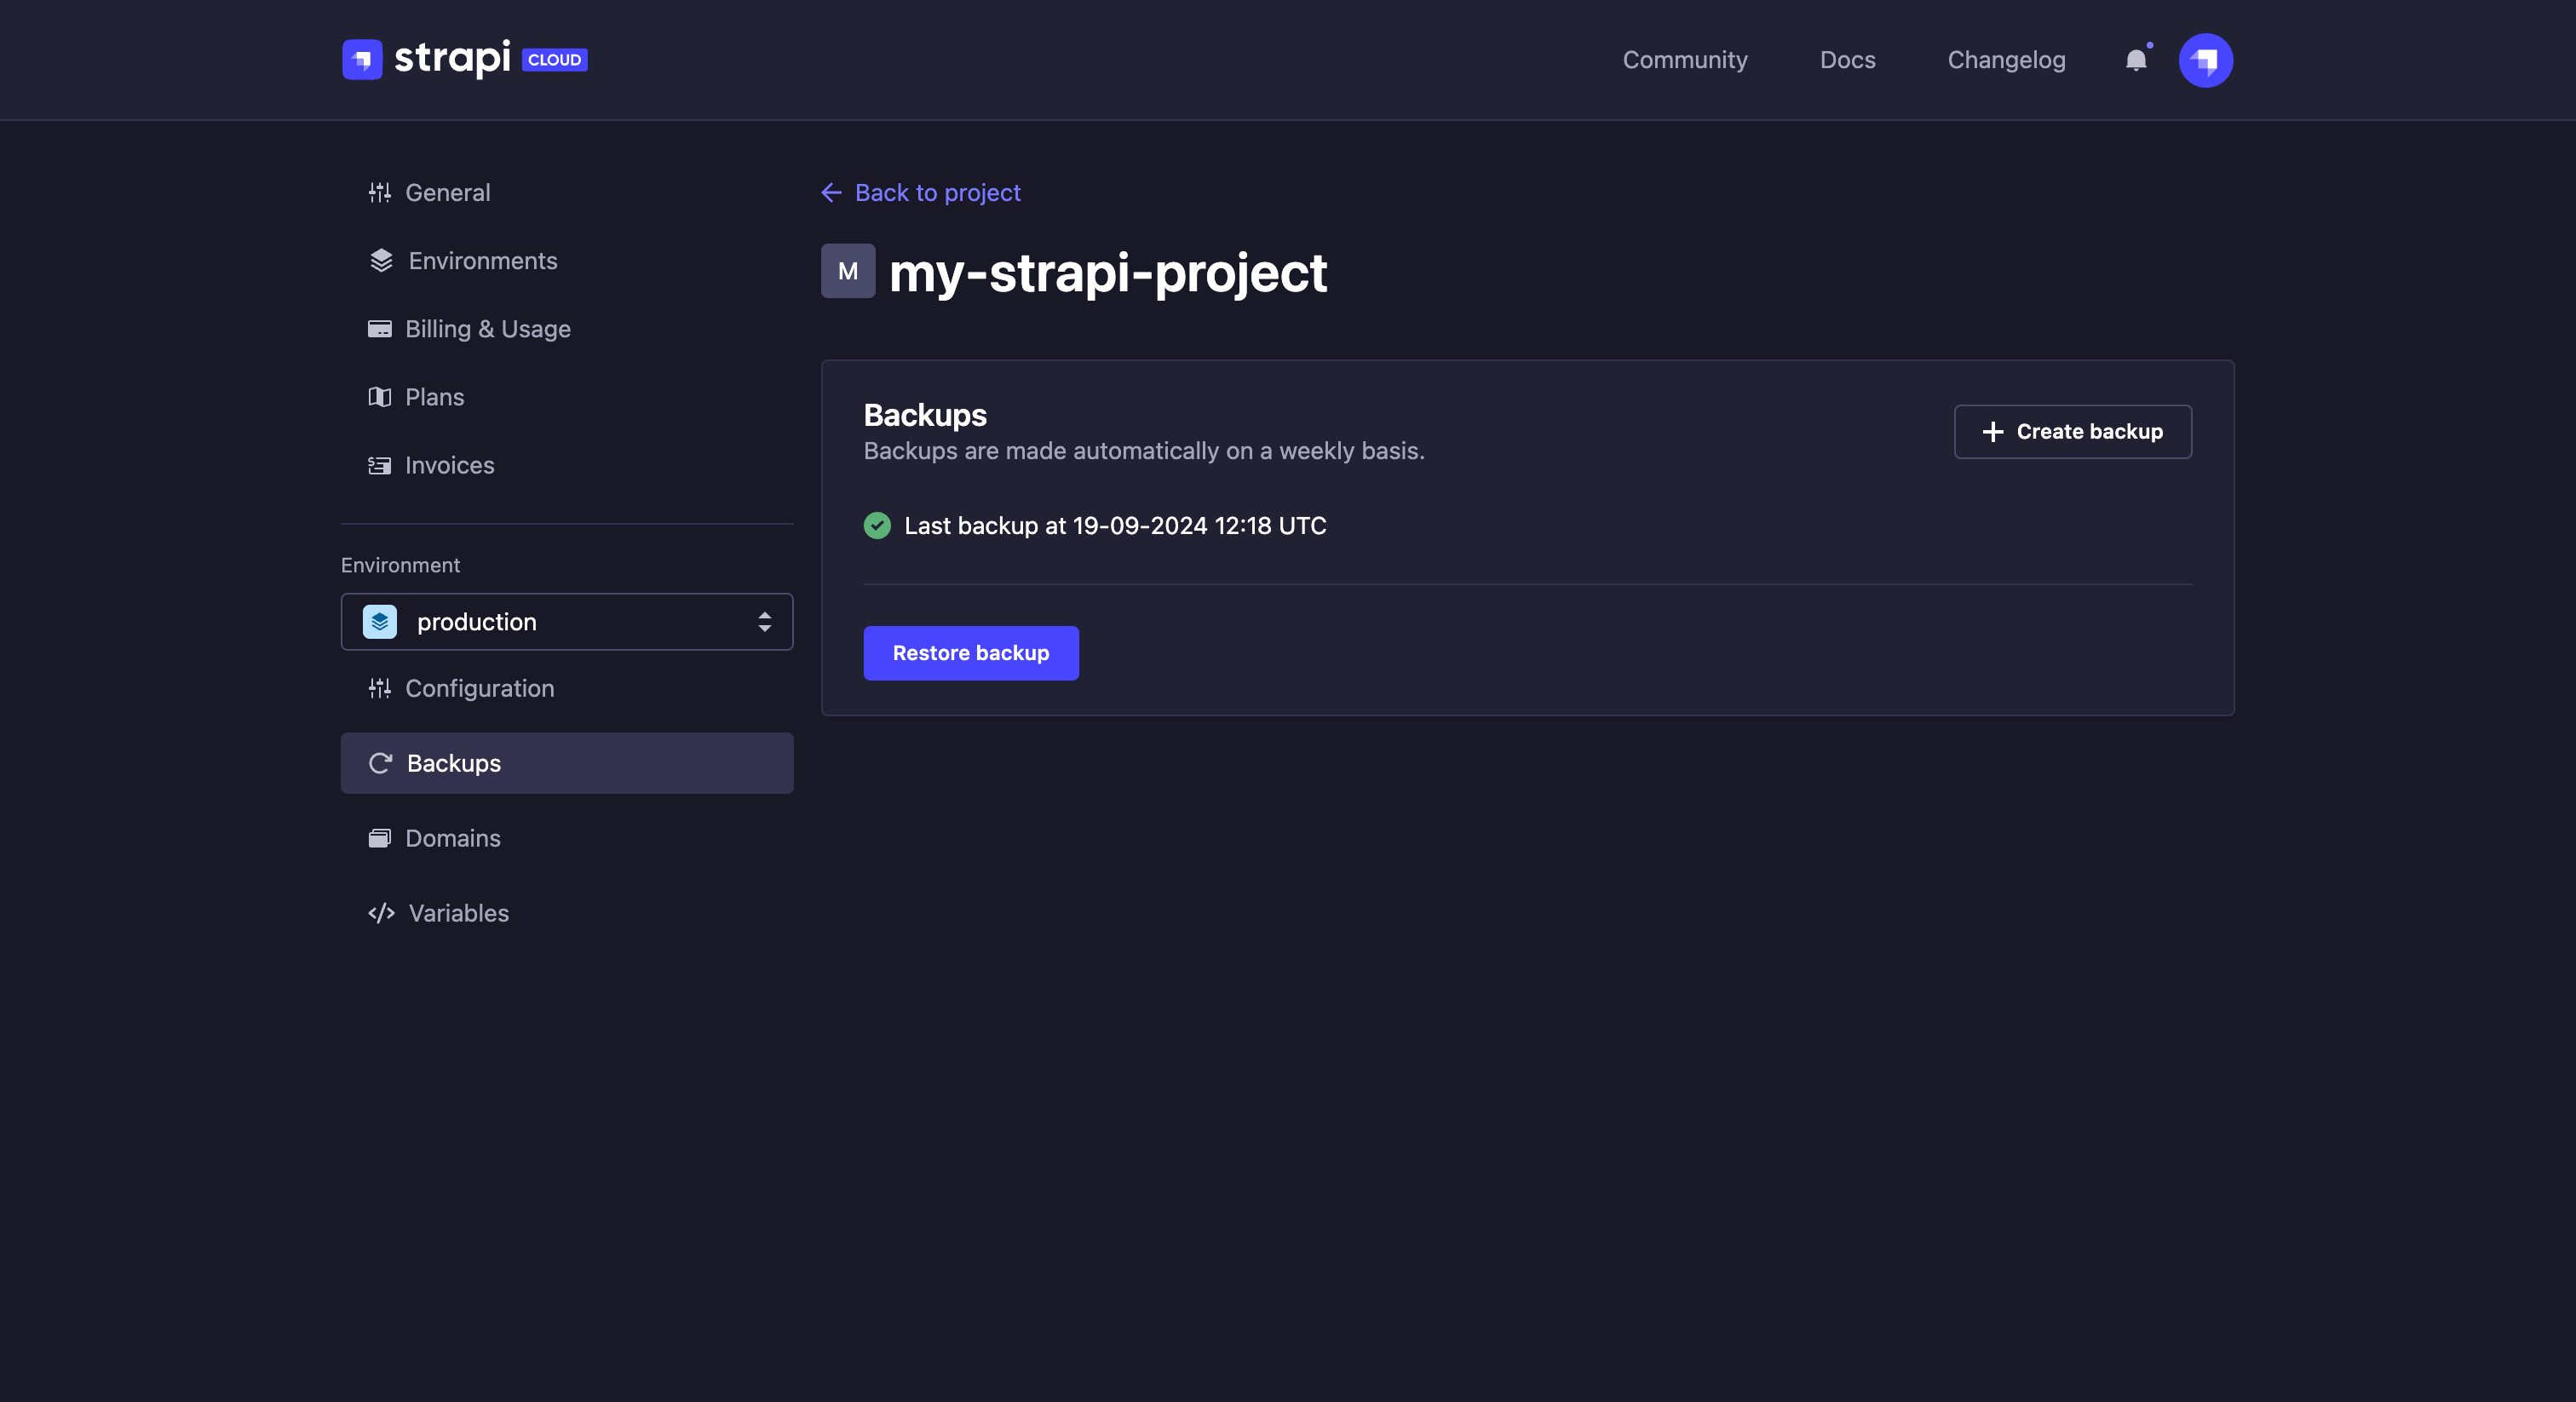
创建手动备份
🌐 Creating a manual backup
要创建手动备份,在 备份部分,点击创建备份按钮。
手动备份应立即开始,在备份完成之前,恢复或创建其他备份将被禁用。
🌐 The manual backup should start immediately, and restoration or creation of other backups will be disabled until the backup is complete.
在创建新的手动备份时,任何现有的手动备份都将被删除。你一次只能拥有一个手动备份。
🌐 When creating a new manual backup, any existing manual backup will be deleted. You can only have one manual backup at a time.
恢复备份
🌐 Restoring a backup
如果你需要恢复项目的备份:
🌐 If you need to restore a backup of your project:
- 在 备份部分,点击恢复备份按钮。
- 在对话框中,从选择备份下拉菜单中选择你项目的可用备份(自动备份或手动备份)之一。
- 点击对话框中的 恢复 按钮。恢复完成后��,你的项目将回到所选备份时的状态。你将能够在 备份 标签中看到恢复的时间戳和所恢复的备份。
- 将显示上次完成恢复的时间戳,以帮助你追踪项目上次恢复的时间。
正在下载备份
🌐 Downloading a backup
如果你需要下载项目的备份:
🌐 If you need to download a backup of your project:
- 在 备份部分,点击下载备份按钮。
- 在对话框中,从选择备份下拉菜单中选择你项目的可用备份(自动备份或手动备份)之一。
- 点击对话框中的 下载 按钮,以
.sql格式下载所选备份的归档文件。
备份文件将仅包含你默认生产环境的数据库。它不会包含资源或任何其他环境的数据库。
🌐 The backup file will include only the database of your default Production environment. It will not include assets or any other environment databases.
域名
🌐 Domains
“Domains”选项卡使你能够管理域并连接新的域名。
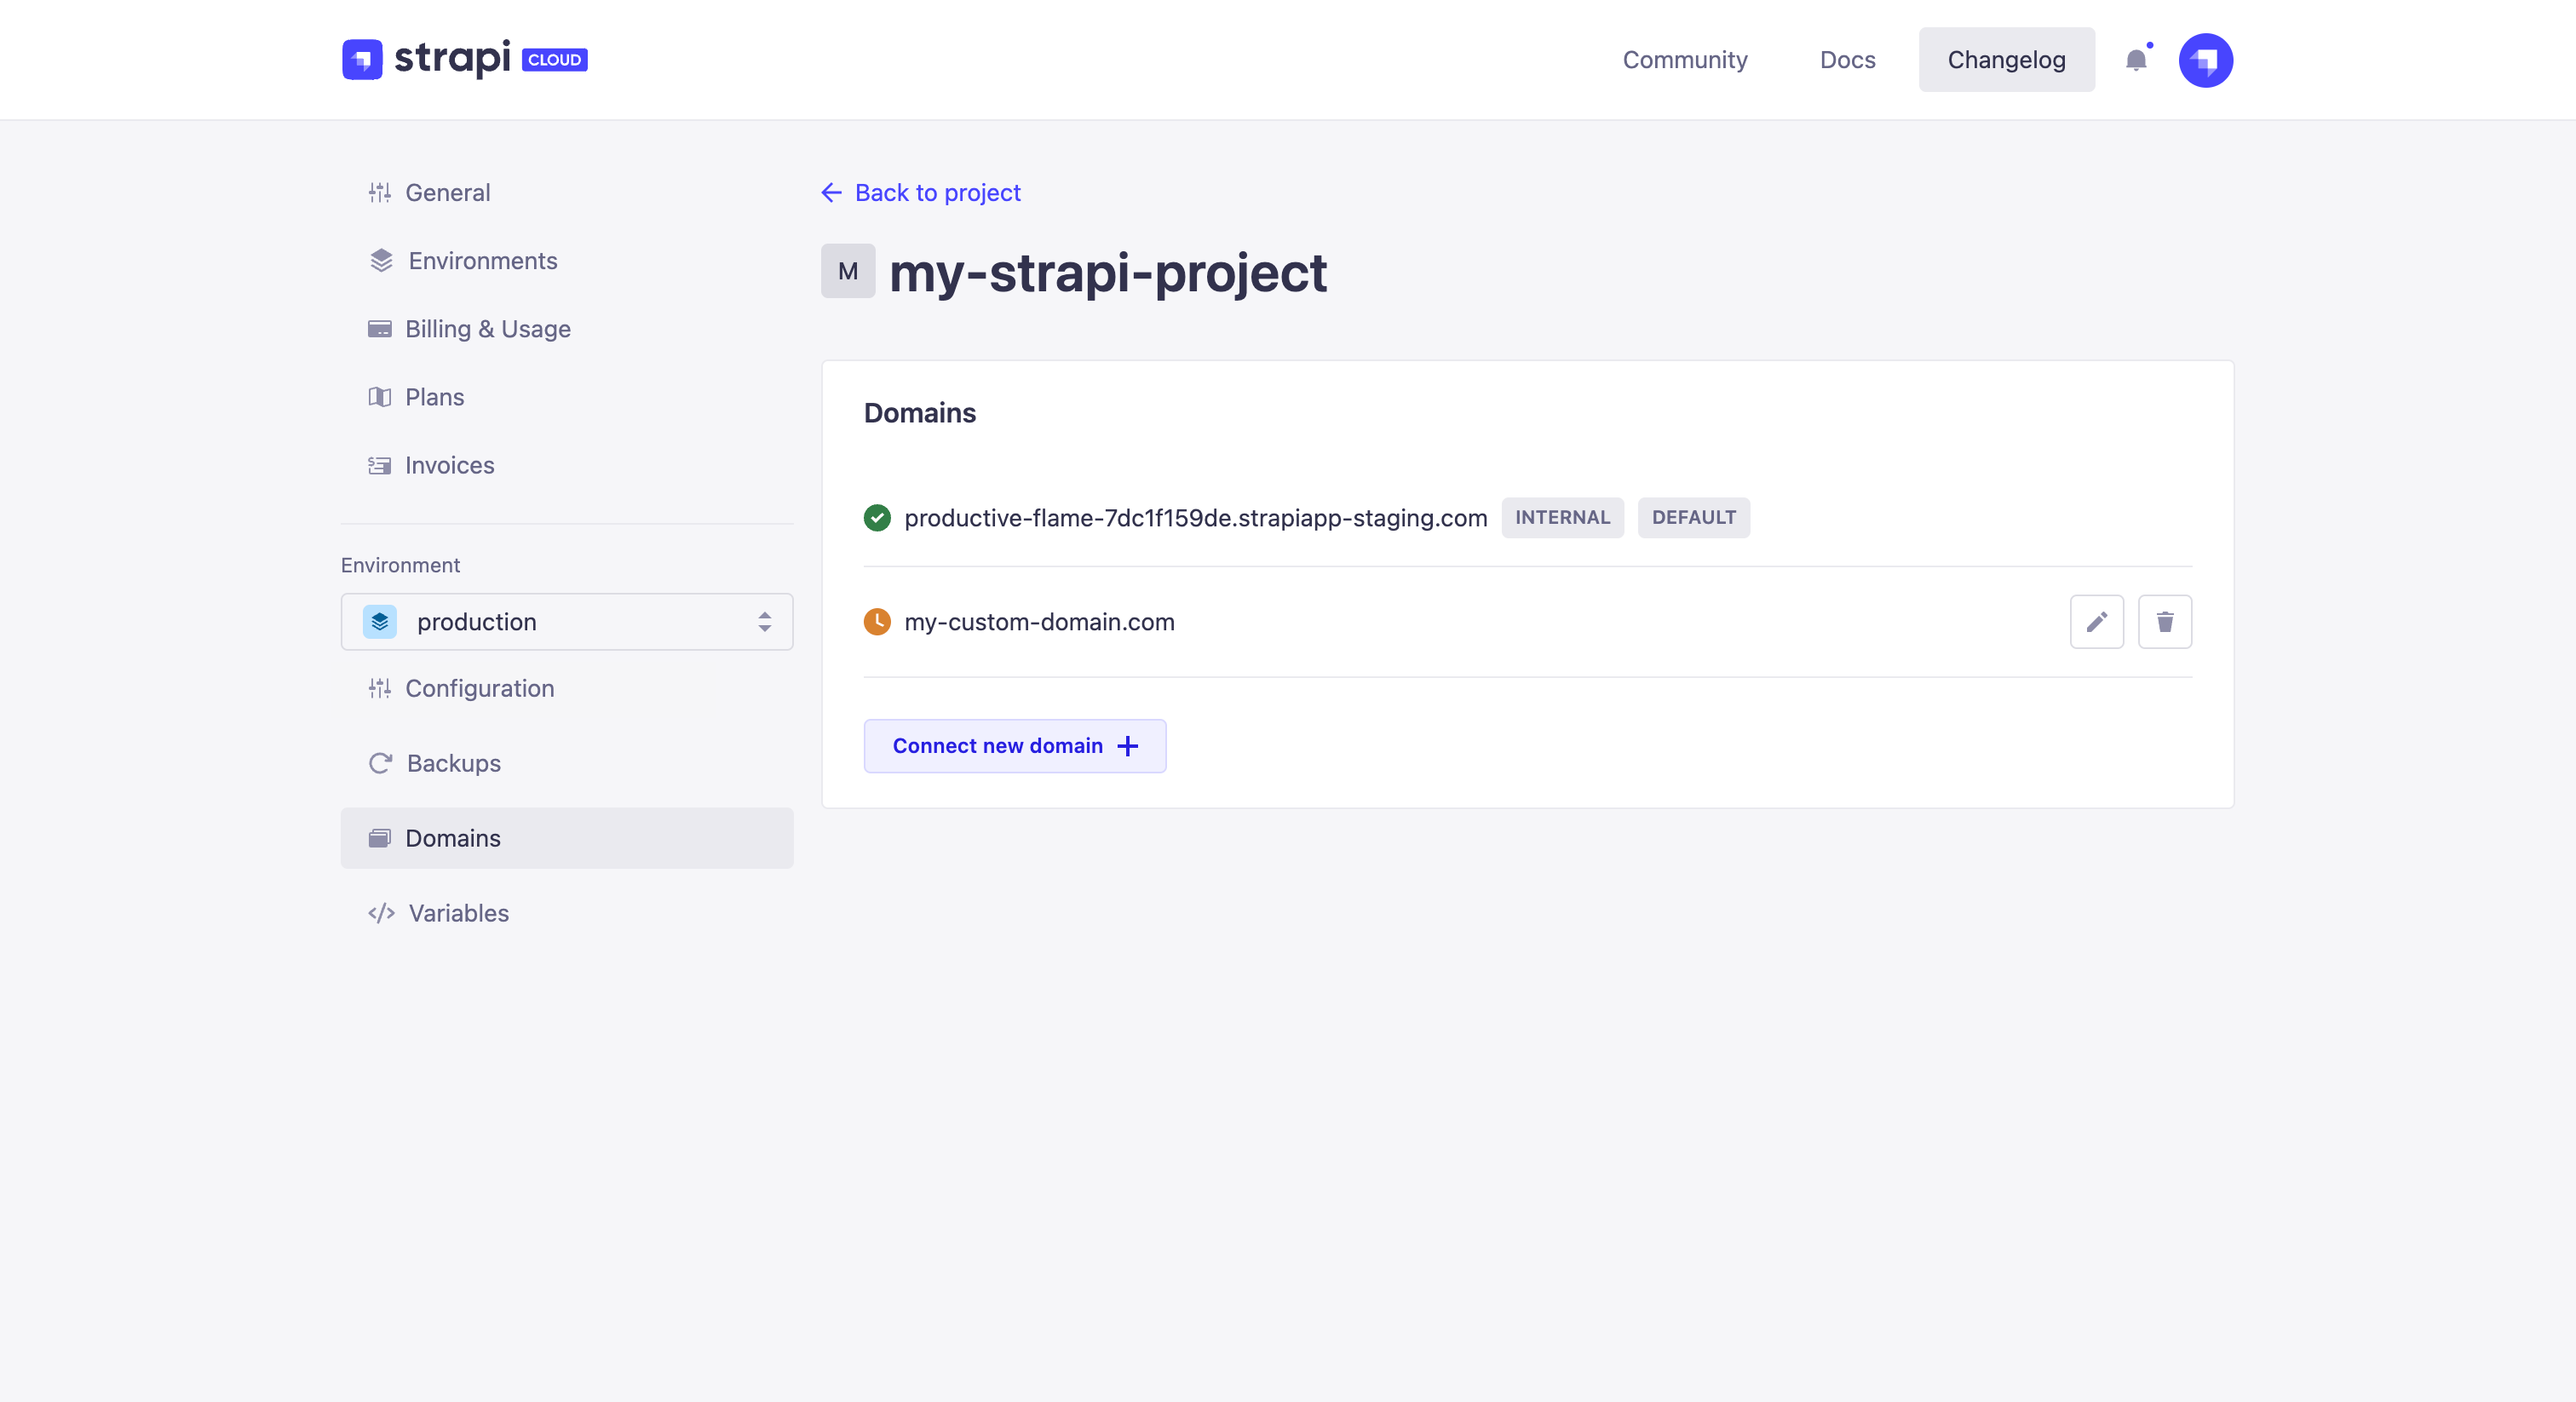
你 Strapi Cloud 项目的所有现有域都列在 域标签中。对于每个域,你可以:
- 查看其当前状态:
- 活跃:该域名当前已确认并处于活跃状态
- 待处理:域名转移正在进行中,正在等待 DNS 变更生效
- 失败:由于发生错误,域更改请求未完成
- 点击 编辑按钮以访问域名设置
- 点击 删除按钮以删除域
连接自定义域名
🌐 Connecting a custom domain
默认域名由两个随机生成的单词加上一个哈希组成。它们可以被你选择的任何自定义域名替换。
🌐 Default domain names are made of 2 randomly generated words followed by a hash. They can be replaced by any custom domain of your choice.
自定义域名在免费计划中不可用。降级到免费计划将导致应用域名恢复为默认域名。
🌐 Custom domains are not available on the Free plan. Downgrading to the Free plan will result in the application domain's being restored to the default one.
-
点击 连接新域名 按钮。
-
在打开的窗口中,填写以下字段: | 设置名称 | 说明 || --- | --- || 域名 | 输入新的域名(例如 custom-domain-name.com) || 主机名 | 输入主机名(即终端用户在浏览器中输入的地址,或通过 API 调用的地址)。 || 目标 | 输入目标(即用户输入主机名时重定向到的实际地址)。 || 设置为默认域名 | 勾选此框以将新域名设置为默认域名。 |
-
点击 保存并部署 以使更改生效。
要完成自定义域名的设置,请在你的域名注册商或托管平台的设置中,将目标值(例如 proud-unicorn-123456af.strapiapp.com)作为 CNAME 别名添加到你域名的 DNS 记录中。
🌐 To finish setting up your custom domain, in the settings of your domain registrar or hosting platform, please add the Target value (e.g., proud-unicorn-123456af.strapiapp.com) as a CNAME alias to the DNS records of your domain.
使用自定义域名时,这些域名不适用于已上传资源的 URL。已上传的资源保持 Strapi Cloud 基于项目的 URL。
🌐 When using custom domains, these domains do not apply to the URLs of uploaded assets. Uploaded assets keep the Strapi Cloud project-based URL.
这意味着,如果你的自定义域托管在 https://my-custom-domain.com,并且你的 Strapi Cloud 项目��名称是 my-strapi-cloud-instance,API 调用仍将返回类似 https://my-strapi-cloud-instance.media.strapiapp.com/example.png 的 URL。
🌐 This means that, if your custom domain is hosted at https://my-custom-domain.com and your Strapi Cloud project name is my-strapi-cloud-instance, API calls will still return URLs such as https://my-strapi-cloud-instance.media.strapiapp.com/example.png.
通过 REST 或 GraphQL 进行的媒体库查询总是返回 Strapi Cloud 上的项目媒体域。如果你从自托管项目迁移,媒体 URL 将不再与你自己的域或 CDN 匹配。请计划使用 API 返回的绝对 URL,或调整前端以允许 Strapi Cloud 媒体域(更多详情请参见 Cloud Fundamentals)。
🌐 Media library queries over REST or GraphQL always return the project media domain on Strapi Cloud. If you move from a self-hosted project, media URLs will no longer match your own domain or CDN. Plan to use the absolute URLs returned by the API, or adjust your frontend to allow the Strapi Cloud media domain (see Cloud Fundamentals for more details).
变量
🌐 Variables
环境变量(更多信息请参见 CMS 文档)用于配置你的 Strapi 应用的环境,例如数据库连接。
🌐 Environment variables (more information in the CMS Documentation) are used to configure the environment of your Strapi application, such as the database connection.
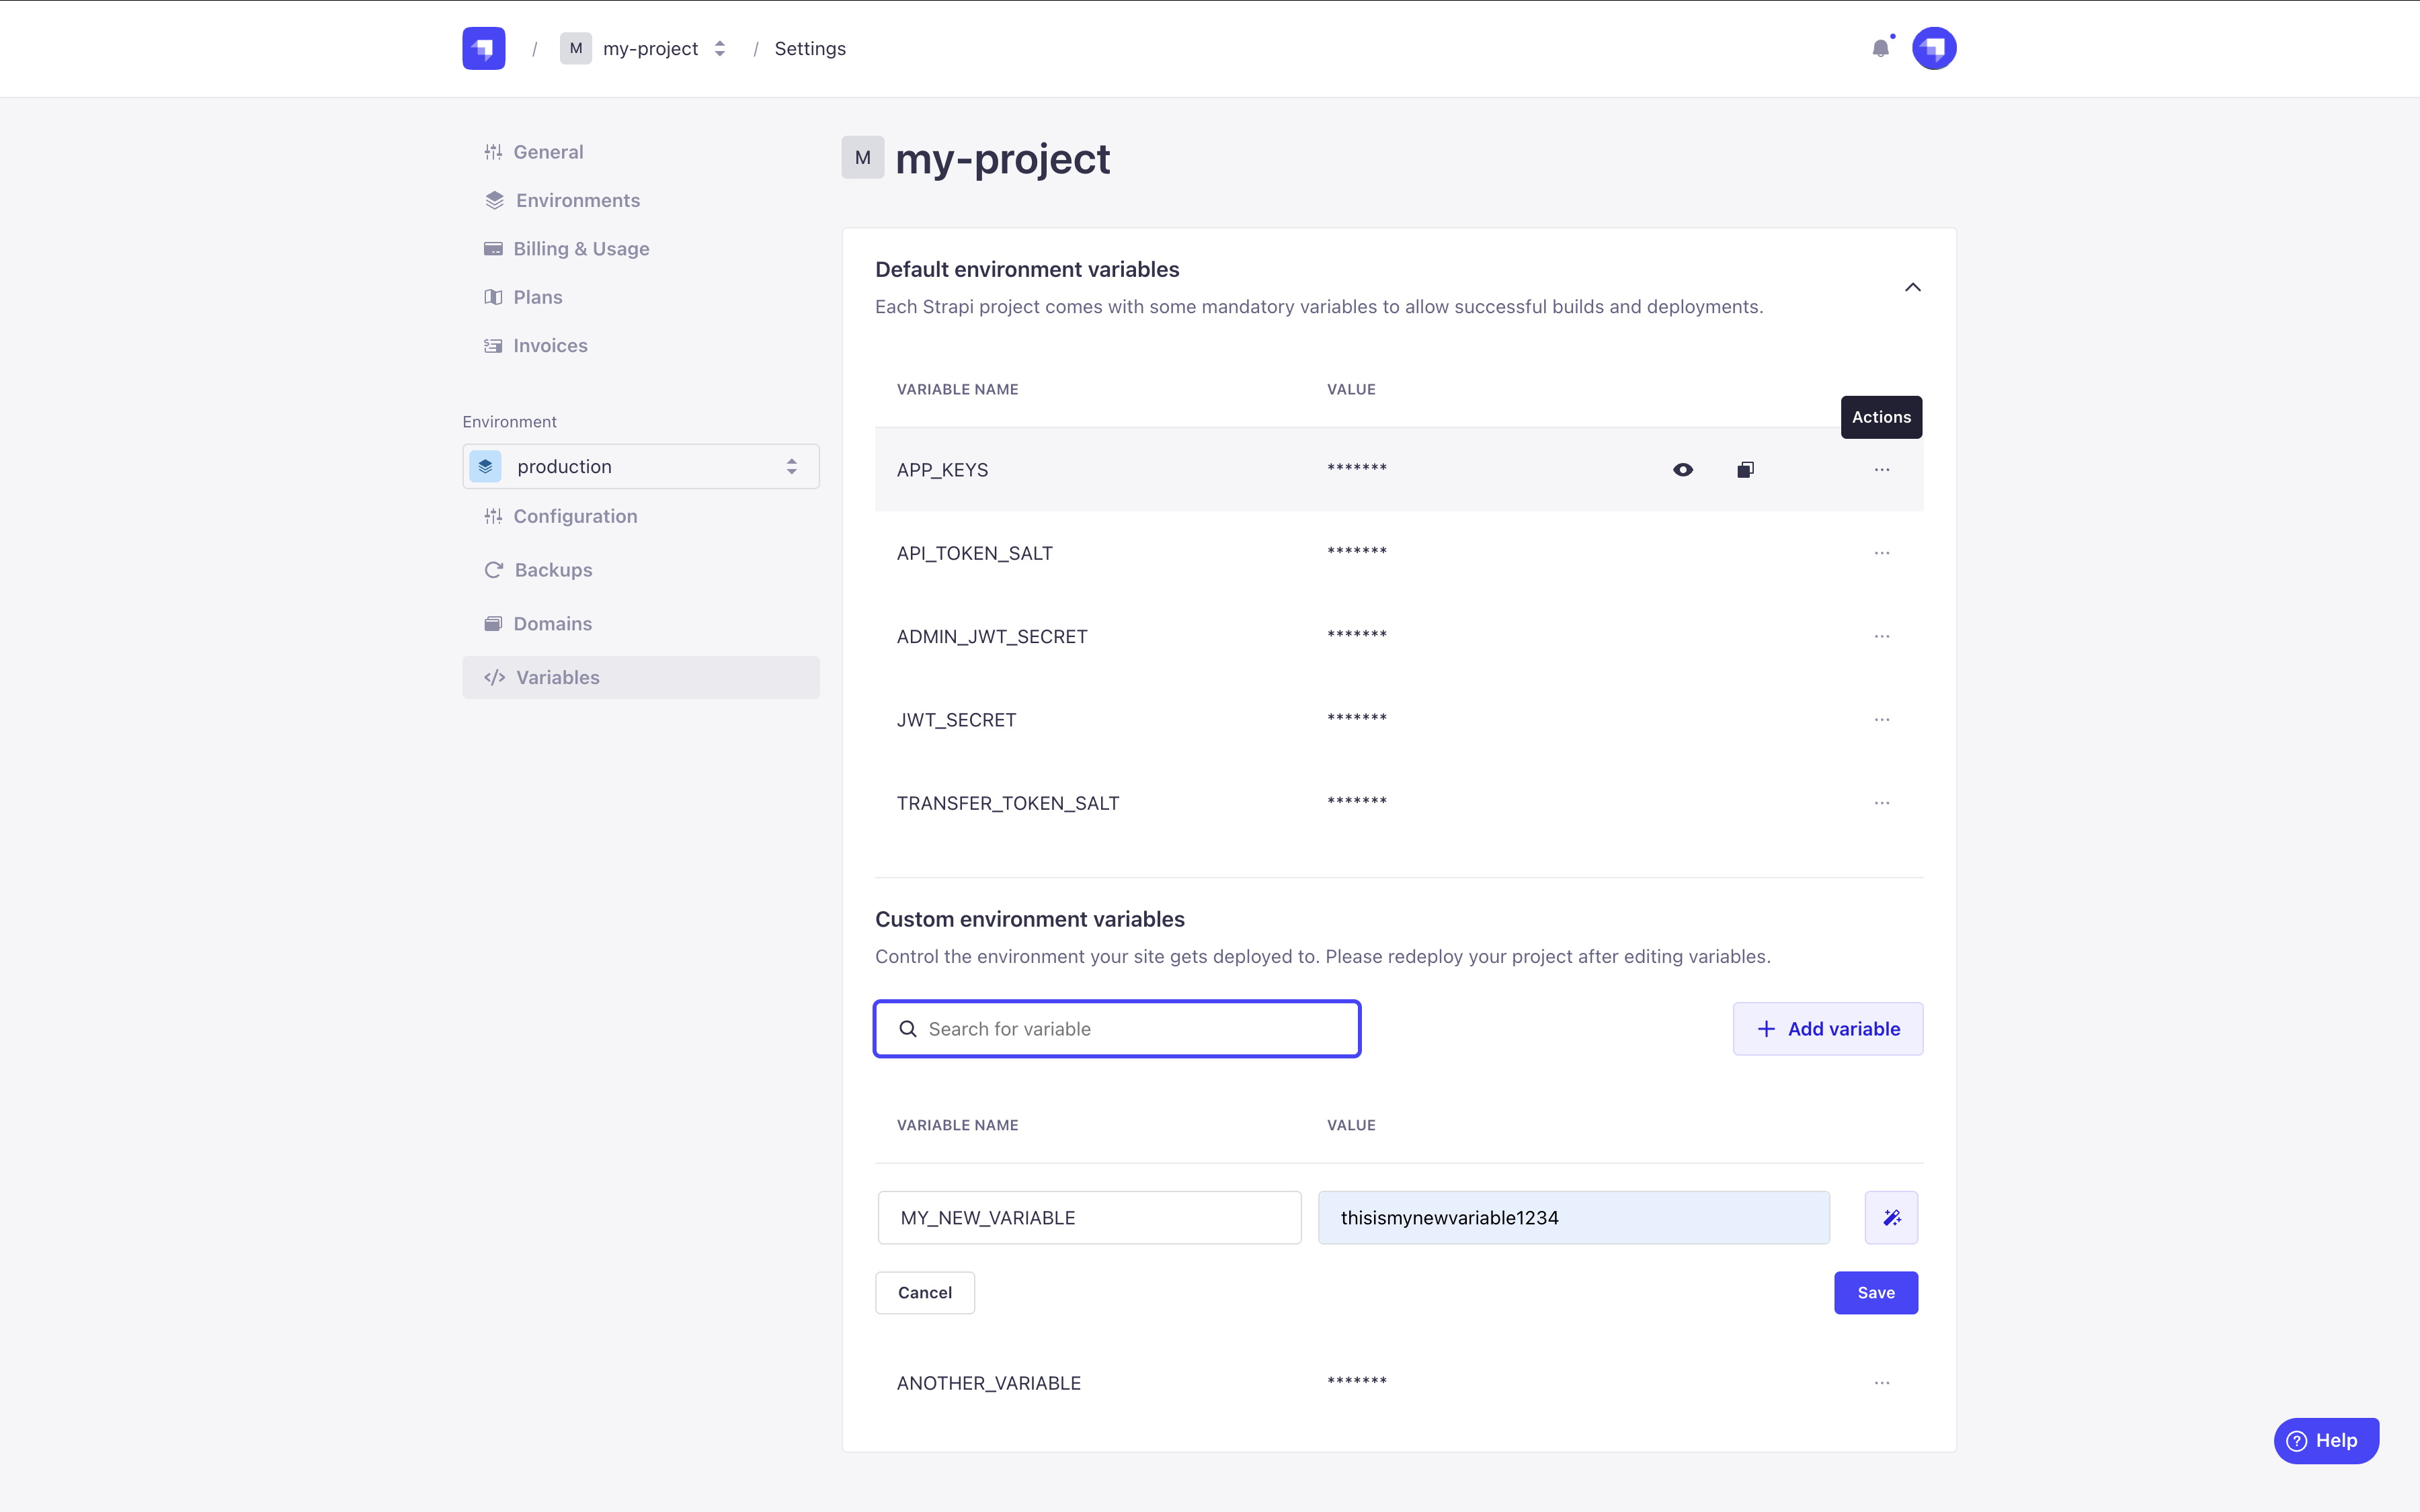
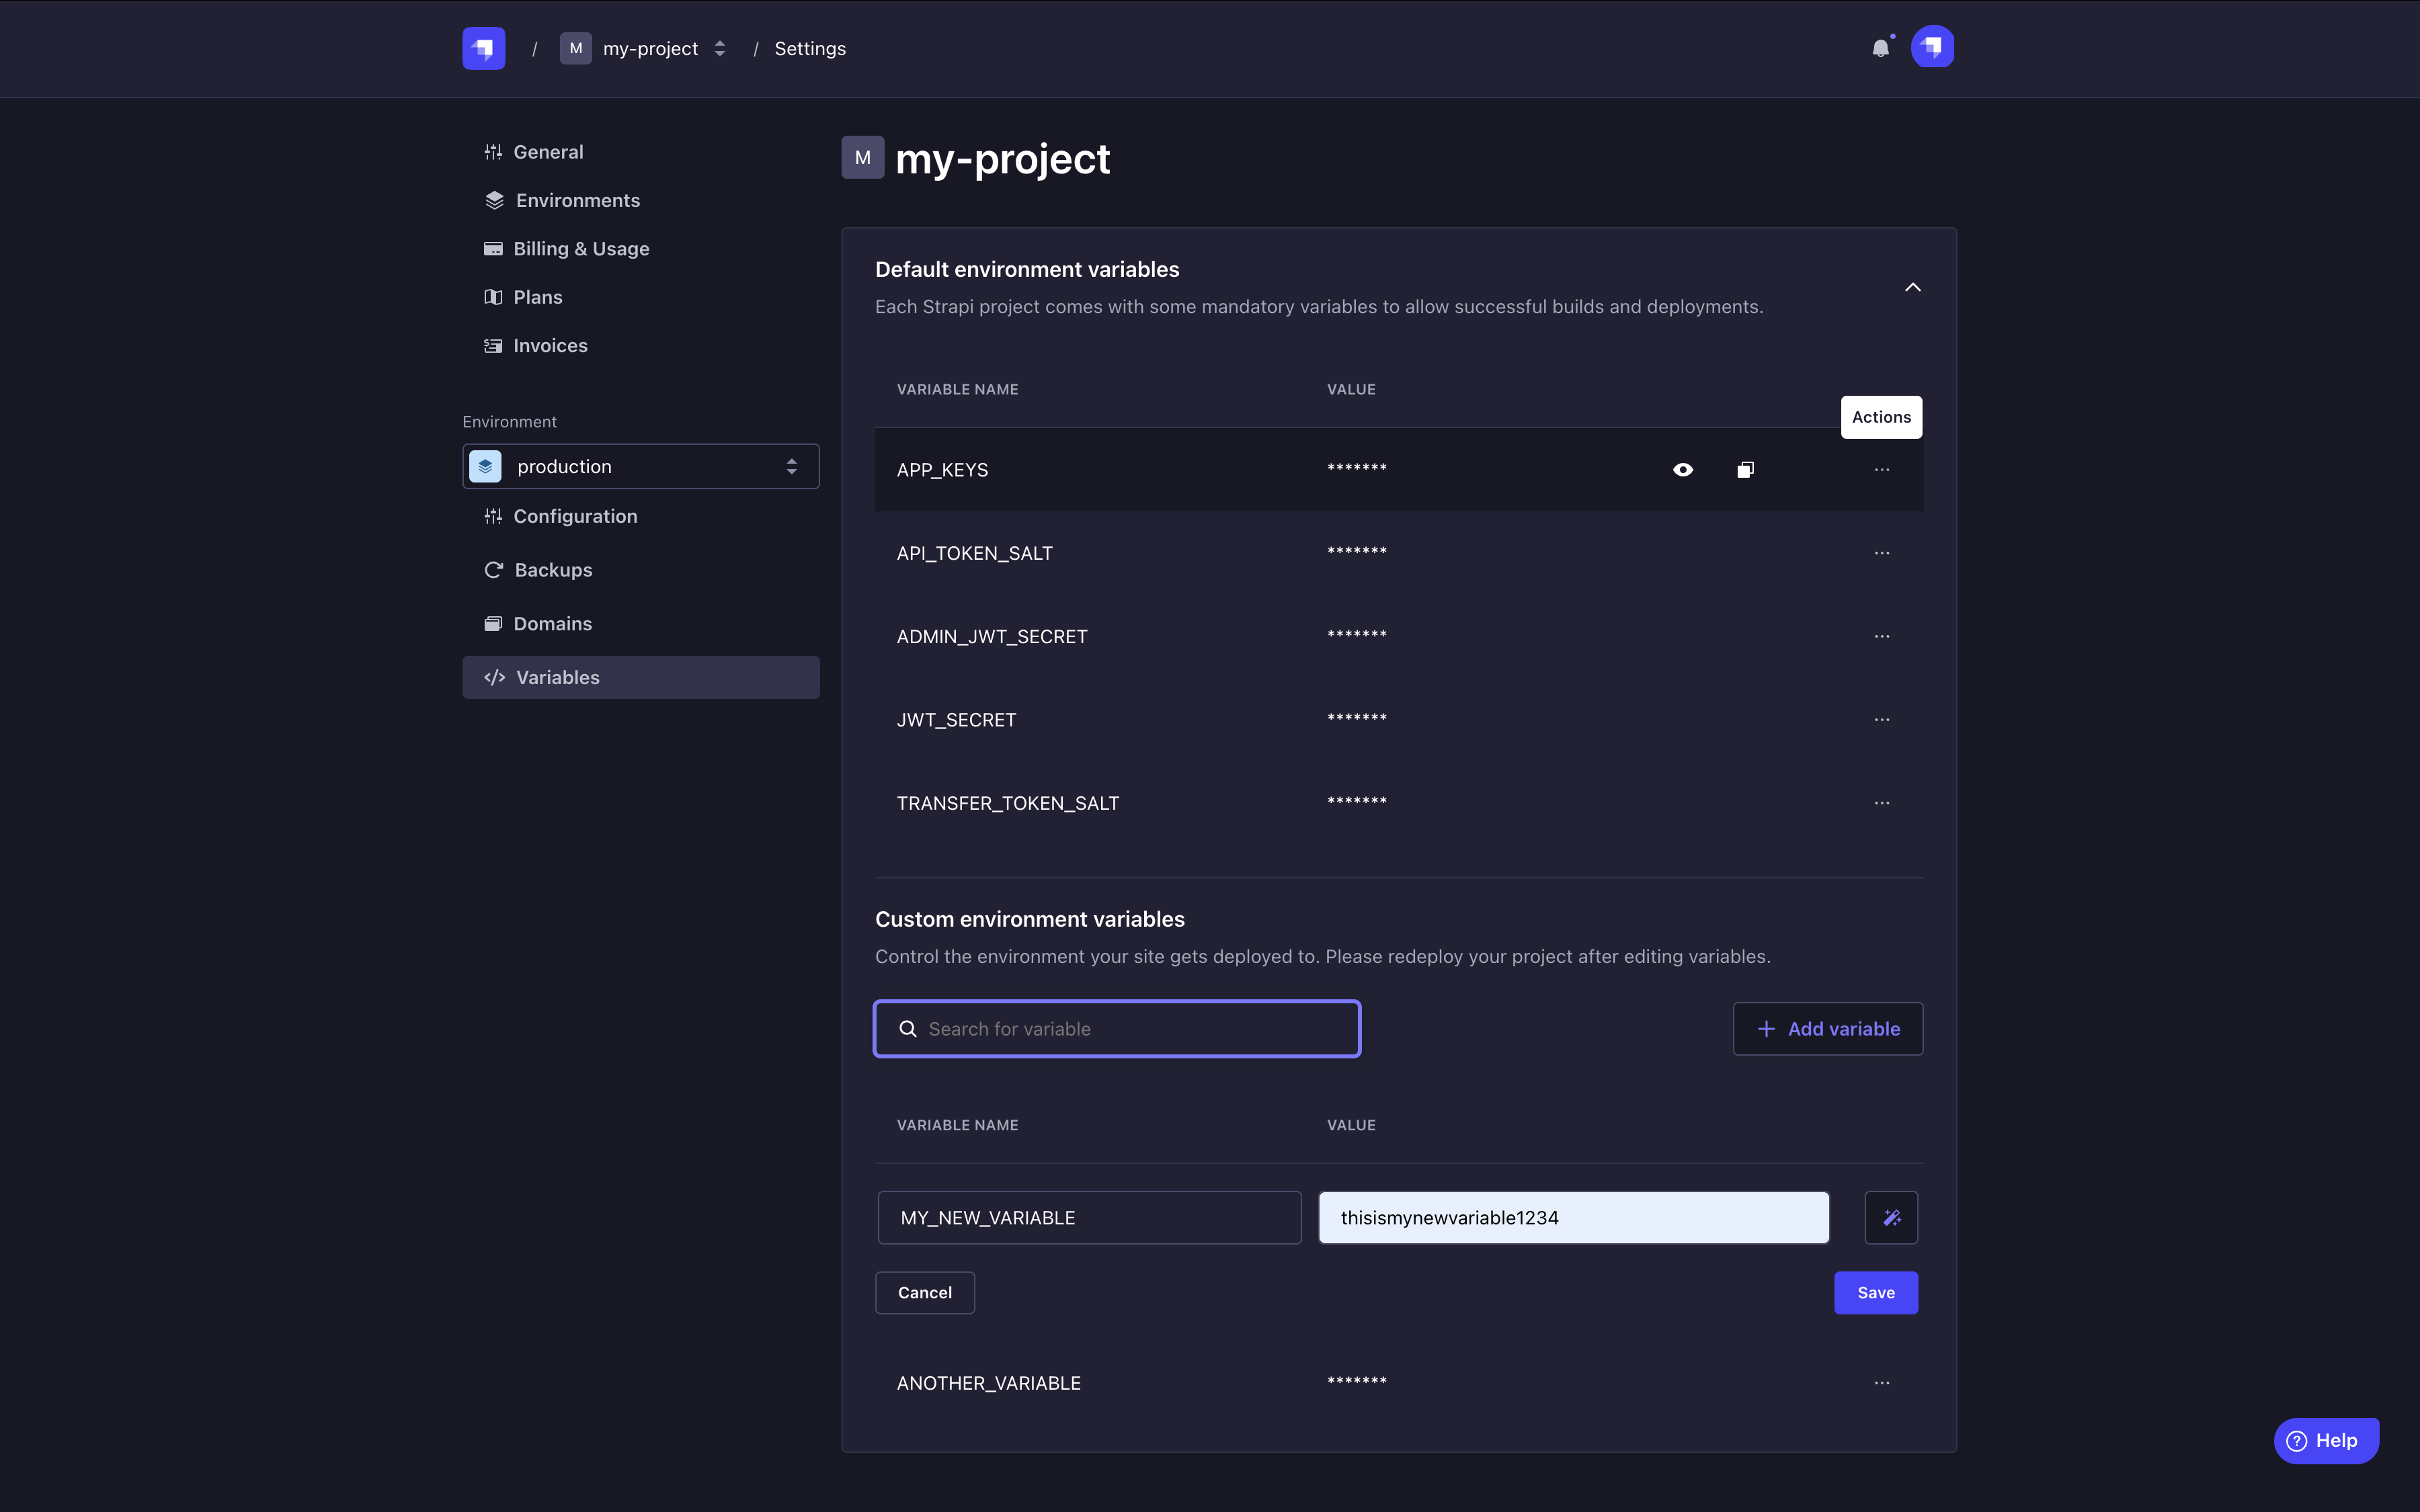
在 变量标签中列出了你 Strapi Cloud 项目的默认和自定义环境变量。每个变量由一个名称和一个值组成。
管理环境变量
🌐 Managing environment variables
将鼠标悬停在环境变量上,无论是默认的还是自定义的,都会显示以下可用选项:
🌐 Hovering on an environment variable, either default or custom, displays the following available options:
- 显示值以使用变量的实际值替换
*字符。 - 复制到剪贴板以复制变量的值。
- 操作以访问 编辑和 删除按钮。
- 编辑默认变量时,名称无法修改,值只能通过 生成值按钮自动生成。别忘了 保存,如果你希望更改立即生效,则选择 保存并部署。
- 在编辑自定义变量时,名称和值都可以通过输入新内容或使用 生成值按钮来修改。别忘了保存,如果希望更改立即生效,请选择保存并部署。
- 删除变量时,系统会要求你通过选择 保存 或 保存并部署 来确认,如果你希望更改立即生效请选择 保存并部署。
使用搜索栏可以更快地在列表中找到环境变量!
🌐 Use the search bar to find more quickly an environment variable in the list!
创建自定义环境变量
🌐 Creating custom environment variables
可以为 Strapi Cloud 项目创建自定义环境变量。创建或编辑环境变量后,请确保重新部署你的项目。
🌐 Custom environment variables can be created for the Strapi Cloud project. Make sure to redeploy your project after creating or editing an environment variable.
- 在自定义环境变量部分,点击添加变量按钮。
- 在同名字段中填写新环境变量的名称和值。或者,你可以点击 图标自动生成名称和值。
- (可选)点击 添加另一个 来直接创建一个或多个其他自定义环境变量。
- 点击 保存 按钮以确认创建自定义环境变量。要立即应用更改,请点击 保存并部署。